
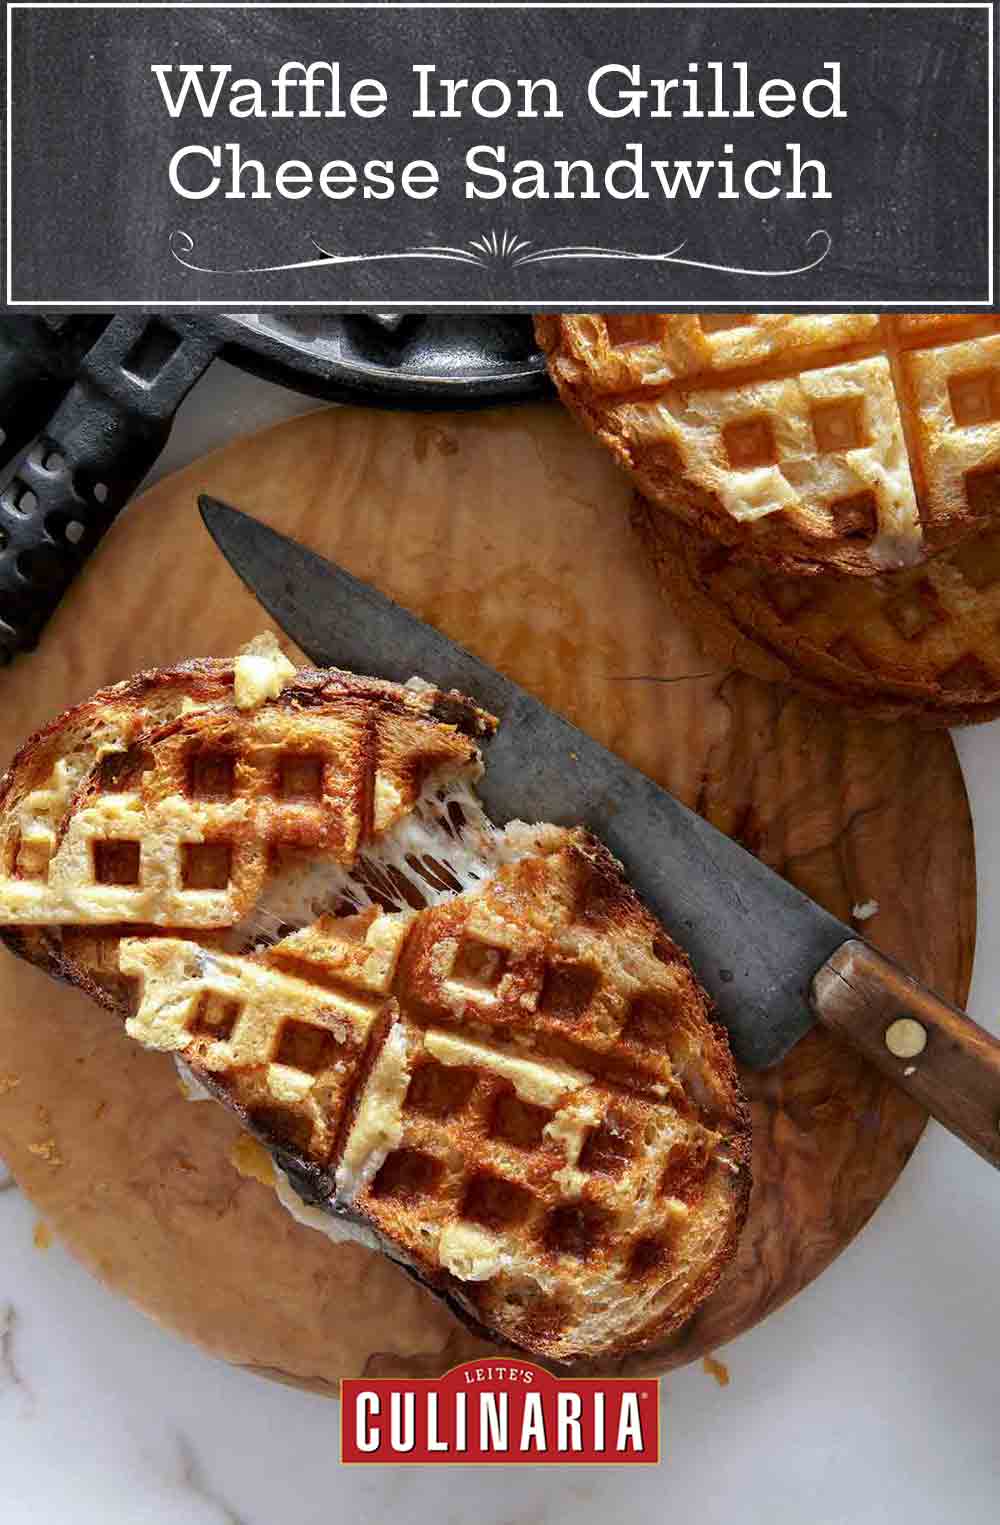
Yup. Pull that waffle iron off the top shelf and wipe off the dust, cuz you’re going to want to give this waffle iron grilled cheese sandwich a whirl. So long panini maker. These darling dimples afford even more surface area than regular grilled cheese or panini for insane amounts of crisp, buttery, carbolicious goodness encasing oozing cheese.–Renee Schettler Rossi
Waffle Iron Grilled Cheese Sandwich FAQs
Grilled cheese isn’t the only use we can conjure for your waffle-making contraption. Heck no. Consider plopping, dribbling, or otherwise putting any of the following on those hot little dimples. Frozen hash browns or tater tots, brownie batter, cornbread, paninis, bacon, quesadillas, polenta, or mochi.
The bread that you want to use here is something hearty with a fairly tight crumb. Being squashed in a hot waffle iron isn’t the most delicate procedure so pick up a nice multigrain, a rustic Italian loaf, or a gorgeous sourdough. Anything that has a little heft to it.

Waffle Iron Grilled Cheese Sandwich
Equipment
- Waffle iron
Ingredients
- 1 tablespoon (1/2 oz) unsalted butter, at room temperature
- 2 pieces good bread, (and by good, we mean really, really good)
- 2 to 3 ounces fontina, Gruyère, or raclette cheese, sliced or grated
- Sea salt, (optional)
Instructions
- Heat a waffle iron.
- Butter both slices of bread on 1 side. Place 1 bread slice, butter side down, on the waffle iron. Layer on the cheese and top with the second slice of bread, butter side up.
- Close the waffle iron, but don't press it down, and let the sandwich cook for about 2 minutes, until the bread is golden brown and crisp at the edges. If you like your grilled cheese bordering on burnt, leave it in for up to 3 minutes. Sprinkle with salt, if desired.

Nutrition
Nutrition information is automatically calculated, so should only be used as an approximation.
Recipe Testers’ Reviews

Got five minutes? Then don’t bother reading this comment, just make this waffle iron grilled cheese recipe and see for yourself. In the same time it takes to read this, you could be making the best grilled cheese sandwich ever. I used simple homemade French bread and sharp Cheddar from the grocery store. The sandwich was crisp on the outside and warm and gooey on the inside. This no-fail recipe will definitely bring out the kid in you.
This crunchy, gooey, buttery treat was quite a hit. I made several iterations—provolone, Gruyère, bacon—and they were all winners. The waffle iron created a crisp exterior with a warm, gooey interior. Why buy a panini maker when a waffle iron does the job so well?

The texture of this waffle iron grilled cheese sandwich is soooo good—crisp but light. When I first saw the recipe, I thought, “Does it really make a difference if I use a waffle iron for grilled cheese or not?” Believe it or not, the answer is yes. Just 2 minutes was the perfect amount of time to produce a crisp sandwich with cheese melted to just the right gooeyness. I used a blend of Havarti, local sharp Cheddar, and provolone. The light sprinkle of salt was the final touch that brought all the flavors together.
The key to this waffle iron grilled cheese recipe is simplicity: bread, butter, and warm melted cheese. It’s also fantastic being able to use a waffle iron for something other than waffles. Plus, depending on your appliance, you can make 4 sandwiches at once, and there’s no flipping involved. This sandwich is just begging to be torn and dunked in tomato soup.
This waffle iron grilled cheese recipe gets my vote for its simplicity and for giving me another use for my waffle iron. I went with a fresh multigrain sourdough from a local shop and a mix of Gruyère and Cheddar. I loved how the extra grill lines from the waffle iron made the sandwiches crisp all over. I served this with Ina Garten’s Tomato Soup, and it made for a perfect winter dinner.

This waffle iron grilled cheese recipe is straightforward, simple, and fun. I think any recipe that a child can make and an adult can love qualifies as a keeper. One of the best parts is that you can design the sandwich any way you like with endless variations of bread and cheese. One warning—make sure you’re familiar with the settings on your waffle iron or you might end up with a Cajun grilled cheese instead of a nice, crisp, golden one. [Editor’s Note: She means a blackened sandwich. You know, as in burnt.]
Grilled cheese sandwiches are on heavy lunch rotation here, and this recipe was a fun, easy way to change things up a little. Like the author says, it’s going to be as good as the ingredients you use, whether your preference is for white bread with American cheese or artisanal bread with imported cheese. The waffle iron makes the outside of the sandwich crisp and crunchy like the crust of regular grilled cheese often is.

Can a grilled cheese sandwich actually rate such high acclaim? This one sure can! “Delicious” doesn’t seem to do it justice. I used good artisanal bread (pain au levain) and a combination of shredded Comte and Dubliner cheese. Our waffle iron is Belgian, so I was a tad concerned that the indentations would be too deep. I needn’t have worried; the sandwich turned out perfectly caramelized, brown, and unctuous—pure comfort food. One sandwich led to another.
I’d recommend spreading some Dijon mustard on the bread before adding the cheese, as it took the sandwich to another level. I want to add fresh tomato slices the next time I make this. I need to stop waxing poetic about this sandwich, don’t I?

This waffle iron grilled cheese recipe takes the basic, loved-by-all grilled cheese sandwich to a whole new level. It was truly an unexpected treasure to find a simple technique that improves a sandwich I already thought was perfect, not to mention that uses a piece of usually untouched equipment in my house.
I left the first sandwich in the waffle iron for 2 minutes and 30 seconds, and it was only slightly crisp, but the second sandwich was in for 3 minutes and 20 seconds and achieved a perfectly crisp texture without any burnt edges. The extra-crisp outside reminded me of panini.
I used Gruyère cheese, a tiny bit of which seeped out and created a cheesy crouton bite that made me want to add even more cheese next time. The sprinkle of sea salt shouldn’t be optional, as it really put the sandwich over the top.
Brilliant! My husband and I are shocked that we never thought of this before. Our waffle iron only gets pulled out of the cupboard a few times a year to make waffles, but in the past few weeks since I first tested this recipe, the waffle iron has been pulled out no less than 4 times to make grilled cheese sandwiches.
I have a Belgian waffle iron but didn’t have any problems using it for this recipe. I thought 3 ounces of cheese were a little excessive and found 1 1/2 ounces to be more than enough. I tried fresh mozzarella and some firmer cheeses like Gouda and Cheddar, and they all worked beautifully.
I can imagine a lot of other variations, too—adding a little dab of pesto or a few sun-dried tomatoes would be fantastic. I found 3 minutes in the waffle iron gave my bread a nicely browned and slightly crisp exterior.

This was a fun way to make grilled cheese. I used a nice Italian bread and a medium Cheddar cheese the first time I tried it. The crust was crisp and buttery, and the cheese was melted completely. I’d make sure to put the cheese in the middle of the bread, as it can ooze out when pressed. I made the sandwich a second time with American cheese, and my daughter loved it. It’s a really fun and easy recipe for teenagers to make themselves. My waffle iron perforated the sandwich into quarters, which made it even more interesting.

This waffle iron grilled cheese recipe was really surprising in a good way. It didn’t seem like much of a recipe at all, just a suggestion to make your grilled cheese in a waffle iron. Well, I had the waffle iron out, the last of a good country loaf, and some random bits of cheese from the cheese shop, so I figured why not try the recipe for breakfast? This technique elevated my good ingredients to a new level of melted deliciousness.
The sandwiches were pressed into crisp little waffle squares with beautifully brown oozing edges. I thought the sandwich might be too thick, so I squeezed the handles of the waffle iron together to squish it down. I was also worried that the cheese would ooze out and make a mess, but the oozy browned bits were fantastic and actually peeled right off the nonstick surface. I’d still recommend using less than 3 ounces though. Next up, the Cheddar, bacon, and apple combo.
First off, I haven’t made my own grilled cheese sandwich in years (probably since I evaluated the Hog Island grilled cheese, so maybe I’m just easy to please when it comes to grilled cheese at home. But I have to say—my sandwich was divine. I ate most of the crust while my daughter ate the middle. She still throws food from her high chair when she’s finished, and I was literally eating the leftover pieces off the floor—it was that good.
I used Dave’s Killer Bread (yellow, for those who’ve never tried it) and aged Cheddar, and we ate the sandwich with grapes and Honeycrisp apples. My butter wasn’t at room temperature, so I put it in the microwave for about 10 seconds to warm it up—this helped prevent tearing holes in the bread when trying to spread the butter.
I sliced the Cheddar as thinly as possible but there were still chunks, which ended up melting just fine in the iron. I was distracted by my daughter while waiting for the sandwich to grill, so I didn’t retrieve it for about 3 minutes, and it was just starting to burn. I’d suggest lifting the iron after the first minute to check the bread.

This waffle iron grilled cheese recipe is great. I used whole wheat bread and extra-sharp white Cheddar and I didn’t add any salt. The first time I made the recipe, I added all 3 ounces of cheese, which ended up being too much, as it was hard to close the waffle iron.
The second time I used 2 ounces, which I still found to be a lot. The third time I used 1 1/2 ounces, and that seemed just right, so if you’d like to reduce the amount of cheese, you can easily do so. What I like best about using the waffle iron, as opposed to a regular grilled cheese press or a skillet, is that you get deep grooves on the sandwich. My waffle iron is the kind that closes tightly and turns over to cook, and my sandwich came out a nice golden brown on both sides.
Why didn’t I think of this? The “waffle iron grilled cheese sandwich” is a snap to make and you can crank out many varieties in no time flat. We eat waffles so infrequently that my waffle iron used to just sit there idly. Well, now my waffle iron can rejoice, as it gets a grilled cheese workout. We always have a stash of bread from Acme in the freezer, as well as various cheeses from Cowgirl Creamery and Marin Cheese Company.
The first time I made this, I used thick slices of pain au levain and a really soft Camembert. The trick to using a waffle iron for these sandwiches is that you have to be able to close the iron. In this case, I had to apply a lot of pressure to close it, which pushed most of the melted cheese out of the bread. I’d recommend using thinly sliced bread and a firmer cheese that stays thick and gooey unlike Camembert or Brie, which tends to liquefy during the cooking process. Using my newfound knowledge, I tried the recipe a second time and swapped out the butter for extra-virgin olive oil. The resulting sandwich was rich, crisp, and gooey. A silicon spatula was perfect for getting the yummy bits of crisped cheese out of the crevices of the iron. My waffle iron is nonstick, which made it easy to clean.
I loved this grilled cheese recipe. I used fancy jalapeño ciabatta rolls, trimming off the top to expose the soft bread inside, and pimento cheese. Oh my word, was this sandwich amazing. The press toasted the bread perfectly, putting little waffle indentations on both sides. The cheese turned into a gooey mix that complemented the toasted bread perfectly.
I’ll be making this on weekends more often. However, I think you need a specific waffle maker to make these accurately. I have a smaller waffle maker with two squares that are about the size of a slice of bread on each side, so I only ended up with 2 servings for this recipe. It worked wonderfully though because I could control how far I pressed it down. I could see this being more awkward to prepare in a round waffle maker where you could only make one at a time and would have too much space around the bread for the cheese to seep out and make a mess. I don’t think it would work at all in one of the fancy flip-upside-down Belgian waffle makers, as it would press the sandwich way too far down into the waffle shape.


Terrific idea. One of my favorite uses for my waffle iron is traditional Thanksgiving Stuffing. It gets real crispy edges which everyone loves, then add a scoop of masked potatoes, gravy and a side of cranberry relish. My brother divides the waffle and makes it into a sandwich using the ingredients but he includes roasted sweet potatoes. Thanks for your site- Love seeing the diverse recipes!
Steve
Steve, your stuffing sandwich idea is nothing short of brilliant!! It’s worth making Thanksgiving dinner just for the stuffing waffles!