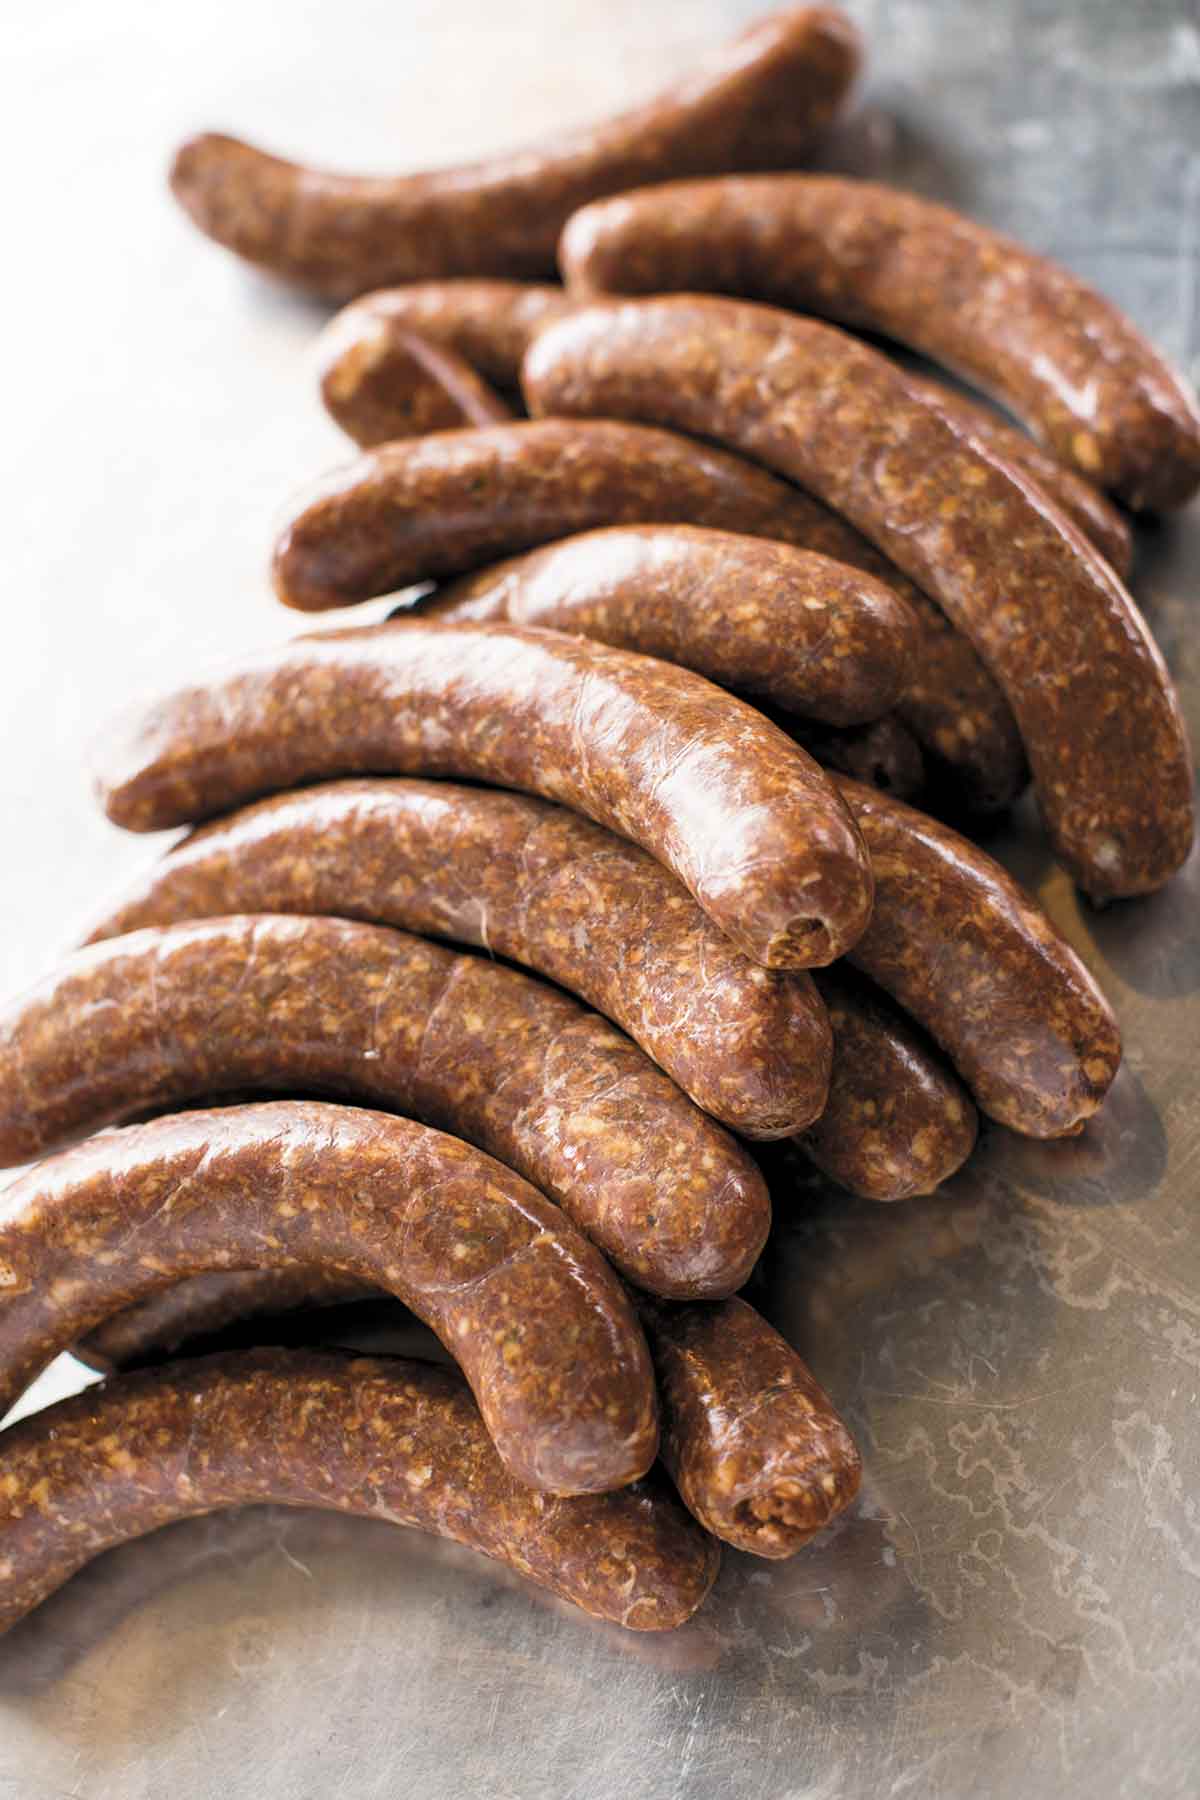

“Chorizo” is somewhat of a loaded term because the word means different things to different people. From Portugal to Mexico to Spain and beyond, this sausage has incredible variance from culture to culture.
We took our favorite elements from both Mexican and Spanish chorizo and combined them into one to make a fresh chorizo that is truly unique to us. –James Peisker | Chris Carter
[Editor’s Note: The instructions below are lengthy, but the process itself is actually quite doable. We’ve included ample handy tricks and tips to make it easy even for virgin sausagemakers.]
Why Our Testers Loved This
Our testers were delighted with these spicy sausages. They loved that the process was simple enough for rookies yet produced perfectly seasoned sausages and made more than enough to share.
Jen White calls this homemade chorizo “Spicy, garlicky, delicious, and great for first-time sausage makers.“
What You’ll Need to Make This
- Pork–Pork shoulder or Boston butt is ideal here because it has plenty of fat marbled through it. You can use a different cut of pork, but make sure that it has a decent amount of fat. Lean cuts will result in dry sausage.
- Salt–You can use whatever type of salt you like for this recipe, but be sure to weigh it as crystal sizes vary and will impact the flavor of the sausage.
- Paprika–This gives the sausage its signature red hue.
How to Make This Recipe
- Dice the pork. Mix the pork, salt, spices, garlic, and oregano in a large bowl until well combined. Chill the pork mixture and your grinder until you are ready to grind.
- Grind the pork twice. Use a medium die and slowly feed the pork mixture through the grinder, stopping to clean or chill the grinder if needed. Chill the ground sausage for 1 hour.
- Prepare the casings. Soak casings if needed.
- Fill the sausage stuffer with the sausage mixture and slide the casing onto the feeder tube. Fill sausages, tying them off every 6 inches.
- Poke the sausages with a fork to remove air bubbles. Chill the sausages overnight.
- Cook the sausages as desired.
Common Questions
There are several different forms of Spanish chorizo, each with its own unique characteristics. The sausage is usually made with pork, but sometimes includes beef, too. Here are some of the most popular types:
1. Chorizo fresco–a fresh, uncured chorizo that is typically used in stews or as a filling for empanadas.
2. Chorizo seco–a cured chorizo that’s dried and ready to eat. It is usually sliced thin and served as a tapa or appetizer.
3. Chorizo picante–a spicy chorizo that is seasoned with paprika, cumin, and other spices. It is often used in paella or grilled with vegetables. Some are raw, others cured.
4. Chorizo dulce–a sweet chorizo that is typically used in soups or stews.
5. Chistorra–a type of fast-cured chorizo from the Basque Country and Navarre. It is usually made with lean pork (or pork and beef), garlic, and paprika and is served grilled or fried as a tapa.
6. Morcilla–a type of blood sausage that is often made with rice, onion, and spices. It is a popular ingredient in Spanish stews and soups.
Hog casings are available in both natural and synthetic form. Natural hog casings need to be soaked in warm water for at least 1 hour prior to use, and the water should be changed often during this time. Synthetic, or collagen, casings should not be soaked prior to use. They have less elasticity than natural casings, so care should be taken not to overstuff them.
More great homemade sausage recipes


☞ If you make this recipe, or anydish on LC, consider leaving a review, a star rating, and your best photo in the comments below. I love hearing from you.–David

How To Make Chorizo
Equipment
- Meat grinder with 3/16 die (medium) or meat grinder attachment for your KitchenAid; sausage stuffer
Ingredients
- 5 pounds fatty pork shoulder or other well-marbled cut of pork
- 1 1/2 ounces salt
- 1/2 ounce ancho chile powder
- 1/4 ounce paprika
- 1/4 ounce cayenne pepper
- 1/3 ounce ground cumin
- Pinch freshly ground black pepper
- 5/8 ounce garlic (about 5 smallish cloves), minced
- 1/4 ounce fresh oregano, minced
- 1 1/8 to 1 1/4 inch hog casings (about 12 feet)
Instructions
- Dice the pork into smallish 1-inch (2.5-cm) cubes.
- In a large bowl, use your hands to mix together the pork, salt, ancho, paprika, cayenne, cumin, black pepper, garlic, and oregano until everything is equally distributed. Cover and refrigerate the chorizo mixture until you’re ready to grind.
- Meanwhile, place your meat grinder in the freezer until chilled through, at least 30 minutes. (By way of explanation, this helps keep the meat cold as you process it. If the grinder isn’t cold, the meat will become too warm and it won’t grind properly, which will ruin the texture and result in a dry, crumbly, less flavorful chorizo sausage, which ultimately leads to sadness.)
- Set up the grinder with a 3/16 (medium) die or, if you’re using a KitchenAid grinder attachment, start with the larger of the two dies for the first grind and then switch out to the second, smaller die for the second grind. Turn the grinder on and slowly add the pork through the feed tube. Be careful not to overload or overfill the grinder. Add the pork slowly, piece by piece, so the elbow doesn’t get overfilled or clogged. If you notice any smearing or clogging on the die, turn off the grinder and clean out the die. Also check your pork to make certain it’s still cold. If at any point the grinder is no longer cold, return it to the freezer until it’s thoroughly chilled and refrigerate the pork rather than leave it at room temperature.
- After the first pass through the grinder, use your hands to completely combine all of the ingredients. Then pass it through the grinder a second time. (The more you grind the meat, the finer the texture will become and the firmer the resulting chorizo sausage will be.) After the second grind, use your hands to once again thoroughly mix the ingredients until the mixture becomes sticky and fully combined. (The sausage should stick to your hand when you turn it upside down.) Cover and refrigerate the chorizo mixture until chilled through, about 1 hour.
- If you’re using natural casings, they’ll need to be soaked in room-temperature water for at least 1 hour before using. You’ll want to change the water several times and we’ve found that running water through them a few times before trying to put them on the extruder tube makes everything way easier. This also results in a softer and more pliable casing, which makes it easier to slide the casing onto the extruder and less likely to split when being filled.
- Prepare your stuffer or stuffing attachment according to the manufacturer’s directions. Add the loose sausage mixture to the stuffer or stuffing attachment and pack it down to remove all air pockets. Lubricate the feeder tube with water and slide the casing onto the tube.
- Once the casing is entirely scrunched onto the feeder tube, pull 2 inches (5 cm) of casing off the tip of the tube. Grasp the casing end with one hand and begin cranking with the other hand. Once you can see meat begin to make its way out of the tube, pinch off the end of the casing so the meat is forced to expand inside the casing as you slowly pull away, keeping a grip on the casing. Be sure both the casing and the counter on which the sausage will fall are very wet and lubricated to prevent any ripping or sticking. (You may find it handy to keep a squeeze bottle of water nearby for this). When about 3 to 4 inches (8 to 10 cm) of chorizo sausage mixture has made its way into the casing, let go of the end and use one hand to feed the casing off of the tube while the sausage is being cranked out with your other hand. As you are doing this, be mindful about filling the casing. You want to find that sweet spot where the casing is filled with meat and a little amount of air remains but not so full that it will bust when you begin twisting. Once all the meat has been stuffed into the casing, leave 6 inches (15 cm) empty casing on the end and cut off any excess to reserve for future use.
☞ TESTER TIP: Having 2 people for this process makes it SO MUCH EASIER! One person can pack the meat in the grinding tube, and the other can guide the casing and the sausage.
- Tie off one end of the sausage and twist, making a simple knot. Measure the desired length of the sausage and mark your workspace with either a piece of tape or line it with parchment and mark it with a pen or pencil to help ensure consistency in the length of all your links. You want to twist the links so that you get about 3 links to 1 pound (455 grams). In general, each sausage should be 5 to 6 inches [13 to 15 cm] long. Starting from the tied-off end of your sausage, use one hand to pinch it at the appropriate length. Then, keeping a hold on the pinched spot, slide your other hand down and pinch off the next length. Now, twist by picking up the sausage, holding onto the 2 pinched spots, and swinging it like a jump rope. Repeat until no sausage remains. When you get to the end, tie it off with a simple knot. You should have 15 to 20 links of homemade chorizo, each 4 to 6 inches in length.
- Lightly poke each sausage link with a fork no more than 2 or 3 times where air bubbles are visible. These tiny holes will allow some liquid to release while the sausages cook and prevent them from exploding. (No need to go wild here with the poking. The more you poke the sausage, the more likely it is to dry out during cooking. Do not poke holes in the casing if you’re planning to smoke the sausage.)
- Place the twisted links in a single layer on a baking sheet or plates, being careful that the links don’t touch one another. Refrigerate, uncovered, overnight to dry out the casings.
- Snip the sausages at the seams to separate them into links (or, if desired, leave them as a whole rope of links like those you might have seen in cartoons!). Cover and refrigerate for up to several days until ready to cook.
- To cook your homemade chorizo, you have a decision. You can grill the links over a charcoal or gas flame, sizzle them in a skillet, braise them in beer, toss them in the smoker, or cook them according to pretty much any recipe that calls for raw chorizo. Whatever approach you decide to take, you want the chorizo to be thoroughly cooked. We’d love to hear what you did with your chorizo so let us know in a comment below! Originally published January 22, 2017.

Nutrition
Nutrition information is automatically calculated, so should only be used as an approximation.
Recipe Testers’ Reviews
This homemade chorizo recipe is a fantastic, spicier take on traditional Spanish chorizo! The instructions for how to make chorizo provided ample results, which means you’ll have plenty to share with friends, and the 24-hour chill time left the refrigerator smelling amazing.
Sausage making requires more time and additional pieces of kitchen gear than the average home cook may have. However, if all of those boxes are checked, this recipe is FANTASTIC! Spicy, garlicky, delicious, and great for first-time sausage makers. I will definitely add this one to my sausage-making arsenal. (That’s a thing, right?)
☞ TESTER TIP: Be warned: This is a very time-intensive project, and stuffing sausage is WAY easier with 2 people. But this recipe is totally worth the work!
I used a KitchenAid mixer with the meat grinder attachment for mincing the pork and the KitchenAid extruder attachment for stuffing the sausage. For Kitchen Aid users, I used the larger of the two dies for the first grind, then switched out to the second, smaller die for the second grind. When extruding, I used the larger of the two extruder tube attachments.
Having 2 people for this process makes it SO MUCH EASIER! One person can pack the meat in the grinding tube, and the other can guide the casing and the sausage. An average home cook may not want to attempt this on their own. And rinsing the natural casings is a process that’s both disgusting and cool (coogusting? disgustool?) because the shape of the intestine is very apparent when the casing is filled with a bit of water.
I was so excited to taste the final product that I had it twice the next day. At lunch I braised a link in a hoppy beer before serving it sliced with some grainy mustard, and for dinner I removed the casings and served small patties of chorizo over buttered brown rice with vinegared Swiss chard. In both meals, the chorizo was the star!
There’s nothing like homemade sausage and this homemade chorizo was snappy and picante! Like my husband said, “The Goldilocks of chorizo—not too hot, not too mild, just right.”
☞ TESTER TIP: Remember to keep your meat cold as you work through the recipe and poke holes sparingly or the sausage could become dry when grilled.
I used 5 pounds pork shoulder—2 kg pork shoulder plus .8 kg pork back fat. I put several pokes in the chorizo. Next time, I would only poke it once or maybe not at all.
Don’t forget to lubricate the feeder tube with water. This is crucial when you learn how to make chorizo because you don’t want the casings to dry out and tear. I keep a squeeze bottle handy and give a squirt every so often. I also squirt the surface where the stuffed sausage lays as it comes out of the feeder.
I served them with marinated eggplant to balance the heat. Our neighbors enjoyed theirs with eggs for breakfast and loved them.


Read the first pargraph could not be botrher with the rest WHY ??Because is it not about time that Americans, especally those that are aparently professionals, joined the rest of the world and usxe the METRIC system because i do not have the inclination to continually CONVERT American Weights and Measures There is more of an audience in the OUTSIDE WORLD.
There are equally good recipes out there that do use the Metric System and the fact is that if an AMERICAN CHEF wanted w to work pretty much anywhwre else inthe world thyy would HAVE to use the Metric system anyway
Albert, we absolutely know the value of using metric in recipes, which is why all of our recipes include metric measurements. You just need to click on the metric button next to the ingredient list and all of the ingredients will be converted.
Albert L J Hall,
Do you need help getting that 123 grams of egg off your face?