
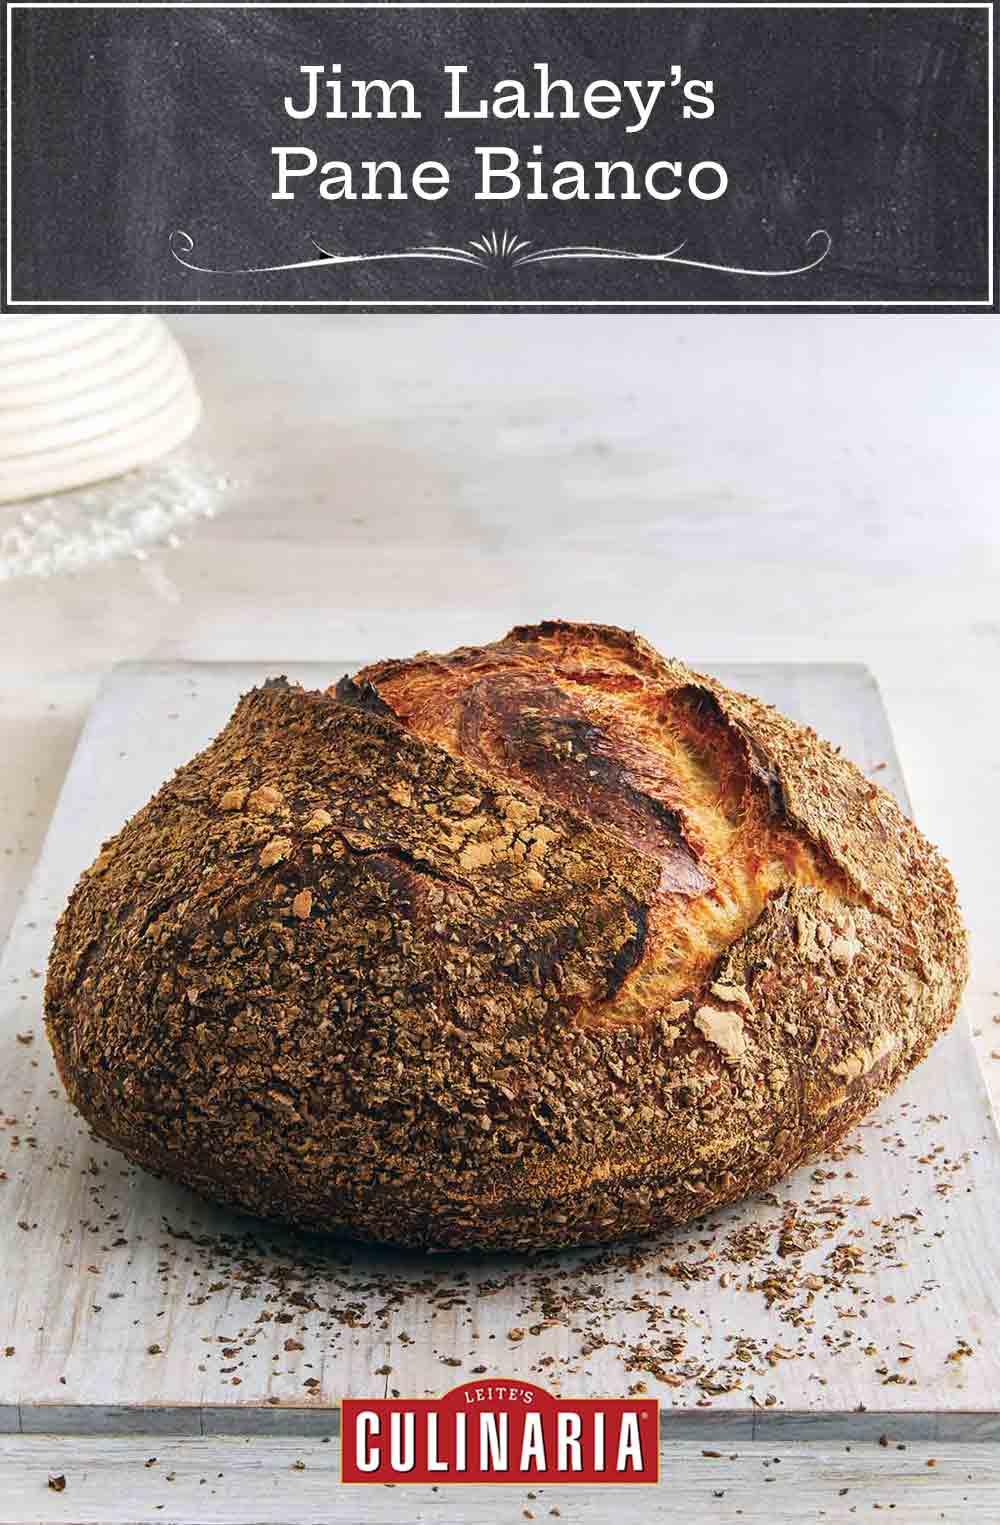
This simple, no-knead sourdough from Jim Lahey is a classic artisan bread that’s classically crisp on the outside and soul-sighingly soft inside. The recipe may appear long and daunting, but have no fear. The most difficult part of the whole process will be having enough patience, particularly when you’re waiting for it to cool.–Angie Zoobkoff
☞ LEARN MORE, READ: HOW TO DRY SOURDOUGH STARTER
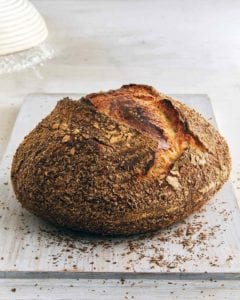
No-Knead Sourdough Bread
Equipment
- A 4 1/2- to 5 1/2-quart (4.3- to 5.2-l) heavy pot with a tight fitting lid
Ingredients
For the biga
- Scant 1/3 cup room temperature (65° to 70°F | 18° to 21°C) water
- Scant 1 tablespoon refreshed fermented starter
- 1/2 cup plus 3 tablespoons unbleached all-purpose flour
- A tiny pinch fine sea salt
For the pane bianco
- 1 1/4 cups water, at room-temperature (65° to 70°F|18° to 21°C)
- 3/4 ounce biga [1 ounce or 30 g in winter]
- 2 3/4 cups unbleached all-purpose flour, plus flour for dusting
- 1 1/8 teaspoons fine sea salt
- Wheat bran for dusting
Instructions
Make the biga
- In a small bowl, mix together the water and the refreshed starter. Add the flour and a few grains of salt. (Use just a tiny pinch, please, as a bit of salt will speed up fermentation, but a heavy dose will slow it down.) The dough will look lumpy, uneven, and small. And that’s okay.
- Cover the bowl and wait up to 24 hours for it to triple in size. Don’t be dismayed if nothing happens for the first 12 hours—it takes a while to get going, but once fermentation starts, it will take off, and is likely to grow more in the final 4 hours than it did in the first 16.
- When you think the biga is ready, poke at it and taste it—a fully fermented biga is pleasantly tangy with a fantastically airy, spongy, viscous structure. It will feel tacky and taste and smell deliciously yeasty with a gentle smack of tartness, a bit like beer but without any bitterness. At this point it’s ready to use. (You may note color changes in the big as the top layer dries out and oxidizes a bit; this is perfectly fine and to be expected.)
- The biga will keep at room temperature (below 72°F | 22°C) for up to several days in a covered container or several weeks in the refrigerator.
Make the pane bianco
- In a 1 1/2-quart bowl, whisk the water and biga together until the biga dissolves, about 20 seconds. Add the flour and salt and, using a large spoon or spatula, rapidly and vigorously mix everything together until just combined, 1 to 2 minutes. Resist the urge to tidy it or consolidate it.
- Scrape the dough off your spoon and from the edges of the bowl and pile it on top of the dough in the bowl. Cover the bowl with a plate and let it sit at room temperature for 20 minutes.
- Lightly flour the edges of the dough and use a dough scraper or rubber spatula to turn the dough by folding the edges of the dough into the center. Cover again and let sit until the dough has doubled in size and is sweet and yeasty smelling, 8 to 20 hours (the colder the weather, the longer it will take).
- When the dough is ready, it will glisten and shimmer and you will see a few bubbles beneath the surface. It should feel light, springy, and curiously soft to the touch. The dough will also have a gassy feel, as if it were inflating…which, in fact, it is. When you pull a strand of it up and away from the bowl, it will thin out as you pull it and become nearly transparent—the classic “windowpane” test. And when it’s really ready to shape, the dough will have developed self-suction and will stick to things—your finger, the bowl, a rubber spatula—but when you pull away, rather than leave a mess, it will come away quickly and cleanly with snap and enthusiasm. When the dough reaches this point of beautiful springiness, it has reached the apex of its elasticity—and is ready to shape.
- Flour the edges of the dough again, scrape from the side of the bowl, and fold them into the center of the dough. Scrape the dough off the bottom of the bowl and flip it over. Let the dough rest at room temperature, covered, for 20 minutes or until the dough shows signs its growing evidenced by a slight but noticeable expansion.
- Line a rimmed baking sheet with parchment paper.
- Gently fold the sides of the dough into the middle of the dough and lift the dough from the bowl. Throw a handful of flour into the bowl. Working quickly and gently, pull the dough into a taut ball—the tension is what will allow the dough to hold its shape. You need to work quickly so the dough doesn’t stick to you. If it starts to stick, dip it in the floury bowl. Pull the sides of the dough down and into the bottom of the dough. You are trying to make the surface of the dough as taut as you can without tearing it—in about 30 seconds or less. (Handling the dough any more than this is likely to damage the airy, delicate structure within.) [Author’s Note: Imperfections are beautiful. It’s always better to stop with an imperfect round than to keep pulling at it until it tears in a grim attempt to achieve perfection.]
- Place the dough, seam side down, on the parchment paper. Loosely cover the dough with a towel. Let the dough rest at room temperature until it’s doubled in size, 1 to 3 hours.
- Place a large pot and a tight-fitting lid side by side in the oven on the middle rack and preheat the oven to 500°F (260°C).
- Use oven mitts to carefully remove the pot from the oven and uncover the dough. Very gently pick the dough up and lower it into the pot. Use a small serrated or paring knife to score the dough with a single slash. Cover the pot immediately and bake for 40 to 45 minutes.
- Take the lid off, carefully remove the parchment, and bake until the crust has attained at least a rich golden color, 5 to 10 minutes.
- When the bread comes out of the oven, you’ll know it’s done baking because it will feel lighter, will sound hollow when you knock on the bottom, and the crust begins to crackle quietly like logs in a fire. Set the loaf on a wire rack to cool.
- If you can bear to, wait an hour or so before cutting into it, as the interior will continue to cook as it cools.
Nutrition
Nutrition information is automatically calculated, so should only be used as an approximation.
Recipe Testers’ Reviews

This recipe is not for a person that wishes to toss together a bread quickly. As sourdough breads go, this is quite simple, but no sourdough, even a “simple”one,will take less than 2/3 of a day at minimum. The time required is what actually makes a bread like this special. So good, in fact, that as good as it is slathered with any number of fancy jams or ordinary butter, it is amazing simply torn from the boule and devoured plain.
The hands on time is somewhere near 20 to 25 minutes but the actual time can be anywhere from 20 to nearly 30 hours.
I used 30 grams of biga and must confess it took me a couple of minutes to mix until there were no dry pockets of flour. My dough took nearly 20 hours in my coldish winter kitchen and I used floured parchment in place of the floured towel.
Honestly, until this basic method was presented a decade ago, it was unheard of for us to even consider baking great breads with a crispy crust and a light springy crumb at home. There have been several great books about sourdough in the last ten years, Tartine Bread, Ken Forkish’s Flour Water Salt, Yeast but one thing they ALL have in common they all owe a debt to the method used with THIS “simple no-knead white sourdough.”
If you’re used to making sourdough bread, this is a fine recipe and technique to tweak and make your own; if not, this is the perfect recipe to learn the method for creating the best breads in your own kitchen.
My final thought is that it is imperative that you wear good gloves or at the least sturdy oven mitts while handling your SCREAMING hot Dutch oven. I use grilling gloves that go halfway to my elbow.
My husband, who loves white sourdough bread, took one bite and gave the bread an “A+.” The bread has a nice crust and a soft chewy interior. The crumb is fairly small and there are not big holes in the bread.
I used 30 g of biga, which is the winter amount. The outside temperature when the biga was fermenting was warm (January thaw). My dough first sat for about 18 hours. It was ready earlier but I wasn’t ready to bake. By the time I did use the dough, it had a nice aroma and bubbles underneath the surface. The information in the recipe about the readiness was helpful.
Later the dough rested for about 2 hours. I placed a clear plastic bowl over the dough so I could see the progress it was making.
My Dutch oven is actually only oven safe to 450 degrees so I turned the temperature down to 450 as soon as I placed the bread in the oven. I baked it for 20 minutes before removing the cover and then baked it for another 20 uncovered and it was fully done.
One thing. I used a bowl bigger than directed but then noticed that the top was drying out. I then transferred the dough to a smaller bowl.

I am new to bread baking and was very interested to try something with a starter as I love the flavor. I used the recommended biga and found it to be easy and it makes a lot more than I could even use.
I do find that the time needed for fermenting the biga and then the time needed to raise the dough makes this a bread that I won’t bake often but perhaps if I got into a routine I could manage it more regularly.
As far as the recipe goes, it was very easy to do and the results are really good! The crust is crisp and the bread is chewy with an amazing texture. I have actually made it few times from the same biga and am quite pleased with my newfound bread baking skills!
On one of the tries, I rolled it in cornmeal and that yielded a lovely result as well. I also used the dough to make pizza dough and it was delicious.
This recipe, though time-consuming because of the rise times, is simple to make and delicious.
I allowed my biga to rest about 24 hours to get more of a sourdough-type bread and the taste was perfect.
Whether the bread is going to be eaten with a meal, to make a grilled ham and cheese sandwich, or with some cheese and wine, we felt this bread outdid any bread that we have available in a bakery nearby.
Don’t let the total time scare you away from this recipe. The hands-on time is minimal and the results are totally worth the wait.


When I first mix the biga, it is very dry? Am I not using enough water? Should it be wet and liquidy?
Hi Dee, you might have a few dry pockets as one of our testers experienced but it should be fine after mixing. Please let us know how it looks once it is fermented.