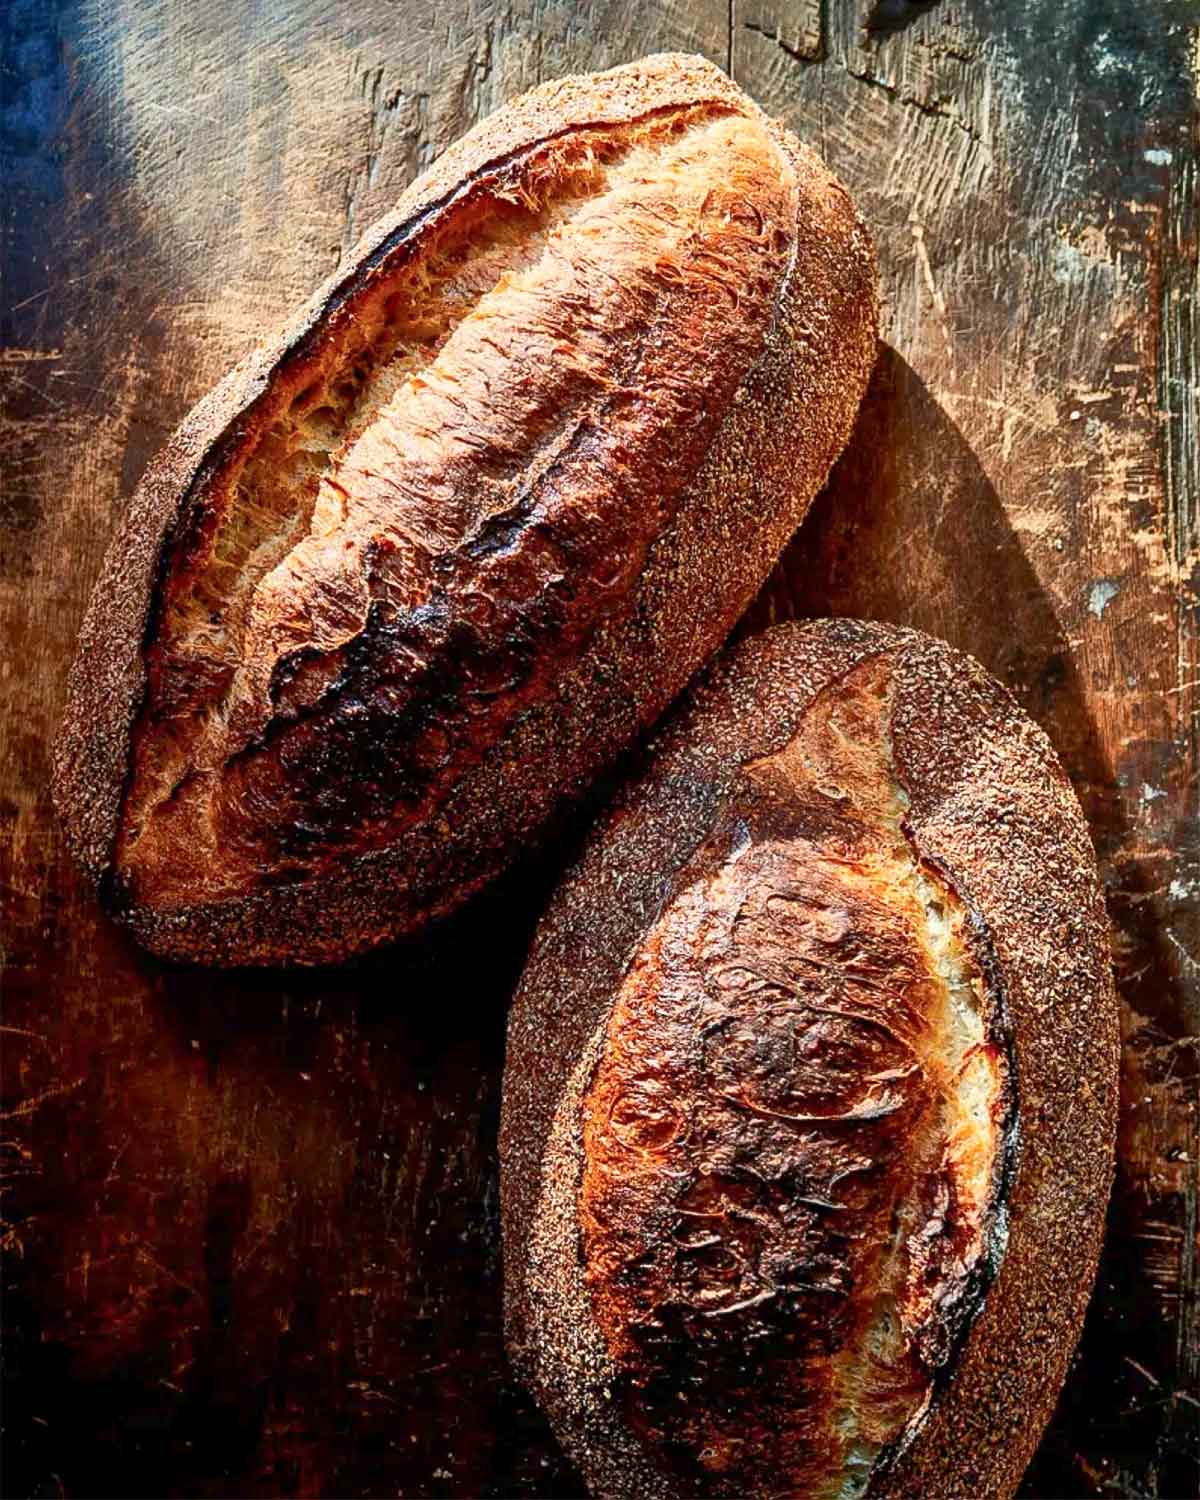

This is our take on a naturally leavened sourdough with a softer, less tangy profile than the early breads of the San Francisco bread scene. It is our go-to loaf at Alimentari due to its versatility. With a light interior crumb and firm dark crust with complex bitter tones, it’s wonderful for sandwiches and crostini. This deeply hydrated bread also lasts for several days after baking. If you prefer a darker loaf, the buckwheat rye is earthy and easy to make by simply changing the flours and following the Filone recipe (See Variation below recipe.)–Donna Lennard
What is filone?
Made with a lightly fermented Italian starter, a filone is Calabria and Tuscany’s answer to everyday bread. With a crisp, crunchy crust and a light, airy crumb, filone is ideal for dipping in olive oil or swirling up sauce.
Filone
Ingredients
- 18 ounces all-purpose flour (3 1/2 cups), plus additional for kneading, as needed
- 12 1/4 ounces room temperature water (1 1/2 cups)
- 5 1/4 ounces sourdough starter
- 1 tablespoon fine sea salt
- Oil, for greasing the bowl
- Semolina flour, for dusting
Instructions
- In the bowl of a stand mixer fitted with the dough hook, combine the flour, water, and starter. Mix on the lowest speed for 5 minutes. (Alternatively, mix in a large bowl by hand until you no longer see any remaining bits of flour and the dough transforms from a shaggy mass into a slightly smoother mass, 5 to 15 minutes.)
- Once the dough has collected into a loose, somewhat cohesive mass, scrape down the sides and the bottom of the bowl for any floury bits. Increase the mixer speed to medium and mix for 5 minutes more. (If making by hand, turn the dough out onto a lightly floured countertop and continue to knead for 5 minutes.)
- Place the dough in a lightly oiled bowl. Cover the bowl loosely with a kitchen towel and let the dough rest at warm room temperature for 30 to 45 minutes.
☞ TESTER TIP: If making with a stand mixer, you can leave the dough in the bowl of the mixer and cover with a towel, but it’s a good idea to remove your dough hook as dough loves to harden onto any surface it can find.
- After the resting time, return the dough to the mixer, sprinkle the dough with the salt, and mix on the lowest speed of the mixer until you cannot see or feel any granules of salt, 1 to 2 minutes. (If mixing by hand, sprinkle the salt on top of the dough and “cut” the salt into the dough using a bowl scraper. Knead the dough until you cannot see or feel any salt granules remaining, about 5 minutes.)
- Remove the dough from the mixing bowl, shape it into a round, and place it in a lightly oiled bowl. Cover the bowl with a kitchen towel and place in a draft-free, preferably warm corner of your kitchen to proof. The dough will NOT double in size; you’re looking for about a 25% increase in volume, and the dough should feel “puffy” and “relaxed” prior to shaping. Depending on the temperature of your kitchen, this can take anywhere from 3 to 6 hours.
- Once proofed, remove the dough from the bowl, place it on a well-floured countertop, and gently degas the dough by using your hands to pat it out and pop any large bubbles. Shape it into a batard by folding the dough over onto itself, picking up the top edge, and pulling it just over the center of the dough, then, using the heel of your hand, push the dough slightly away toward the top edge. Now turn the dough counterclockwise 90 degrees and do the same thing three more times; the dough should be a smooth oval. Turn the dough over and tighten it by gently pulling the dough toward you on the countertop, using the slight friction between the dough and your countertop to further tighten the dough. Turn the dough 180 degrees and repeat.
- Place the dough, seam-side up (top-side down), in a proofing basket or shallow bowl coated with semolina flour to prevent sticking. Sprinkle more semolina over the top. Loosely cover with a kitchen towel and refrigerate for anywhere from 12 to 24 hours.
- When ready to bake, preheat the oven to 450°F (232°C). Place an empty 5-quart (4.7-liter) Dutch oven with its lid in the oven to preheat.
- Once your oven and pot are preheated, remove the dough from the refrigerator and carefully turn it out from the basket into the Dutch oven.
☞ TESTER TIP: To make it easier to transfer the dough from the proofing bowl to the hot Dutch oven, you can gently turn it out onto a sheet of parchment paper, then use the parchment as a sling to carefully lift the dough and set it inside the Dutch oven.
- Score the top of the dough using a sharp paring knife in any pattern you like. Using a spray bottle, spray the dough with a little water, cover with the Dutch oven lid, and place the entire vessel in your oven. Bake for 20 minutes.
- Remove the lid and continue to bake until the crust is a deep golden brown, 20 to 30 minutes more.
- Let your bread cool completely before slicing.
Notes
BUCKWHEAT RYE FILONE
To make the buckwheat rye filone variation, replace the filone loaf ingredients with these ingredients instead and follow the directions for the filone loaf. 11 ounces all-purpose flour (315 g) (2 1/8 cups)10 1/2 ounces room temperature water (295 g)
9 1/2 ounces sourdough starter (270 g)
3 ounces rye flour (90 g) (3/4 cup plus 1 tablespoon)
2 ounces buckwheat flour (60 g) (1/2 cup)
1 tablespoon plus 1 teaspoon salt (15 g)
Oil, for the bowl
Semolina flour, for dusting

Nutrition
Nutrition information is automatically calculated, so should only be used as an approximation.
Recipe Testers’ Reviews
A really easy sourdough loaf that has a good texture and is mainly hands off, if using a stand mixer. I generally make sourdough by folding the dough every half hour for 3 or so hours. This recipe really cut out those steps by kneading at the beginning and still made a good bread with a lovely shiny crumb.
The recipe is very simple to follow with such clear descriptions that it would be easy if this was your first time making bread. I think to take it to the next level would be to make the rye loaf. The plain loaf was very good but was missing a little complexity that I think a darker flour would supply. I am definitely going to be making this again.
Italian bread was a staple in our house growing up. A trip to our local bakery, which is still in business after 125 years, was a highlight of my childhood. The rule of thumb was to always buy 2 loaves, one of which would inevitably be torn into immediately on the way home. Though the bread of my childhood was most likely yeasted, I was eager to press my sourdough starter into service to see if I could recreate something even half as good as those intoxicating loaves of my youth. Mission accomplished!
This recipe produced a very tasty and indeed versatile loaf, equally at home on the dinner table or sliced for sandwiches. The crust had a satisfying crunchiness and beautiful golden color thanks to the dusting with semolina. We didn’t perceive any sour notes with the refrigerated rest at 13 hours. Oven spring was modest, and the crumb somewhat tighter than in many artisan loaves, but still filled with lovely holes. This bread was at its best on day one, as it did show some drying on day two when stored cut side down on a cutting board.
This recipe was a great way to expand my bread-making repertoire, and I’ll surely make it again, next time trying out the buckwheat rye variation.
What I learned along the way—using a stand mixer and all-purpose flour can turn out a terrific loaf with minimal effort. Unlike with artisan no-knead sourdoughs, most of which use bread flour, the signs of fermentation for this type of dough are much less obvious. Be sure to start with an active starter and account for room temperature variables. In my 72°F kitchen, the proofing took 5 hours. Although there was no dramatic rise or bubbles, I trusted the directions. If you only have an oblong banneton as I do, go ahead and shape the dough for a batard instead of a boule.

Oh my goodness. Oh my goodness. Oh my goodness! I baked a loaf of bread and it turned out the way it was supposed to. A loaf of sourdough bread. I’ve tried in the past without success. I have also told myself that it didn’t really matter, because I live where sourdough has been a tradition since the Gold Rush, and one can get a fabulous loaf of sourdough bread at any corner store on any block.
Well, the joy of doing this myself was completely satisfying. Now, I can imagine most people reading this thinking, “Yeah, big deal. I do that every weekend.” They may even see my loaf and think, “Amateur!” Well, guilty as charged on both accounts. My photos will speak for themselves. What they won’t tell you is just how delicious this bread was.
We enjoyed the bread when it was warm, with butter melting into the surface. We enjoyed it toasted, again with butter. The bread even made delicious croutons for a Caesar salad.
This buckwheat rye filone recipe may seem like a lot of effort, but it is not. Like some other loaves using a sourdough starter, you only need to do short pieces of work over an extended period of time to end up with an excellent tasting loaf.
Other than having made pancakes with a buckwheat mix, this was the first time I’ve used buckwheat flour in a loaf of bread—but it won’t be my last. This bread has great taste with minimal effort.

I’m an experienced bread baker, but this recipe is easy enough for a beginner. I made both the white and the buckwheat-rye versions and I’ll advise that if you are new to baking bread, start with the white as it’s an easier dough to work with. The buckwheat-rye dough is very sticky and more difficult to work with. I’d highly recommend using a stand mixer if you have one—it does all the hard work for you.
Flavour-wise, the white was my preference. It had a nice open, shiny crumb and the crust had a great crunchy texture. The white loaf was not sour at all. The buckwheat-rye was much denser and more sour tasting; it also seemed to taste saltier.
While this won’t be my new go-to bread recipe (it’s just not my preferred method), it’s clearly written and will produce some great bread. Take your time and follow the instructions—it will not lead you astray. To all the new bread bakers out there, I encourage you to try it and find what works for you.

This seemingly unpretentious filone loaf was as much a pleasure to make as it was to eat. Of course, there was drama. There’s always drama when working with sourdough. It did have an incredibly crisp crust and chewy, complex-flavoured crumb. A simple bread with a hefty attitude. Coming back soon for sure!
I used my stand mixer as it is always a more efficient way for me when it comes to kneading dough. I waited for the shaggy mass to convert into a smoother mass. It did become somewhat smoother but it remained incredibly sticky. I had used my own sourdough starter and occasionally this happens with some of my repeat recipes. I assumed this was going to be one of those times and carried on.
For ease of clean-up and since my dough didn’t look like it was going to conform to moving into another bowl without a sticky fight, I left the dough to rest in the mixer bowl with the dough hook attached then covered in clear wrap and rested for 45 minutes. For the salt addition, I just connected the bowl and the dough hook back on the mixer. The salt disappeared after 2 minutes of mixing just as anticipated in the recipe.
Shaping the dough into a round was another sticky matter. The oiling of the bowl helped somewhat. After 6 hours of proofing, my dough had expanded in volume by 25%. It looked very relaxed but was more huffy than puffy. The instructions were easy to understand and the dough was easier to handle this time but still had some residual separation anxiety…The semolina in a lined proofing basket definitely helped tame the formed dough mass.
Some 15 hours later and cold out of the refrigerator, it turned easily onto a sheet of parchment paper to enable transferring to my hot Dutch oven. This is a practice I now consistently use as it ensures all my dough makes it into the Dutch oven and also assists with scoring and brushing off the excess flour or, in this case, semolina. I may have gone a bit overboard with the amount of semolina used but I was determined to subordinate the sticky dough. It worked!


I’m not seeing the measurements for the buckwheat and rye version; can you please provide that? Thank you!
Sorry about that, Mary. It was inadvertently removed from the recipe card. You should be able to see it now.
I followed the recipe mixing in/substituting 1 cup of whole wheat flour, sesame, chia, and fennel seeds. I’m a newbie but happy with the results. Takes a long time, but it’s delicious!
Donna, well, that is a gorgeous loaf!! Congrats. Newbie no more!