
To celebrate a harvest is really what Southern food is to me, and that’s either eating the vegetables raw in the field, or cooking them for dinner or preserving them for the winter. That’s a product of hard work in the field, hard work in the kitchen but also hard work in carrying on a tradition, and preserving a tradition that is instrumental to life in the South.–Sean Brock

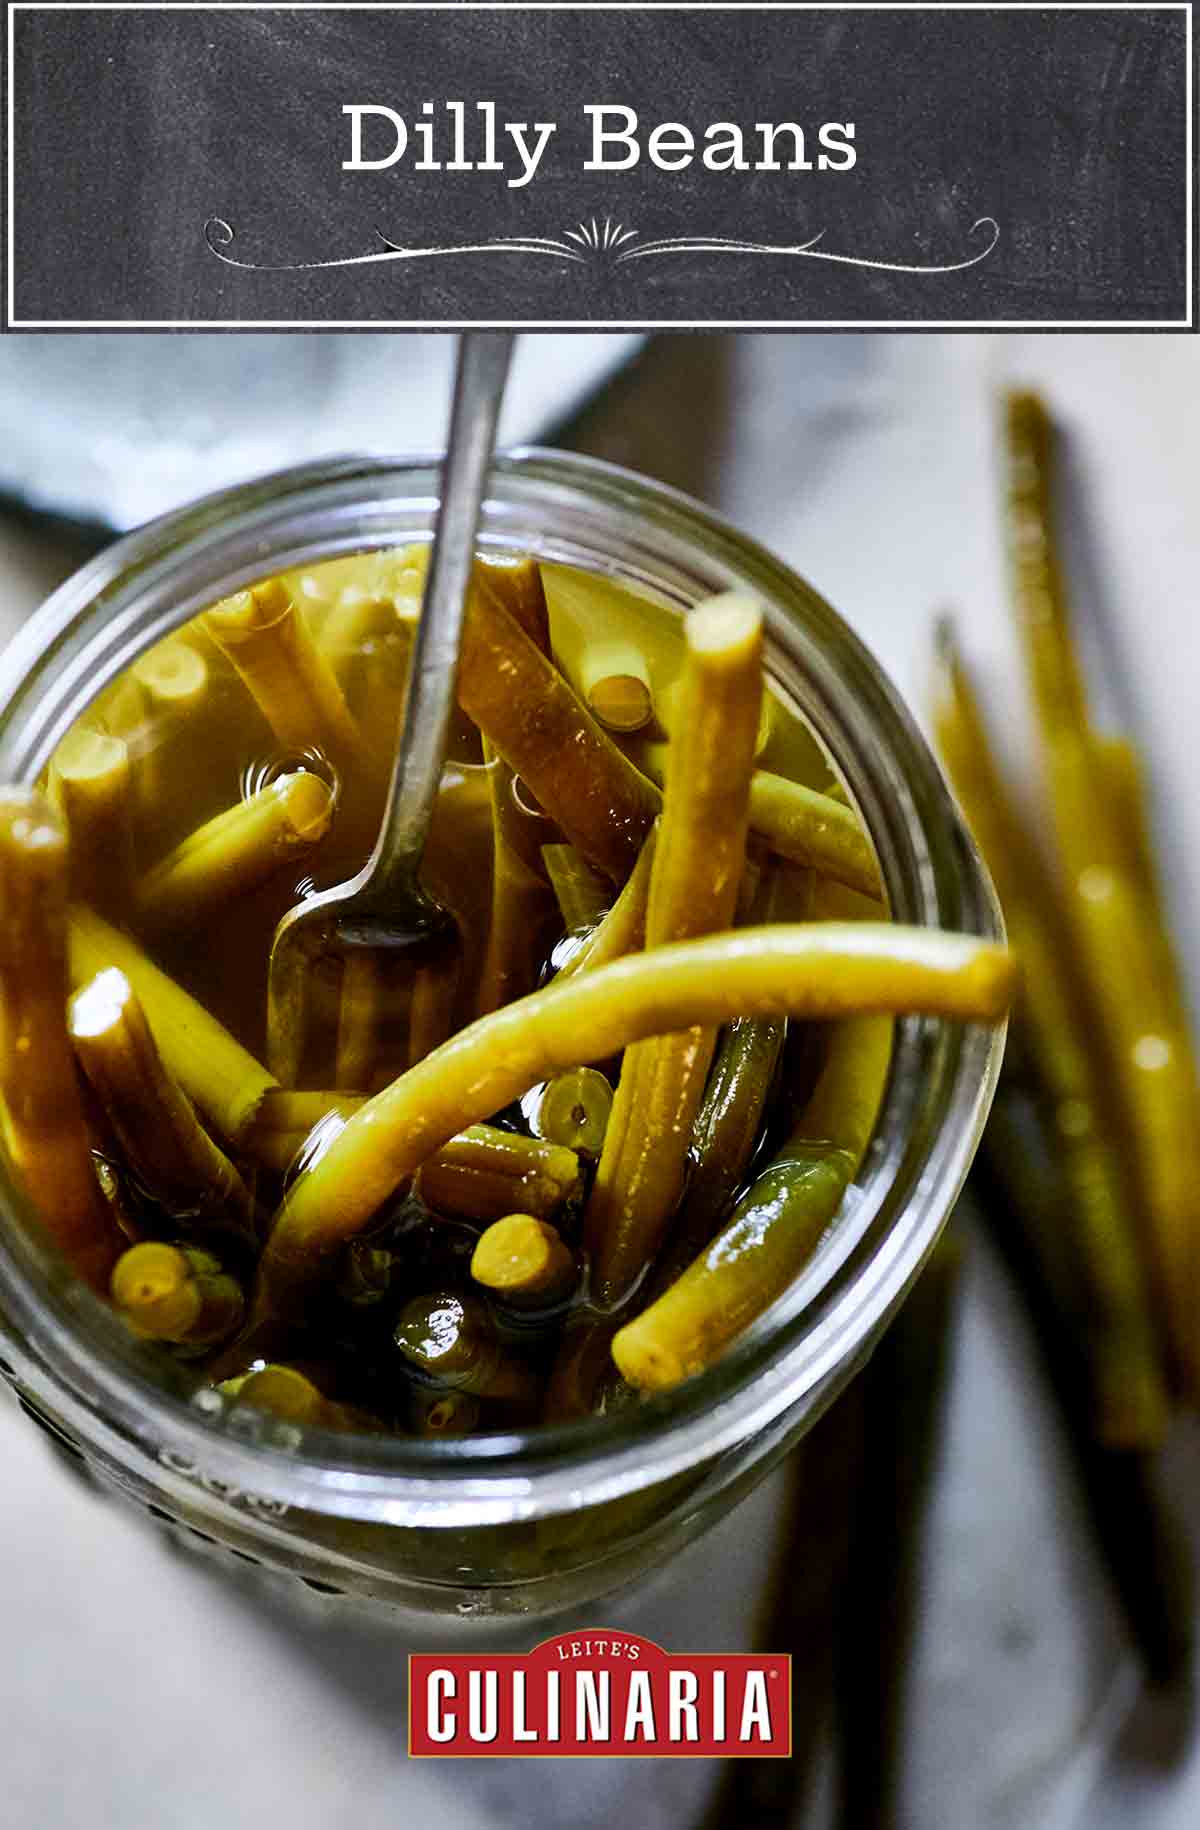
Dilly Beans
Equipment
- Water bath canner
- Three (1 quart | 946ml) canning jars with rings and lids, sterilized*
Ingredients
- 3 1/2 cups distilled white vinegar (5% acidity)
- 3 1/2 cups water
- 1/2 cup granulated sugar
- 1/4 cup Diamond Crystal brand kosher salt
- 3 tablespoons diced sweet onion (1/8 inch | 3 mm)
- 6 fresh bay leaves
- 1 tablespoon crushed red pepper flakes
- 1 1/4 teaspoons ground turmeric
- 1 teaspoon celery seeds
- 2 tablespoons dill seeds
- 1 1/2 teaspoons yellow mustard seeds
- 9 black peppercorns
- 3 garlic cloves, peeled
- 9 large fresh dill sprigs
- 3 pounds fresh beans, such as greasy, cut-short, half-runner, or Turkey Craw, washed, strings removed, and trimmed to fit the jars if necessary
Instructions
- In a large, nonreactive saucepan over high heat, combine the vinegar, water, sugar, salt, onion, bay leaves, red pepper flakes, turmeric, and celery seeds and bring to a boil, stirring to dissolve the sugar and salt. Turn off the heat.
- Into each sterilized jar, put 2 teaspoons of the dill seeds, 1/2 teaspoon of the mustard seeds, 3 peppercorns, 1 garlic clove, and 3 dill sprigs. Fill the jars with the beans, standing them up vertically, and ladle over the hot pickling liquid, leaving a 1/2-inch (12-mm) headspace. Wipe the rims and threads clean. Place the lids and rings on the jars and finger-tighten the rings.
- Process the jars in a boiling-water bath for 13 minutes, adjusting for altitude if necessary. It's important that the jars seal properly and a vacuum forms. If any jars didn't seal, you must store them in the refrigerator.
☞ TESTER TIP: Remove the bands from your jars before storing to prevent rust or mold from forming under the bands.
- Allow the beans to cure for 1 week before eating. Properly sealed, the beans will keep in a cool, dark place for up to 6 months. Refrigerate after opening.
Notes
*How do I sterilize jars for canning?
Fill a large canning pot fitted with a rack three-quarters full with water. Place your canning jars and rings in the pot and bring the water to a boil over high heat. When the water has come to a boil, set a timer for 5 minutes. Remove from the heat and cover the pot. Meanwhile, put the lids in a saucepan of hot water and heat until the water reaches 180°F (82°C). (Never boil the lids, because the sealant material may get damaged and then won’t produce a safe seal.) Remove from the heat and cover the pan. Lay a clean kitchen towel out on the counter or set out a wire rack. When you’re ready to fill the jars, using canning tongs, remove them from the pot and invert them onto the towel or rack. Leave them there for 1 minute, then turn them right side up and fill them. You want the jars to be hot when you put the food into them. Use tongs to remove the lids and rings and shake off the water before putting them on the jars.
Nutrition
Nutrition information is automatically calculated, so should only be used as an approximation.
Recipe Testers’ Reviews

I made these dilly beans 10 days ago and finally opened them this afternoon. They are SO good, even better than I had imagined. I do a lot of preserving but I still find that vegetables never come out the way I envision them. These, however, absolutely exceeded my expectations. They’re crisp and fresh with an amazing flavour–perfectly spiced and not too vinegary tart.
I could only find “ordinary” green beans at the grocery store but they still looked good. I do look forward to making these again in the summer when I can try different kinds of green beans from the farmer’s market.
The recipe is easy to follow and all the ingredient amounts were appropriate. I used dill pollen instead of dill and it really packs a powerful dilly punch; I knew this going in and used it because I do love the flavour. I bought the dill pollen about a month ago and couldn’t wait to try it, this recipe was the perfect reason.
I made the full three 1-quart jars and processed them according to the directions. The first jar is well on its way to being devoured but I have hidden the other 2 in the pantry for a crunchy, surprise snack. I am so pleased that I’ve discovered that I can indeed make pickled vegetables that I’ll actually eat! This recipe is quick and easy but you’d never know from the results. I’ll definitely make these again and again.

These dilly beans are definitely worth making. The final product is crunchy, tart, and spicy… and the ways to enjoy them is endless. They make a great side for ham. In the future, I will be sneaking them into creamy potato salad, adding them to my charcuterie boards, and serving them alongside cocktails. The hardest part of this recipe is waiting a week for them to cure. I’ll be stocking up on these so I can enjoy them all year long!
Like many people, I enjoy shopping for produce at the local farmer’s market. During this morning’s visit, I bought garden fresh green beans for this easy recipe. The only challenge of the recipe is having to wait one week before being able to enjoy the dilly beans!
It’s worth the wait. These beans are delightfully dilly. We were invited to a BBQ dinner and I took a jar so everyone could try them too. They liked these dilly beans a lot.


Thanks for this! I just opened a jar I did myself without a recipe and the vinegar ratio sorta took my breath away. I need a bit more guidance. Wouldn’t want to wreck a perfectly nice Bloody Mary with a bloody disastrous green bean!
Re: canning: I long for the days when dishwashers had a “dry” cycle. It was great to run the cycle to clean the jars and lids and just leave them waiting patiently in the dishwasher on the “dry” cycle. Now I take them from the dishwasher and put them on wire rack on a cookie sheet in a 200˚ oven while I prepare whatever the product is. The lids should be compound side up in a single layer with nothing in contact with the compound. They can sit ready for me to fill them at a temperature approximate to whatever I’ve boiled then simmered.
When the jars come out of the water bath they go back on the wire rack to cool. I don’t know when the last time I lost anything to thermal shock is.
Finally, I always attempt to pick up each jar by just the lid with the screw-on rim removed when they’ve cooled slightly. If the lid is loose, I clean the rim of the jar and the lid and put that jar back in the water bath a second time. I’ve never had a second failure to seal but, of course, if anything isn’t completely sealed it could go in the fridge for immediate use.
One final thought. It’s one of nature’s cruel ironies that all the fresh produce comes in the summer when a hot humid kitchen is really the last thing you want. I use the burner on my BBQ for my water baths. I can fill the big enamel pot quickly with a water hose and the gas burner on my BBQ is hotter than my stove top. Meanwhile. all that steam is outside where it belongs!
Thanks, Rainey! Some great suggestions there. I love the idea of sticking your canner on the bbq! Every year I buy 40 lbs of peaches to can, and without fail it’s always the hottest week of the year. Definitely one of nature’s cruel ironies.