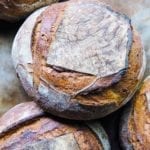
Pain au Levain
This pain au levain is an authentic French-style sourdough made with flour, water, sourdough starter, and plenty of patience. Its distinct tang and chewy crumb are well worth the wait.
Equipment
- Bowl scraper or bench scraper; baking stone
Ingredients
For the wake-up feed
- 7 ounces mature sourdough starter (levain), made at least 1 week in advance
- 1 1/2 cups (7 oz) all-purpose flour
- 1/2 cup (4.2 oz) lukewarm water (90°F | 32°C)
For the final feed
- 5.8 ounces sourdough starter (levain)
- 3/4 cup (5.8 oz) all-purpose flour
- 1/3 cup (2.8 oz) water
For the dough
- 5 cups plus 2 1/2 tablespoons (23.3 oz) all-purpose flour, plus more for dusting
- 1 1/2 cups (6 oz) whole spelt flour
- 5 tablespoons (1.2 oz) whole rye flour
- 1 tablespoon plus 2 teaspoons (1 oz) salt
- 3 cups (24 oz) water
- Rice flour, semolina, or all-purpose flour for dusting
Instructions
Wake up the starter
- If you have a starter that you’ve been maintaining but that isn’t active, place the starter in a clean bowl and mix in the flour and water by hand, stirring and blending with your fingers, until well incorporated. Cover with a tea towel and let ferment at room temperature for 8 to 10 hours.
If your starter is already active, proceed to step 2.
Give the starter a final feed
- About 3 hours before you want to make your bread dough, place the starter in a clean bowl and mix in the flour and water by hand, stirring and blending with your fingers, until well incorporated. Cover with a tea towel and let ferment at room temperature for 3 hours. You will use all of the starter (levain) from this feed in the dough.
Make the dough
- In a large bowl, combine the all-purpose, spelt, and rye flours, and the salt. Divide the starter into 6 pieces and scatter them on top of the flour. Make a well in the center of the flour and add the water.
- Using your fingers, start to blend the water and starter into the flour with your fingers. As the flour begins to absorb the water and the mixture starts to thicken, plunge both hands in and gently squeeze the dough. Work the water into the flour first since the starter is already hydrated. Then start to work the starter into the moistened flour as you squeeze. Work from the side of the bowl closest to you across to the other side, squeezing with both hands. Rotate the bowl a quarter turn and squeeze your way through the dough again. You will feel the dough starting to come together as a more cohesive mass as the water and starter become more fully incorporated. Use your bowl scraper from time to time to scrape the sticky dough from the sides of the bowl into the center.
- Keep rotating the bowl and squeezing the dough until everything is fully incorporated, 1 to 2 minutes. It will remain a shaggy and sticky mass. The dough should have a definite give but also some resistance and you should be able to feel a core when you squeeze it.
- Turn the dough onto an unfloured work surface, using the bowl scraper to get it all out of the bowl and scraping as much off your hands as you can.
☞ TESTER TIP: The dough will be very wet. This is normal for pain au levain. Resist the urge to add more flour.
- Starting with the edge of the dough closest to you, grab it with both hands, palms down, and pull it gently toward you. Stretch it up and flip it over the top of the dough mass by 2 or 3 inches (5 or 8 cm) and press it back into the surface of the dough. Grab the new edge closest to you and stretch it gently up and flip it over the top. Repeat this stretching and flipping of the dough 4 or 5 times, working your way to the far side of the mass. The stretches should be gentle enough not to tear the dough apart. As you continue this process, the dough will start to hold together better and be easier to stretch though it will still be very sticky.
- Scrape up the dough with a dough scraper, rotate it a quarter turn, and repeat the stretching and flipping through the dough mass 4 or 5 times for a total of 3 to 5 minutes. With each stretch and flip of the dough, you will feel it developing and becoming more cohesive and less sticky. When most of the dough holds together and pulls off the work surface as you stretch it, slide the dough scraper under it and gather it into a ball. The dough will not be fully developed yet and will still be a little sticky.
- Cup your hands around the bottom of the far side of the ball and pull it gently toward you, allowing the dough to grip the work surface, then move your hands to the left rotating the dough counterclockwise. Return your hands behind the dough and pull and rotate again 1 or 2 times. This will tighten the surface and help shape the dough into a smooth ball.
- Return the ball to the bowl with the smooth side up and let it rest for 15 minutes.
- On a lightly floured surface, place the dough smooth side down and gently press out the dough to flatten it into a round about 2 inches (5 cm) thick. Grab the edge closest to you and stretch it up and over the top of the dough, about 2/3 of the way to the opposite side and then press it into the surface. Grab the edge opposite you and stretch and fold it toward you over the first fold, about 2/3 of the way to the closest edge, and press it into the surface. Rotate the dough a quarter turn and repeat 2 more folds, one away from you and one toward you.
- Turn the dough over so the seam side is down. Form a ball by cupping your hands around the bottom of the far side of the dough and pulling it toward you, rotating the dough counterclockwise. Repeat once or twice to form a ball. The dough will be more developed and will stretch tighter than before. Be careful not to stretch it too tight; if the surface starts to tear, stop tightening. Return the ball to the bowl, smooth side up, and let rest for 15 minutes.
- Repeat this stretching and folding 3 times at 15-minute intervals for a total of 4 folds over an hour.
- After the final fold, return the ball to the bowl smooth side up, cover with a tea towel or plastic wrap, and let sit in a warm, draft-free place until the dough has doubled in volume and feels airy when gently touched, about 1 hour.
- Turn out the dough on a lightly floured surface, smooth side down. Press it gently to flatten a bit until it is about 2 inches thick. It’s okay to press out some of the gases, but do it gently and not too thoroughly. Grabbing the edge opposite you, stretch the dough and fold it over the top, about halfway toward you. Gently press the dough down, then stretch the edge closest to you and fold it over the first fold. Press it in gently. Rotate the dough a quarter turn and repeat 2 more folds, one away from you and one toward you.
- Turn the dough over so the seam side is down. Cup your hands behind the dough and gently pull it toward you to stretch the surface. At the same time, move your hands to the left, rotating the dough counterclockwise about a quarter turn, rounding it. Repeat once or twice to form a ball. Return the ball to the bowl with the smooth side up and cover again with a tea towel or plastic wrap until it doubles in volume again, anywhere from 30 minutes to 2 hours, depending on the warmth of your kitchen.
- On a lightly floured surface, place the dough smooth side down and use your scraper to divide the dough into 2 equal pieces.
- Gently press 1 piece of the dough to flatten it into a rough circle about 1 inch (25 mm) thick. Grab the edge opposite you and stretch it up and over the top of the dough, about 2/3 of the way toward you. Gently press into the surface with the heel of your hand. Rotate the dough a quarter turn and grab the edge opposite you again, stretching and folding it over the first fold, about 2/3 of the way toward you, pressing it gently. Repeat two or three times until you have a loose ball shape and then turn the ball over so the seam side is down.
- Cup your hands behind the ball with your pinkie fingers and the sides of your hands on the table, then gently pull your hands toward you. At the same time as you are gently pulling, move your hands to the left, causing the ball to rotate counterclockwise about a quarter turn. The dough should grip the table and the surface will tighten. Move your hands behind the ball again, pulling gently and rotating the ball. Cover with a tea towel and repeat with the second piece of dough. Let the dough rest for 15 to 20 minutes so the gluten relaxes a bit.
- Turn the first ball over so the smooth side is down and gently press the ball a bit. Stretch and fold the opposite edge about 2/3 of the way toward you and press into the dough with the heel of your hand. Rotate the dough a quarter turn and stretch and fold another flap about 2/3 of the way toward you over the first flap and press it in. Repeat 3 times and then turn the ball over so the seam side is down. Cup both hands behind the ball so that your pinkie fingers and the sides of your hands are touching the table and pull the dough ball toward you. At the same time, move your hands to the left so that the ball rotates counterclockwise about a quarter turn. Move your hands back behind the ball and repeat pulling and rotating the ball, stretching and tightening the surface of the dough. Keep rounding until you have a smooth, tight surface and a nice round shape, taking care not to pull so hard that the surface tears. Repeat with the second ball of dough.
- Evenly flour 2 bowls or proofing baskets with a light coat of flour. Invert the balls into the baskets so that the seam side is up.
- Preheat the oven to 500ºF (260°C) with a baking stone in the middle rack and steaming pan or cast-iron skillet on the lowest rack set below the stone.
- Cover the loaves with a towel and let rise until they feel lighter and full of air, 1 to 2 hours.
- Dust a peel or a rimless baking sheet with rice flour and turn out one of the proofed loaves onto the peel with the seam down close to the front edge of the peel.
- Using a funnel, carefully pour about 1⁄4 cup water into the cast iron skillet and quickly close the door. Let the steam settle for 30 seconds or so while you score the loaf.
☞ TESTER TIP: If you don’t have a funnel for getting water to your steam pan, fear not. Just open the oven door and pour the water into the pan as quickly as possible and close the door.
- Use a razor blade or sharp knife to evenly score the loaf with cuts about 1/8-inch (3-mm) deep.
- Open the oven and place the tip of the peel on the baking stone where you want the loaf to end. Leave room for the second loaf if the stone is large enough; center the loaf if it is not. Quickly pull the peel out from under the loaf, letting it drop onto the baking stone. Close the oven door immediately. If your stone can fit 2 loaves, quickly score the second loaf and place it onto the baking stone. If not, refrigerate the second loaf until the first is finished baking.
- Add 1 cup water to the skillet and quickly close the oven door. Reduce the oven temperature to 450ºF (232°C). Bake until the crust is a deep brown color and the loaf sounds hollow when it’s tapped on the bottom, about 35 minutes. If it still gives a heavy thud, return it to the oven for 5 to 10 minutes.
- Cool the bread on a wire rack before slicing.
Notes
Shop The Look
Love the look? Click to bring the LC Lifestyle into your home. 3 1/10 Quart Multi Bowl by Le Creuset 18-inch by 40-inch Turkish Tea Towel by Turkish DoweryNutrition
Serving: 1slice | Calories: 219kcal | Carbohydrates: 44g | Protein: 7g | Fat: 1g | Saturated Fat: 0.1g | Monounsaturated Fat: 0.04g | Sodium: 597mg | Fiber: 4g | Sugar: 0.1g