


I have an odd habit when it comes to food. Certain recipes remind me of certain people. I’m sure there’s some scientific explanation for this, but I prefer my Theory of the Heart. It’s as if I’m conjuring these people in the kitchen when I cook. My white chocolate cake with pistachio buttercream frosting brings to mind my friend Carlotta, as does my lemon curd cake, American’s Test Kitchen’s beef in Barolo, and all things coconut. Anything chocolate is The One—all the better if it’s chocolate and peanut butter. Shrimp and leeks is my not-quite-legal sister-in-law, Diane (I call her that because, as most of you know, The One refuses to marry me). The wintry snowflake cake evokes my niece, Megan. Yes, sometimes I even talk to them in absentia. And no, it’s not dementia.
These bow tie cheese straws are all about our dear friend Deborah, who passed many years ago. I haven’t made them since she died. It would be too painful. To have her sitting on the counter or hovering over my shoulder (I’m not quite sure exactly where the dead hover as they watch you cook), yammering away as I mix, fold, roll, and cut, would be too painful.
Every time The One and I would invite Deborah and her husband, John, over for dinner, she’d call me and ask, “Is it jacket and tie time?” That was code for, Are you making those bow tie cheese straws? She adored them. She’d bluster into the house, smacking kisses on cheeks, and head straight for the living room, where she knew a bowl of the cheese straws would be waiting for her.
“These are the cutest things!” she’d say each time as if she were seeing them anew. While I popped the cork on a bottle of bubbles—The One and I never start a party without bubbles—she’d snag one and wiggle it at her neckline. Edible attire. They became forever entwined with the memory of Deborah.
I created the bow ties cheese straws quite by accident. I used to make long, slender cheese straws. Everyone, including Deborah, loved them. But it pissed me off that they were always breaking, leaving guests to forage for the shards in the bottom of the vase I served them in or, worse, shooting me an apologetic look as they attempted to sweep up the bits and bobs that fell on the floor. That’s when I came up with the idea of bow ties. Wham! No more breakage.
We had guests to dinner last week, and when The One suggested I make Deborah’s bow ties, I relented. “Damn you for leaving,” I thought as I carefully cut out the rectangles of dough. It had happened so fast, none of us could wrap our heads around it. When she was in the hospital and refused to see any of us—her vanity got the best of her—I still visited. To respect her wishes, I just sat in the waiting room, hoping she would somehow know I was there. I didn’t bring any bow ties or The One’s old family recipe for potato salad (that is, the Hellmann’s recipe), which she also loved. She wasn’t conscious anymore. Seeing me bereft, a nurse escorted me back to the ICU and let me sit in the hall, just across from her open door. I couldn’t see Deborah’s face, just her arms and legs, which looked thin and suddenly terribly old. The sense of free falling was overwhelming. I was feet from my dear friend yet I couldn’t attain closure. I needed one last look, one last crack about her obsessive need to cook for 20 when she was having only eight people for dinner, one last chance to plan lunch right after eating breakfast together at that place on Columbus Avenue.
Several days later, it was jacket and tie time for real. And just like that, a recipe died with a friend. Until now. Deborah, I promise I will once again make these often, and each time, I’ll let the ghost of you barge into my kitchen, leaning on the counter as you catch me up on the latest gossip, show me endless photos of your granddaughter (Do you know you also have a new granddaughter?), and peer into the oven expectantly.

Bow Tie Cheese Straws
I hate to use that terribly overused word “addictive,” but, cross my heart, that is exactly what these bow tie cheese straws are. There’s a marvelous light crunch that gives way to an intense cheesiness and, wait for it, wait for it–ahhh–that tickling burn in the back of the throat. If you can bear to part with any, these make great holiday gifts. (Hint, hint.) Bake up a batch, carefully fill a cellophane bag with a dozen or two, and tie with raffia or a colorful ribbon. If you’re looking for some fun gift tags, we’ve got you covered with our Gift Tag Collection I and Collection II. Just print them on cardstock, cut them out, and feel the love.–David Leite
LC Not Older, Just Hotter Note
If there’s one thing we can appreciate, it’s a crowd-pleasing recipe that can be made in advance. This bow tie cheese straws recipe is exactly that. The dough can last up to five days in the fridge and be rolled at a moment’s notice. Just be warned, the longer the dough sits, the spicier the bite. We’re guessing the cayenne blooms, in a manner of speaking. We like to think of it as the dough being not older, just hotter. Deborah, of all people, would appreciate that.
Bow Tie Cheese Straws
Ingredients
- 2 1/4 cups all-purpose flour
- 1 3/4 teaspoons kosher salt
- 1/2 teaspoon cayenne pepper, more if you can take it
- 2 sticks well chilled unsalted butter, cut into 1/2-inch (12-mm) cubes
- 1 cup grated aged white Cheddar cheese, packed
- 1/2 cup grated orange Cheddar cheese, packed
- 1/2 cup grated Parmigiano-Reggiano cheese
- 6 tablespoons ice water
Instructions
- In the bowl of a food processor, blitz the flour, salt, and cayenne pepper until combined. Drop in the butter cubes and pulse until the butter is the size of peas, about 10 one-second pulses.
- Dump the flour mixture into a bowl. Add the cheeses and toss until well combined. Drizzle in the water, 1 tablespoon at a time, fluffing and stirring with a fork. Squeeze the dough with your fingertips. If it sticks together, great. If not, add a little more water, a few drops at a time, until it does stick, making sure to add no more than 1 or 2 tablespoons additional water.
- Lightly dust a work surface with flour and dump the dough onto it. Gather and press the dough into a rectangle that measures 12 inches by 6 inches, with the shorter side facing you. The dough will be crumbly and pathetic-looking. Just saying. Persevere.
- Using a pastry scraper, fold the top 1/3 of the dough towards you and then fold up the bottom 1/3 to cover as if you were folding a sheet of paper to go in an envelope. You should have 3 fat layers. The dough will break and fall apart along the seams. Again, press on.
- Turn the dough clockwise, so it looks sorta like a book. Roll the dough a second time into a 12-by-6-inch rectangle, and fold it in thirds again. Wrap the dough in plastic and let it rest in the fridge for 30 minutes.
- Position a rack in the middle of the oven. Crank the oven to 350°F (177°C).
- Remove the dough from the fridge and let it sit for several minutes. Roll and fold two more times as before. Cut the dough in half and return the unused half to the fridge. (You can refrigerate the dough for up to 5 days.)
- Lightly flour a work surface and roll the dough half into a rectangle 12 to 14 inches long horizontally. The dough should be a bit shy of 1/8 inch thick. Grab a pizza cutter and cut long horizontal strips about 1 1/4 inches wide. (A ruler is handy for this.) Then cut the dough in a vertical fashion to form strips that are 2 inches wide.
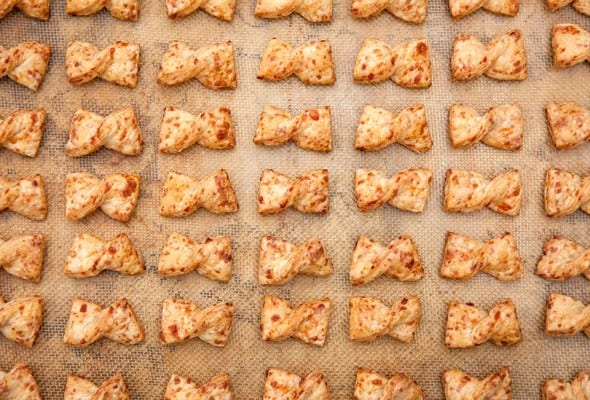
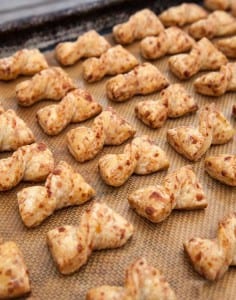
- On a baking sheet covered with parchment or a Silpat, line up the 1 1/4-by-2-inch rectangles like a battalion. Here comes the fun part: Give each rectangle a half twist, pressing down on both sides of the twist to anchor it. It should look like a bow tie.
- Bake the bow tie cheese straws for about 20 minutes or until light brown with dark freckles. They will crisp as they cool. These are best eaten the same day (hell, the same hour) they’re made.
An LC Original
View More Original RecipesNutrition
Nutrition information is automatically calculated, so should only be used as an approximation.


3 generations of us worked to make these happen for a Thanksgiving appetizer. WHOA but they were good, especially when still warm!
That’s wonderful, Pat. We’re delighted that you loved them.
I love cheese straws but usually get them premade. These look so much better.
I hope you give them a try, Christy.
Christy, they are!! And they are sooooo wicked good!
Are the final steps done by hand so as not to mix the cheese in fully, wondering why processor isn’t used (“stiff” fingers, prefer machine mixing but not if it compromises recipe). To make in advance would you suggest baking/freezing reheating or after shaping, freezing unbaked? Thank you.
Den, finishing the dough by hand will give you lots of light flaky layers and won’t break down the cheese, as you mentioned. This will give you crispy cheese straws that aren’t greasy. As for preparing in advance, I haven’t tried it, so I can’t say for certain, but I’d recommend making and shaping them and then storing them unbaked in your fridge for a day or so, or your freezer for longer. If they’re frozen, let them thaw before baking.