TL;DR (Quick-Answer Box)
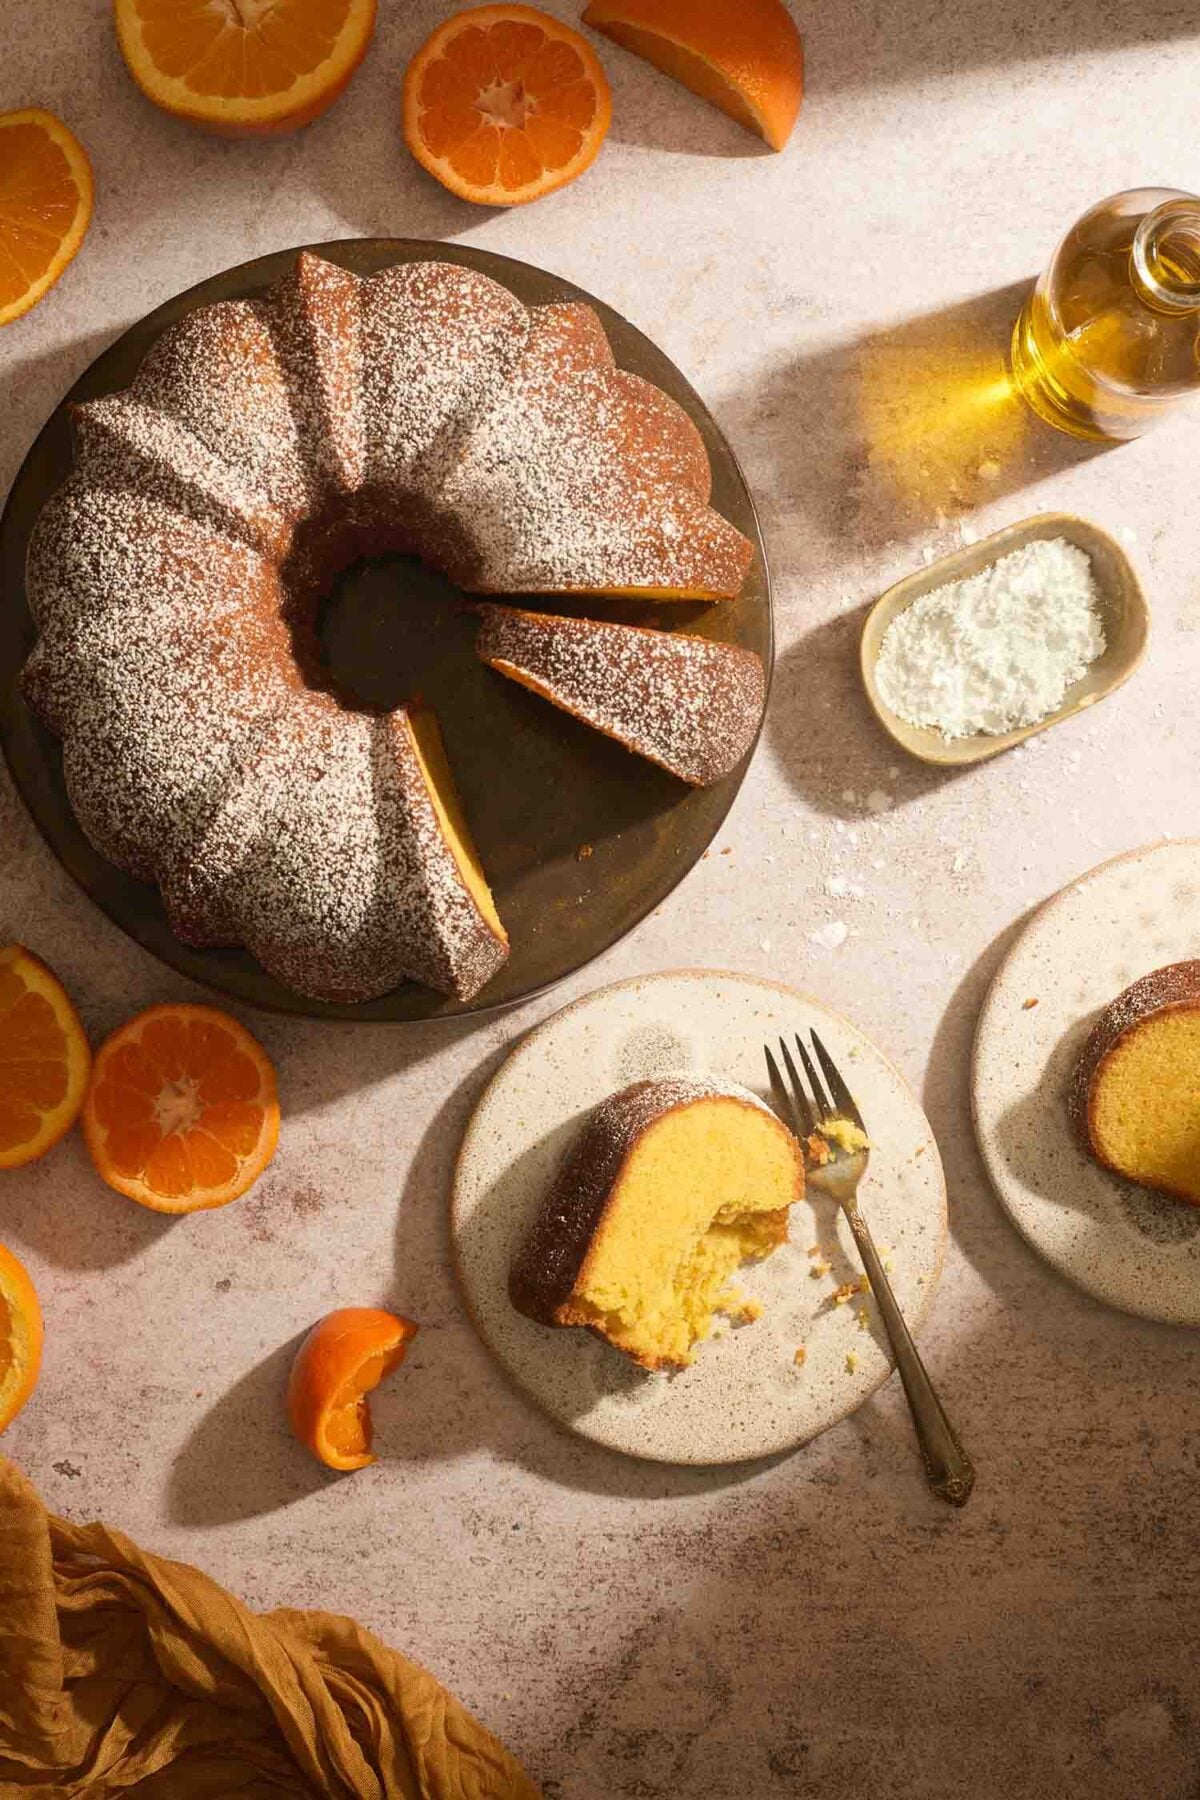
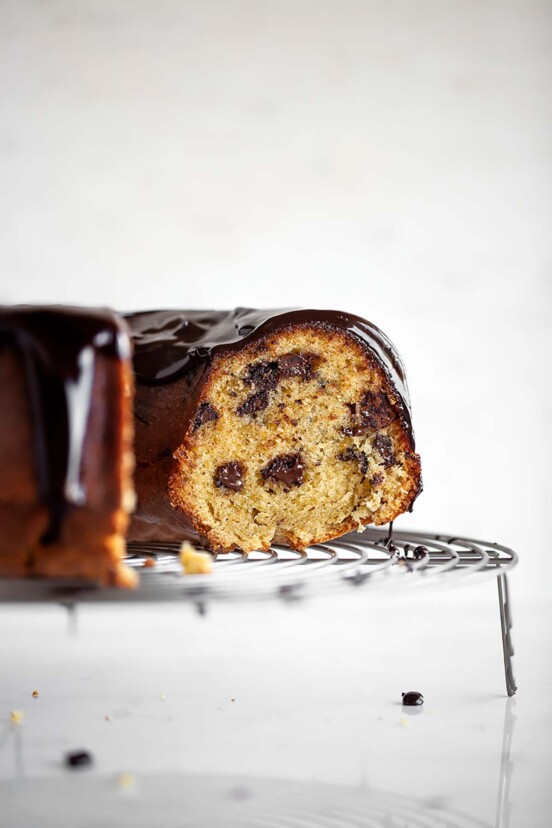
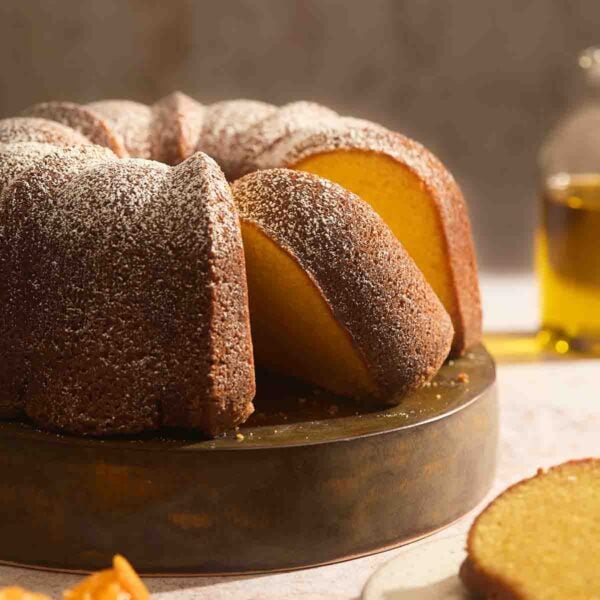
- What it is: A dense, moist Portuguese Bundt cake bursting with fruity olive oil, orange juice, and zest, finished with a delicate dusting of powdered sugar.
- Why you’ll love it: Well, first, who doesn’t love orange? And this has, without a doubt, the plushest texture of any cake I’ve ever made. It’s so amazing, it’s actually served in an elegant pastry shop in Paris. Last, it’s so easy to make, you don’t need to reach for the Xanax.
- How to make it: Zest oranges into sugar, beat with eggs. Alternate adding flour and olive oil. Drizzle in juice, bake, and let sit overnight. (I mean it.)

Jump To
- TL;DR (Quick-Answer Box)
- Why this olive oil cake recipe works
- Notes on ingredients
- Variations & shortcuts
- Cake Goop: No more stuck cakes
- How to make orange olive oil cake: For visual learners
- Your orange olive oil cake questions, answered
- Olive oil cake pro tips & troubleshooting
- What to serve with an olive oil cake
- Storage & reheating
- More tangy orange cake recipes
- Portuguese Orange Olive Oil Cake Recipe
- Recipe Testers’ Reviews
When I was living in Lisbon researching The New Portuguese Table, I lived just up the hill from the Sé Cathedral. Further up that same hill was a tiny, unassuming bakery, Papas, that lured me in every single morning. Their orange cake was a revelation: dense, moist, and practically vibrating with citrus. I took everyone who visited me there for breakfast, much to the bewilderment of the locals, for whom breakfast is usually just a shot of “jet fuel”—our nickname for their throat-scorching bica espresso.
I eventually begged for the recipe. They handed it over with a smile, but when Cindi Kruth (my tireless recipe tester) and I baked it back in the States, it was a disaster. The problem was that they gave me a recipe for a classic airy chiffon cake. Hysterical. Yet their mighty bolo de laranja was dense and rich, and one of the best citrus cakes I’ve ever eaten. One slice could satisfy even my appetite.
It took me 13 trials to get it right. Thirteen. I was at my wits’ end until I mentioned my frustration to my friend, the brilliant chef Fausto Airoldi. I asked if his mother or grandmother ever made cakes with olive oil, and his eyes lit up. He said it was incredibly common. That was the “aha!” moment.
The olive oil doesn’t just add moisture; it anchors the orange, turning a simple sponge into something sophisticated, silky, and—dare I say—sexy. It’s now traveled the world, even showing up in chic Parisian bakeries, but it’ll always taste like a Lisbon morning to me.
Chow,

Featured Review
I made this for dinner with my daughter’s Portuguese in-laws (ballsy, I know). It was a big hit with the whole family! Her father-in-law (who, as far as I can tell, doesn’t eat anything but his wife’s cooking, Portuguese restaurant cooking, seafood, and sardines) loved it. I will be making this again and again by acclaim, and the thanks go all to you. My cake was a bit darker than yours, but I think that’s because I baked it on convection at 325 degrees for the full hour and a quarter—and it was still good! I would send you a picture, but I only have a third of it left.
Catherine Priester

Why this olive oil cake recipe works
This is, without quibble or braggadocio, one of the best olive oil cakes you’ll ever make. Unlike other citrus cakes, this bolo de laranja is intentionally dense. Olive oil is a liquid fat that coats flour proteins better than butter. The result? Hoo-boy! A tight crumb that’s remarkably tender and stays moist for days. Rubbing the zest directly into the sugar before beating releases all that pent-up essential oil. And the sheer volume of fresh juice keeps the crumb outrageously moist without ever turning heavy.
Notes on ingredients
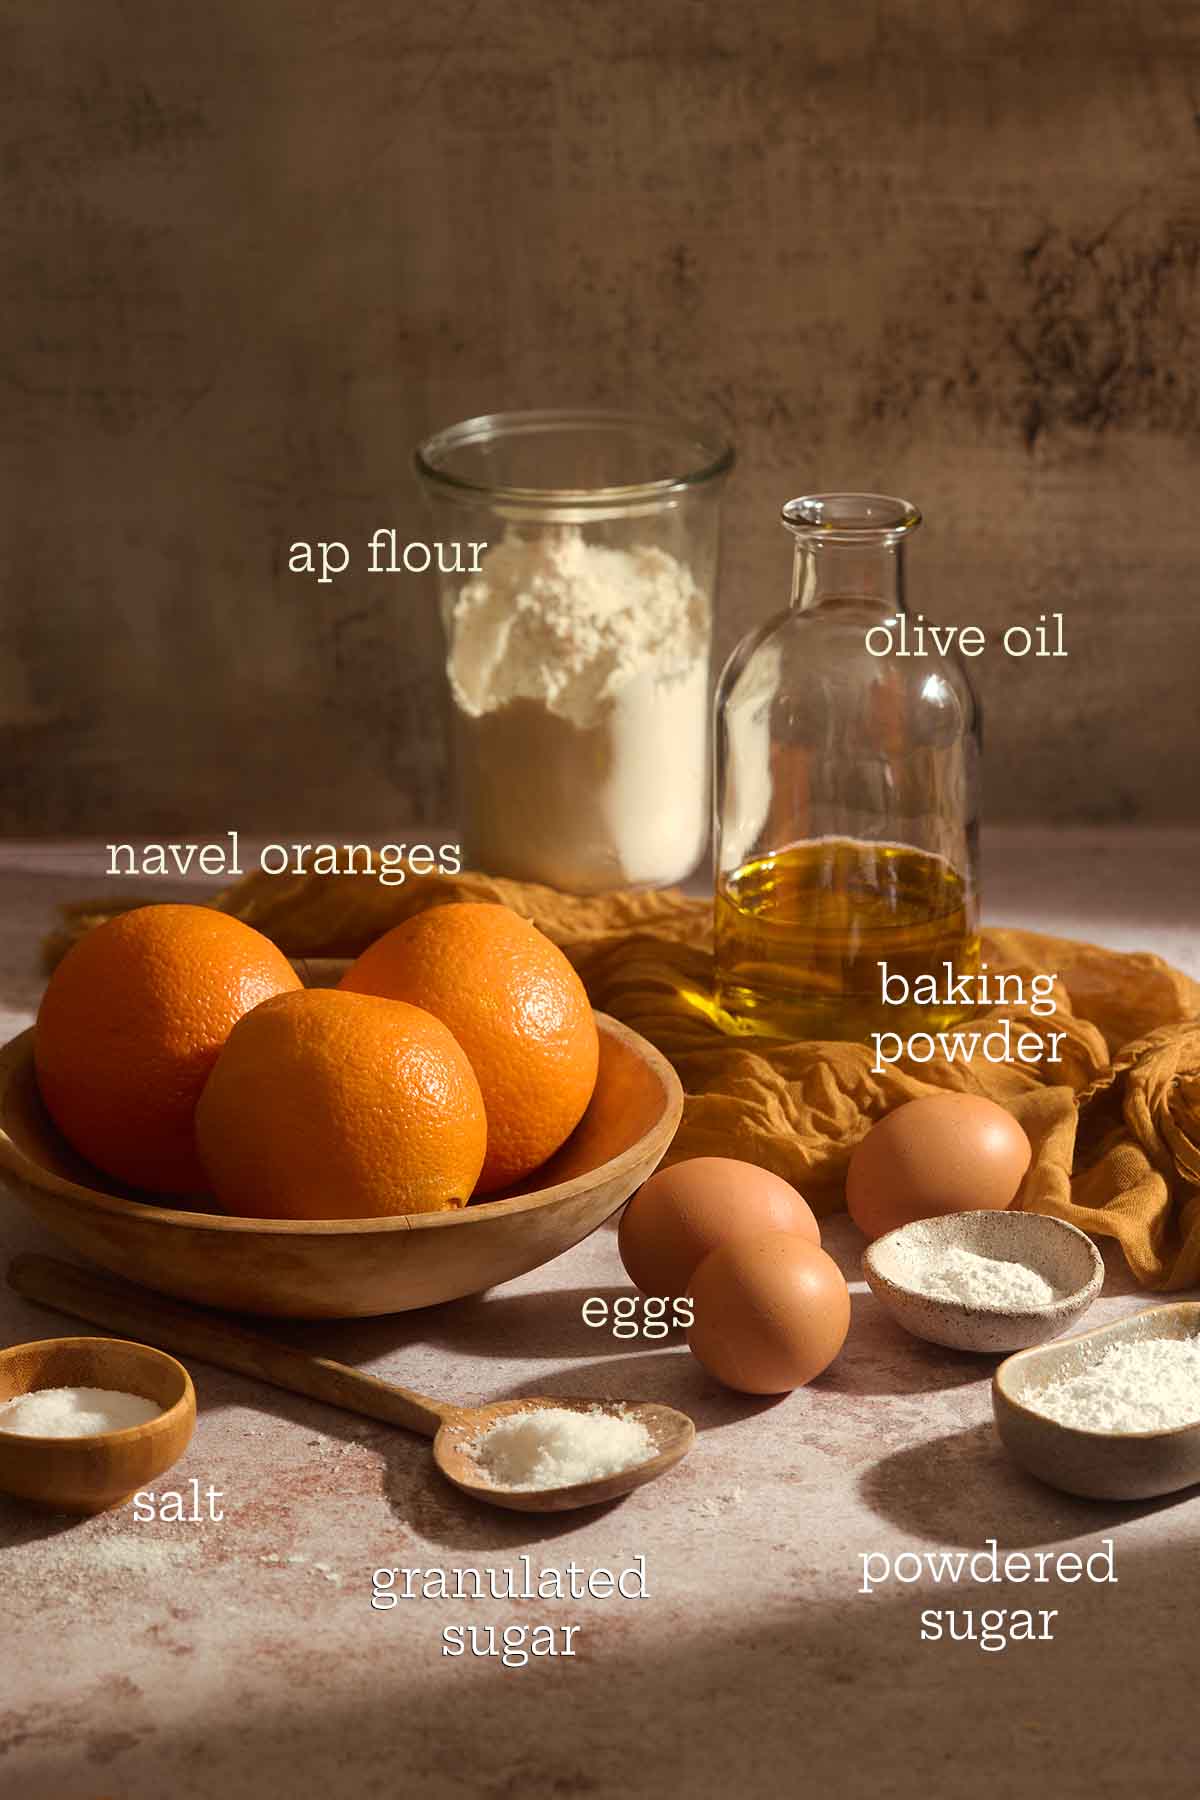
- Navel oranges—The big, heavy-for-their-size winter ones. You need the zest of 3 rubbed directly into the sugar—not stirred, rubbed, with your fingertips—plus the juice of 4 to 5. Don’t even think about bottled juice.
- Extra-virgin olive oil—Reach for a mild, fruity oil. Look for aromas of tart apple, apricot, pineapple, or banana—anything that suggests fruit. Avoid anything peppery; it will pick a fight with the orange and win. Bertolli, California Olive Ranch Arbequina, or my go-to, Kirkland Signature Organic Extra Virgin Olive Oil, work beautifully here.
- All-purpose flour—This hefty cake the sturdy structure it needs. Don’t swap in cake flour—you’ll lose the characteristic dense crumb that makes this cake what it is.
- Eggs—Make sure they’re at room temperature. Cold eggs won’t emulsify properly with all that olive oil, which can leave a dense, greasy layer at the bottom. Pull them out an hour before you bake. (If you’re in a rush, put them in a bowl of warm water for 5 minutes.)
Variations & shortcuts
Citrus swaps
Blood oranges give you a slight blushy interior and a wee more complex flavor. Cara Cara oranges are sweeter and stunning. Tangerines and mandarins both work—reduce the sugar by 1/4 cup, though. Swap zest and juice in equal measures for any of them.
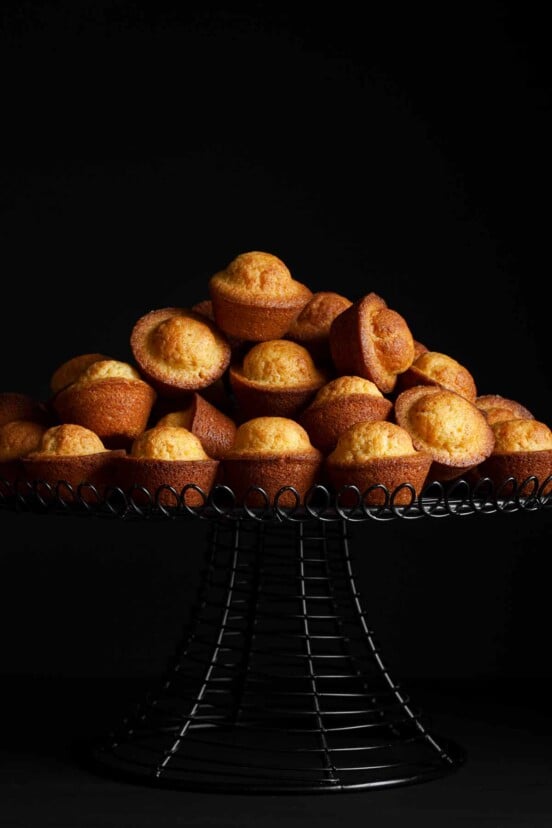
Mini Bundts or muffin tins
Bake the batter in mini-Bundt pans or a standard muffin tin—no liners, just very thorough greasing. Start checking at 20 to 25 minutes. The overnight rule still applies. (Resist, I tell you.)
Add a glaze
The powdered sugar is traditional and I think perfect, but if you want something with a bit more punch, whisk 1 cup of confectioners’ sugar with 2 tablespoons of fresh orange juice for a citrusy drizzle.
Cake Goop: No more stuck cakes
You should have seen me turning out that mutilated cake. The string of curses that came out of my mouth made even ME blush! There’s nothing that ruins a morning faster than a mangled cake.
That frustration led me to search for an answer: Cake Goop. It is the ultimate insurance policy for intricate Bundt pans like the one used here. It’s a little baking witchcraft that makes all the difference.
How to make Cake Goop
- Whisk 1/2 cup all-purpose flour (60 g), 1/2 cup vegetable shortening (90 g), and 1/2 cup vegetable oil (100 g) together until 100% smooth. That’s it.
- Brush it generously into every nook and cranny of your pan (as seen in Step 1 below).
NOTES
- Storage: I store it for up to 3 months at room temp or 6 months in the fridge. It works every single time.
- For gluten-free bakers, substitute King Arthur’s Measure for Measure Gluten-Free Flour.
- For chocolate cakes, substitute cocoa powder for the flour.
How to make orange olive oil cake: For visual learners
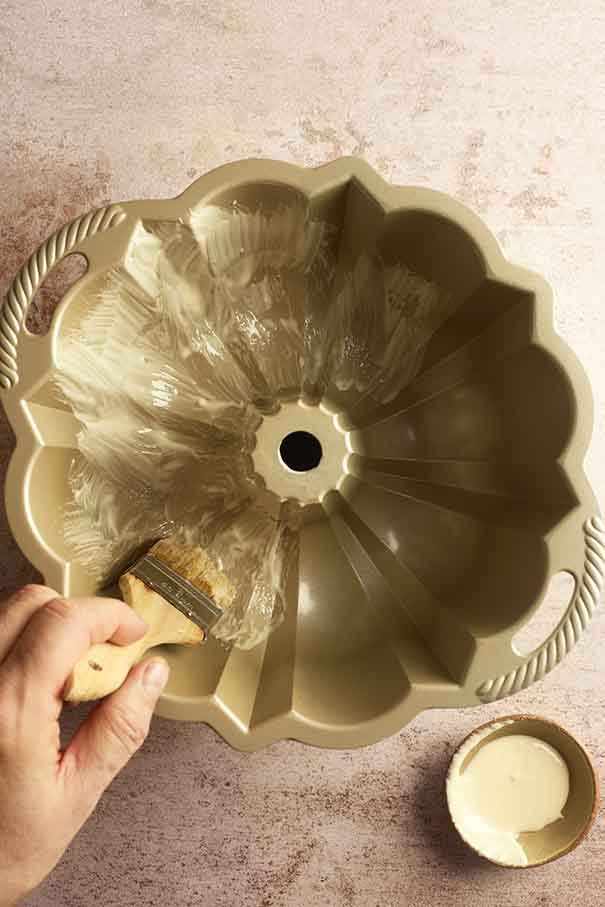
- Brush the Bundt pan with Cake Goop, working it into every ridge and crevice. Miss a spot, and the cake will remind you.
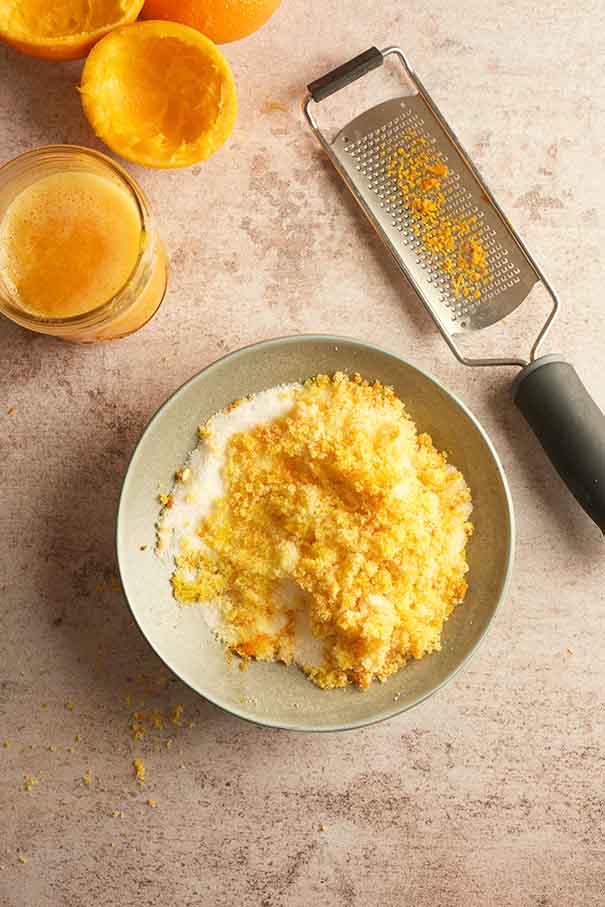
- Rub the orange zest into the sugar with your fingertips until it looks like damp, fragrant sand.
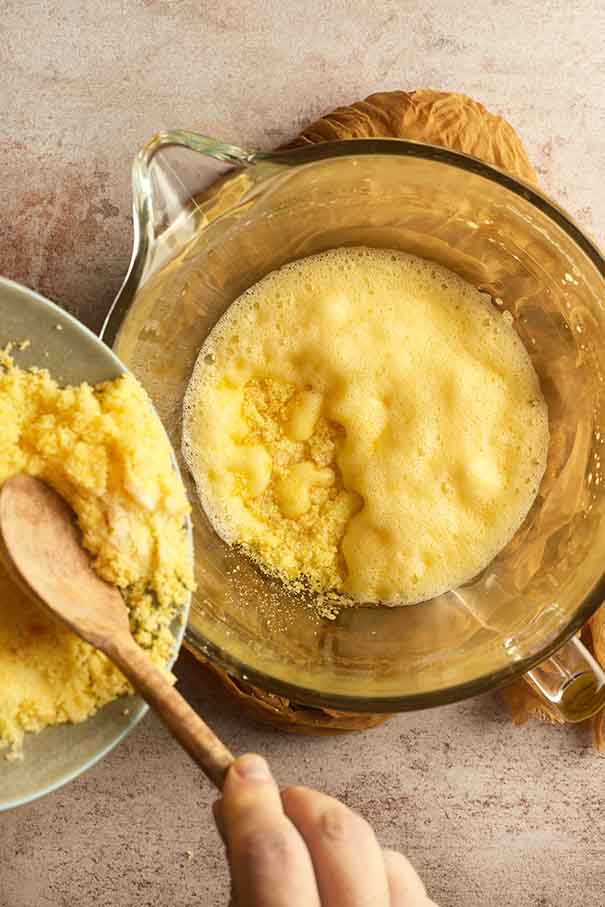
- Spoon the orange sugar slowly into the beaten eggs while the mixer runs.
- Beat until thick and pale yellow, falling from the beater in a slow, lazy ribbon.
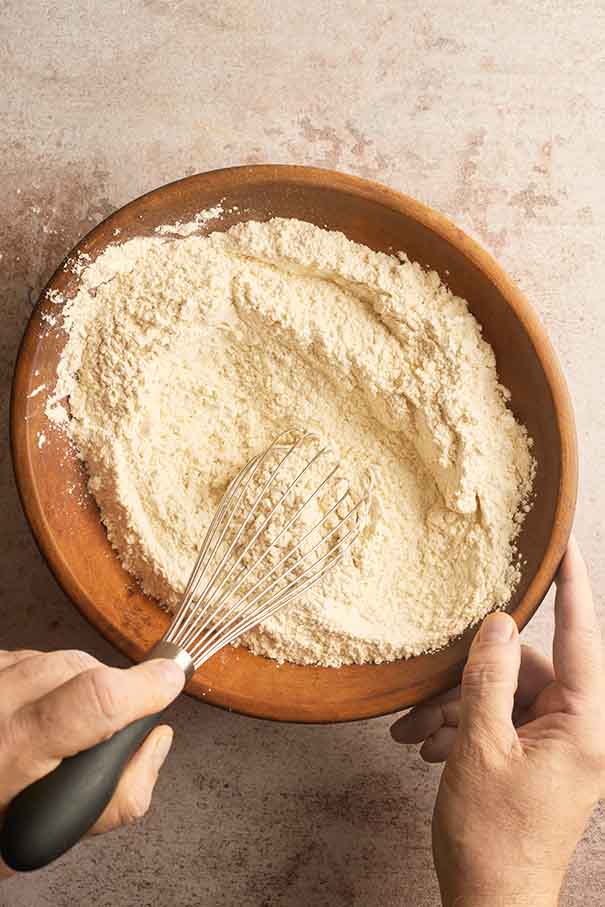
- Whisk together the flour, baking powder, and salt in a separate bowl.
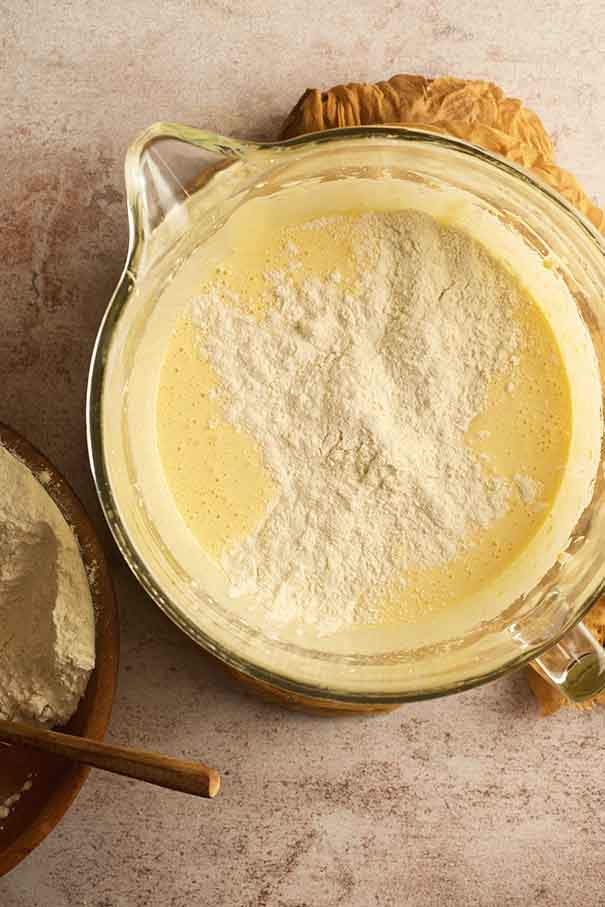
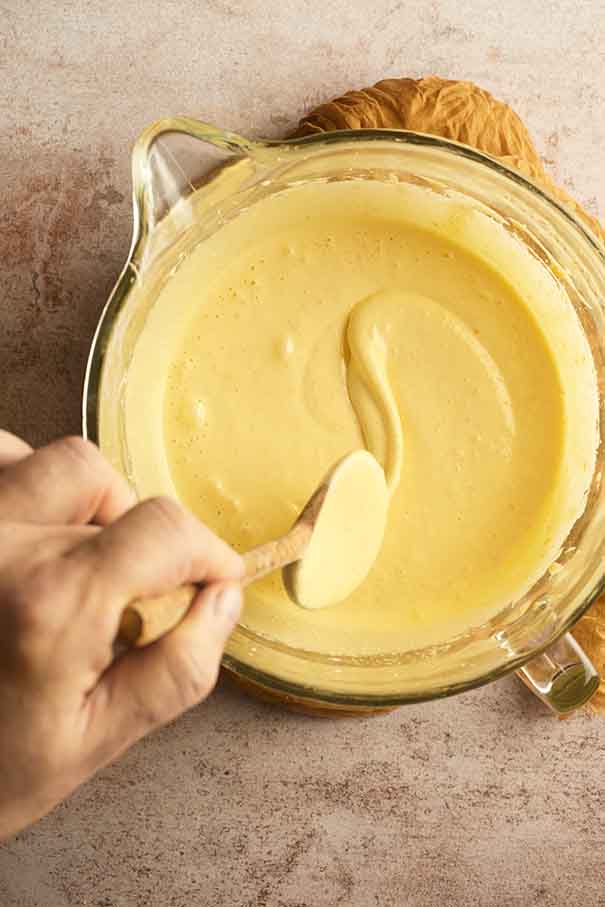
- Add some of the flour mixture and beat until just incorporated.
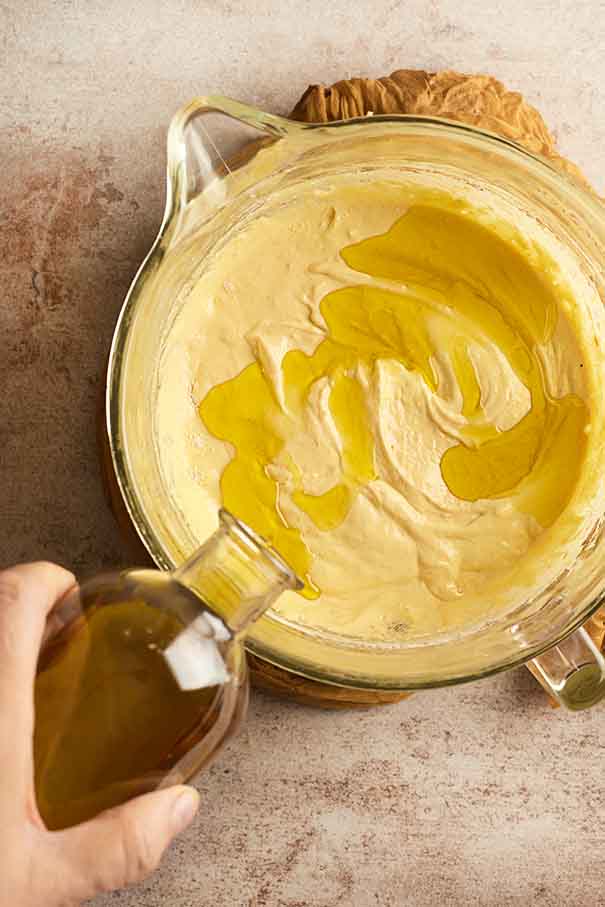
- Continue beating, alternating the olive oil and flour, ending with the flour, and beat until smooth.
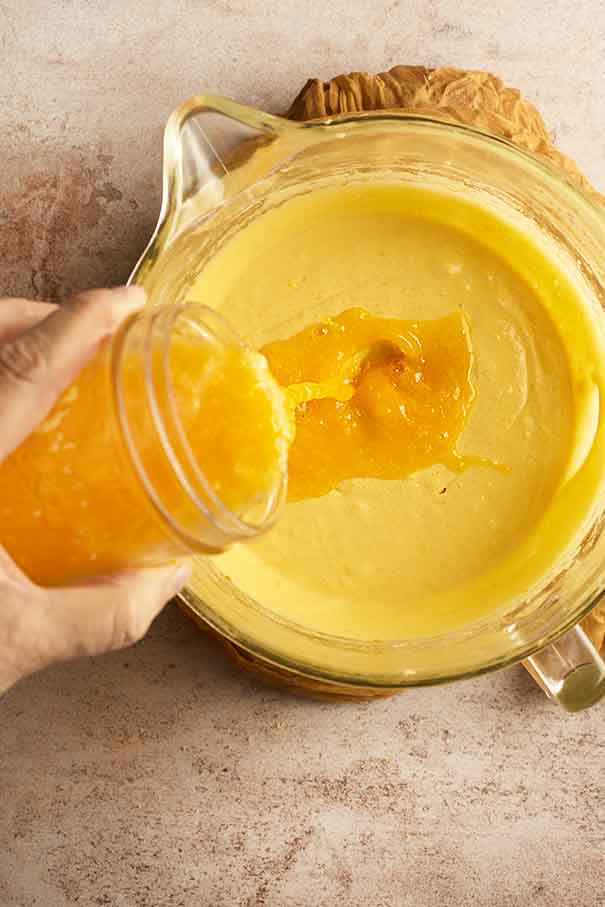
- Pour in the orange juice on the lowest mixer setting. The batter will be thin. Panic not. Scrape into the pan and bake.
Want to save this?
Your orange olive oil cake questions, answered
Well, technically, all olive oils are fruity—olives are fruit. But when it comes to this cake, “fruity” means the oil tastes like something you’d want to dip bread into: tart apple, apricot, pineapple, or banana on the nose. Fine-quality extra-virgin oils tend to land here. What you’re avoiding is pepperiness—that back-of-the-throat burn that will bulldoze the orange entirely.
As you know, I’m egalitarian when it comes to ingredients. I don’t care where they come from, as long as they work. And the oil I’ve used for decades… drumroll, please… is Kirkland Signature Organic Extra Virgin Olive Oil. It’s a blend of Mediterranean olives from several countries. It’s never let me down.
I know, I know. The smell is torture. And I’m the guy who told you you had to wait 36 hours before baking your chocolate chip cookies. I’m now considered the Marquis de Sadist Baker. It’s a title I gladly hold. But, yes, you really do have to wait 24 hours. The olive oil needs time to settle, and the orange flavor needs to “bloom.” Think of it this way: It is twice as good on day two, which means you’re only have to eat half to be equally satisfied. (Yeah, right.)
I don’t recommend it. A dark pan runs hotter, which browns the outside too much before the inside is done—and it makes sticking way more likely. Stick with a light-colored pan; Nordic Ware’s Anniversary Bundt Pan is the one I use since I developed this recipe back in 2007.
Totally! If you don’t have a 12-cup Bundt pan, you have two great options for baking the full recipe:
One 9-by-13-inch baking pan: Keep a close eye on it as it will rise right to the brim. Start checking for doneness around 40 to 45 minutes.
Two 10-inch round cake pans: These behemoths can safely handle the volume and lift of a split batch. Start checking for doneness around 40 to 45 minutes.
If you want to halve the recipe, use 3 large eggs and bake it in a 9-inch square pan or a 9-inch springform pan for about 50 to 55 minutes.
Yup, but carefully. Several readers have had success cutting it to 2 1/2 cups without a noticeable change in texture. Going below that starts to affect the structure and the characteristic caramelized crust. I’d hold the line at 2 1/2 cups. No less.
Three likely culprits: 1. You didn’t grease the pan thoroughly enough, 2. You left the cake in the pan too long after baking, or 3. Your pan is older and needs to retire. The 15-minute window after the cake comes out of the oven is critical. The cake’s structural enough to move but still warm enough to release cleanly. Set a timer. Seriously.
Absolutely. Blood oranges, Cara Cara oranges, Sumo Citrus, tangerines, mandarins… anything in the orange family works beautifully. I’d pull back on the sugar by about 1/4 cup for tangerines, which tend to run sweeter than navels. Meyer lemon is possible but trickier; the acid balance is different, and I haven’t landed on a tested ratio yet. Stay tuned
Olive oil cake pro tips & troubleshooting
☞ Room-temperature eggs matter
Cold eggs won’t emulsify properly with the olive oil, which can result in a dense, greasy layer at the bottom of the cake. Pull them out an hour before you start. (If you’re in a rush, place the eggs in warm water for five minutes.)
☞ Don’t overmix once the flour goes in.
Beat until just a few wisps of flour remain, then stop. Overworking the batter toughens the crumb.
☞ The juice goes in last, on the lowest setting
Pour it in slowly. Ask anyone who’s worn orange batter down the front of their cabinets.
☞ The 15-minute cool time isn’t a suggestion
When the pan comes out of the oven, set a timer for 15 minutes. Too soon and the cake won’t hold its shape; too late and the sugar welds to the pan.
What to serve with an olive oil cake
This cake is dense enough to stand on its own alongside a strong espresso—ideally a bica, if you want to feel like you’re in Lisbon. For dessert, a dollop of unsweetened whipped cream or a spoonful of mascarpone is exactly right. A chilled glass of Tawny Port wouldn’t be wrong, either. If you want to dress it up for a dinner party, macerated strawberries with a splash of Cointreau and a few cracks of black pepper are outrageously good alongside it.
Storage & reheating
Counter: Under a cake dome, this keeps beautifully for 3 to 5 days at room temp. In fact, it only gets better.
Fridge: If you must refrigerate, wrap it tightly in plastic for up to a week. Always bring it back to room temperature before serving.
Freezer: Wrap individual slices in plastic wrap, then foil. They’ll keep for up to 3 months.
Reheating: Ten seconds in the microwave, and it tastes freshly baked.
More tangy orange cake recipes
Featured Review
I’ve been making this delicious cake… for years now, but it makes a lot for us two retired folks. So I tried halving the recipe using 3 eggs and our 9-inch USA square cake pan, and the results were perfect! It was done in 50 minutes. We like the Cara Cara navel oranges here, also delicious.
Lowandslow
Portuguese Orange Olive Oil Cake
Video
Equipment
- 12-cup light-colored Bundt or tube pan (A dark pan will turn out a cake that sticks and is unpleasantly brown. I use Nordic Ware's Anniversary Bundt Pan.)
Ingredients
- Cake Goop, (above), or nonstick baking spray with flour
- 4 to 5 large navel oranges
- 3 cups granulated sugar
- 3 1/2 cups all-purpose flour
- 1 1/2 teaspoons baking powder
- 1 3/4 teaspoons kosher salt
- 5 large eggs
- 1 1/2 cups mild, fruity extra-virgin olive oil
- Confectioners' sugar, for sprinkling
Instructions
- Position a rack in the middle of the oven, remove any racks above it, and crank up the heat to 350°F (180°C). Coat a 12-cup Bundt or tube pan with Cake Goop or baking spray and set aside.
- Finely grate the zest of 3 oranges into a medium bowl and rub it into the 3 cups granulated sugar with your fingertips. Set aside.
- Squeeze the juice from 4 oranges. You should have 1 1/2 cups of orange juice; if not, squeeze the fifth orange.
- In a large bowl, whisk together the 3 1/2 cups all-purpose flour, 1 1/2 teaspoons baking powder, and 1 3/4 teaspoons kosher salt.
- In the bowl of a stand mixer fitted with a paddle attachment or with a handheld mixer in a large bowl, beat the 5 large eggs on medium-high speed until well combined, about 1 minute.
- Spoon in the orange sugar and continue beating until thick and pale yellow, about 3 minutes.
- Switch to low speed and alternate adding the flour mixture and the 1 1/2 cups mild, fruity extra-virgin olive oil, starting and ending with the flour and beating until just a few wisps of flour remain.
- Drizzle in the orange juice, with the mixer on its lowest setting, to bring the batter together.
- Scrape the batter into the prepared pan and bake until a cake tester comes out with a few moist crumbs clinging to it, about 1 1/4 hours. Check the cake occasionally, and if the top begins to brown a touch too much, loosely cover it with foil.
- When the cake's done, place the pan on a wire rack and let the cake cool in the pan for 15 minutes.
☞ TESTER TIP: Don't forget to come back after 15 minutes. Seriously. If the cake remains in the pan too long, the sugars begin to cool and stick to the pan.)
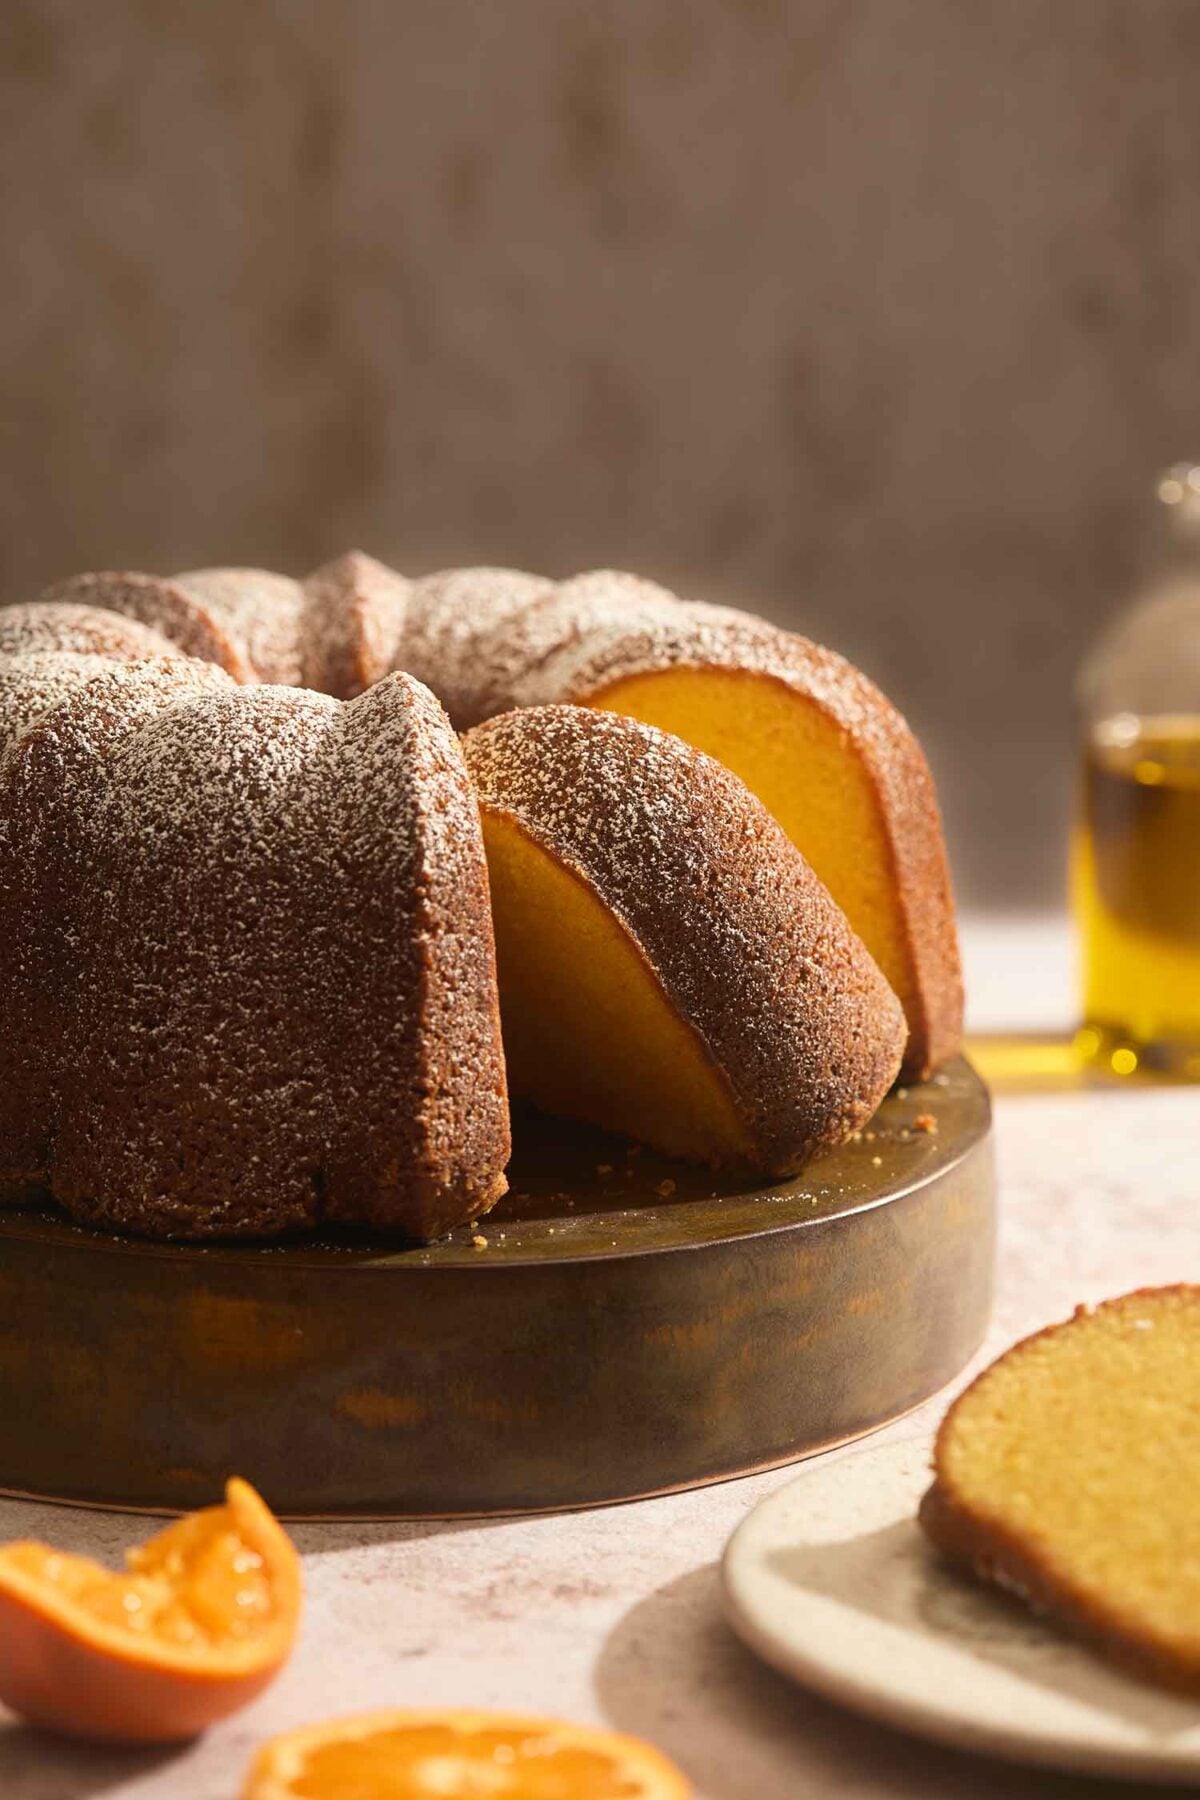
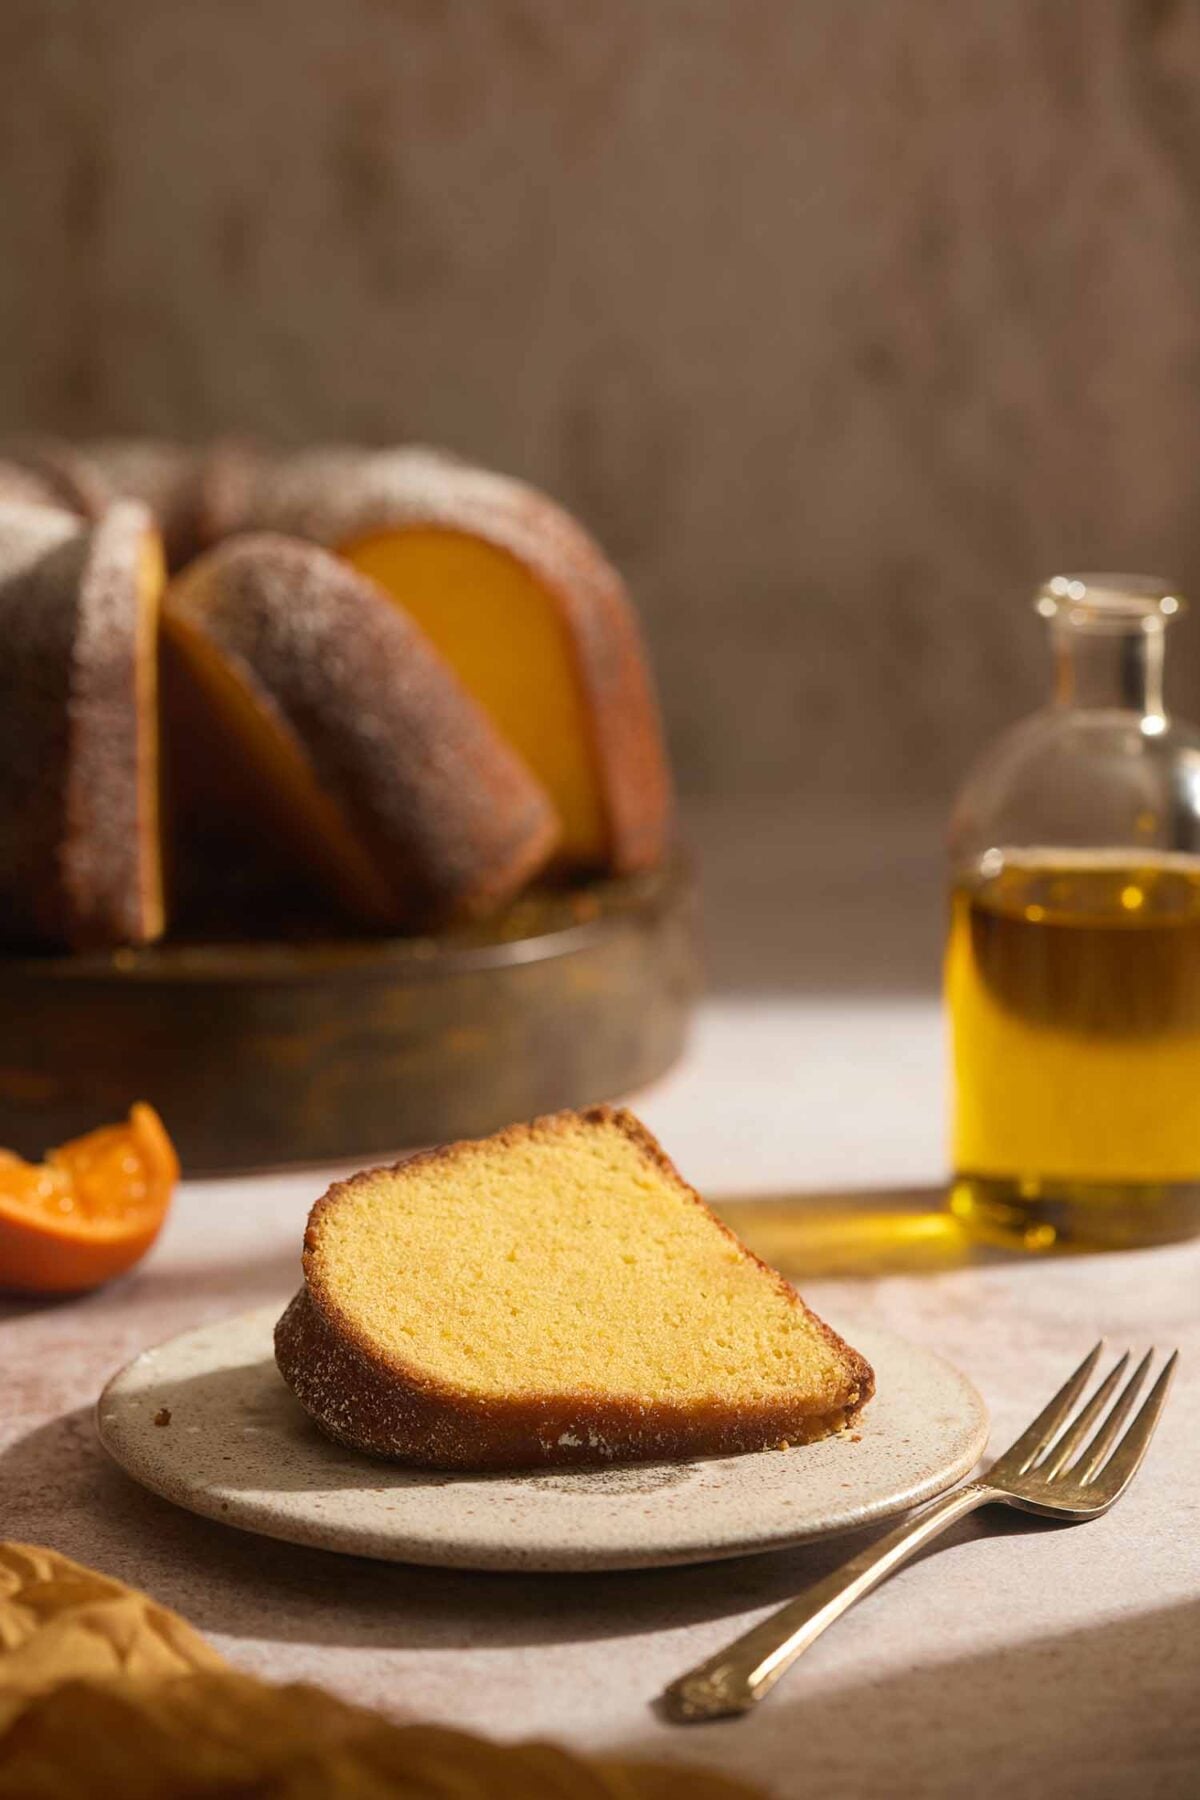
- Turn the cake out onto the wire rack and let it cool completely. (I know. Resist the temptation.) Place the cake on a covered cake stand and let it sit overnight.
☞ TESTER TIP: Seriously. This dense, moist, fruity cake only gets better with age. Don't even think about taking a bite until the day after you make it—or even the day after that.
- Just before serving, dust with confectioners' sugar.

Explore More with AI
Nutrition
Nutrition information is automatically calculated, so should only be used as an approximation.
Recipe Testers’ Reviews
Did you know only 68% of the recipes we test make it onto the site? This recipe survived our rigorous blind testing process by multiple home cooks. It earned the Leite’s Culinaria stamp of approval—and the testers’ reviews below prove it.

This olive oil cake recipe is an epiphany. It is literally the most fantastic, wondrous creation to ever grace my kitchen. The smell while it’s baking tantalizes, the taste when it’s removed from the oven mesmerizes. Thank you, David, thank you. I cannot wait to make this for everyone I know and let the worshiping begin!
I made the recipe exactly as written. Has anyone tried this with another citrus?
After reading the description in this orange olive oil cake recipe, I couldn’t wait to make it. The cake turned out just as wonderfully delightful as I had imagined. I waited the full 2 days before cutting into it, and I’m glad that I did. It’s moist and decadent.
I made this cake for Easter brunch and I was nervous the cake may be too sweet for a few of my guests who don’t eat sweets, so I cut the sugar down to just under 2 1/2 cups with great success. Surprisingly, I could have enjoyed the cake a bit sweeter, and I usually don’t like cakes too sweet, so I imagine the 3 cups would make a perfectly sweet and fabulous cake.
The cake was displayed on our counter in a glass-covered cake dome for about 5 days and it remained moist until it finally completely disappeared.

Here’s the hit of a recent charity bake sale! Easy and a real keeper—the note advising not to cut into the cake on the first day was my first clue how perfect it would be for a bake sale or other need to plan ahead.
I did cut into it on the first day, though, and it was very moist, but not at all in a negative way. It was equally wonderful and perfectly moist on the second day, and I cannot report further, as it was completely devoured on day two—or sold, as it went to a bake sale.
Customers loved this olive oil cake and specifically inquired about it. If I make this for a public event again, I’ll attach little tags with a link to the recipe on this site! It’s easy to make and quietly delicious.
I noted the 12-cup Bundt pan specified and divided the recipe into a 9-cup Bundt pan, four mini-Bundts, and a 3-cup “garden bug” Bundt pan that makes five different varieties, including a dragonfly and a ladybug. The bugs were not only charming but tasty. They and the mini Bundts, attractive and impressive, were both standouts at the bake sale for their visual appeal as well as their taste.
The first time I made the cakes, I poured all the batter into these two pans; on my second test batch, I didn’t fill the molds quite as full and made a second set of the bugs in the 3-cup pan. I had no trouble reducing the baking time down for these smaller cakes, and, in fact, the quick bake time for them added to the appeal of this cake. And on top of the delicious flavor and charming Bundt shapes of this sweet orange dessert, it’s a lovely yellow color, sunny, upbeat and attractive.
It took the full 5 oranges to make the required amount of juice. I used a handheld mixer with successful results. After the 15-minute cooling period, the cakes turned out perfectly from the light-colored Bundt pans I used.


Made the cake in mini bundt pan for a picnic and it was crowd fave! Brushed on some orange juice after it came out of the oven to add some moisture. The texture is perfectly fluffy and the expressive orange flavour is lovely. I will definitely make this again!
Elena, I’m so delighted you enjoyed this! The cake’s already really moist because of the oil. Did the orange juice add more moisture? Do you think it’s needed? I’d love your feedback, as it might be worth adding a note to the recipe.