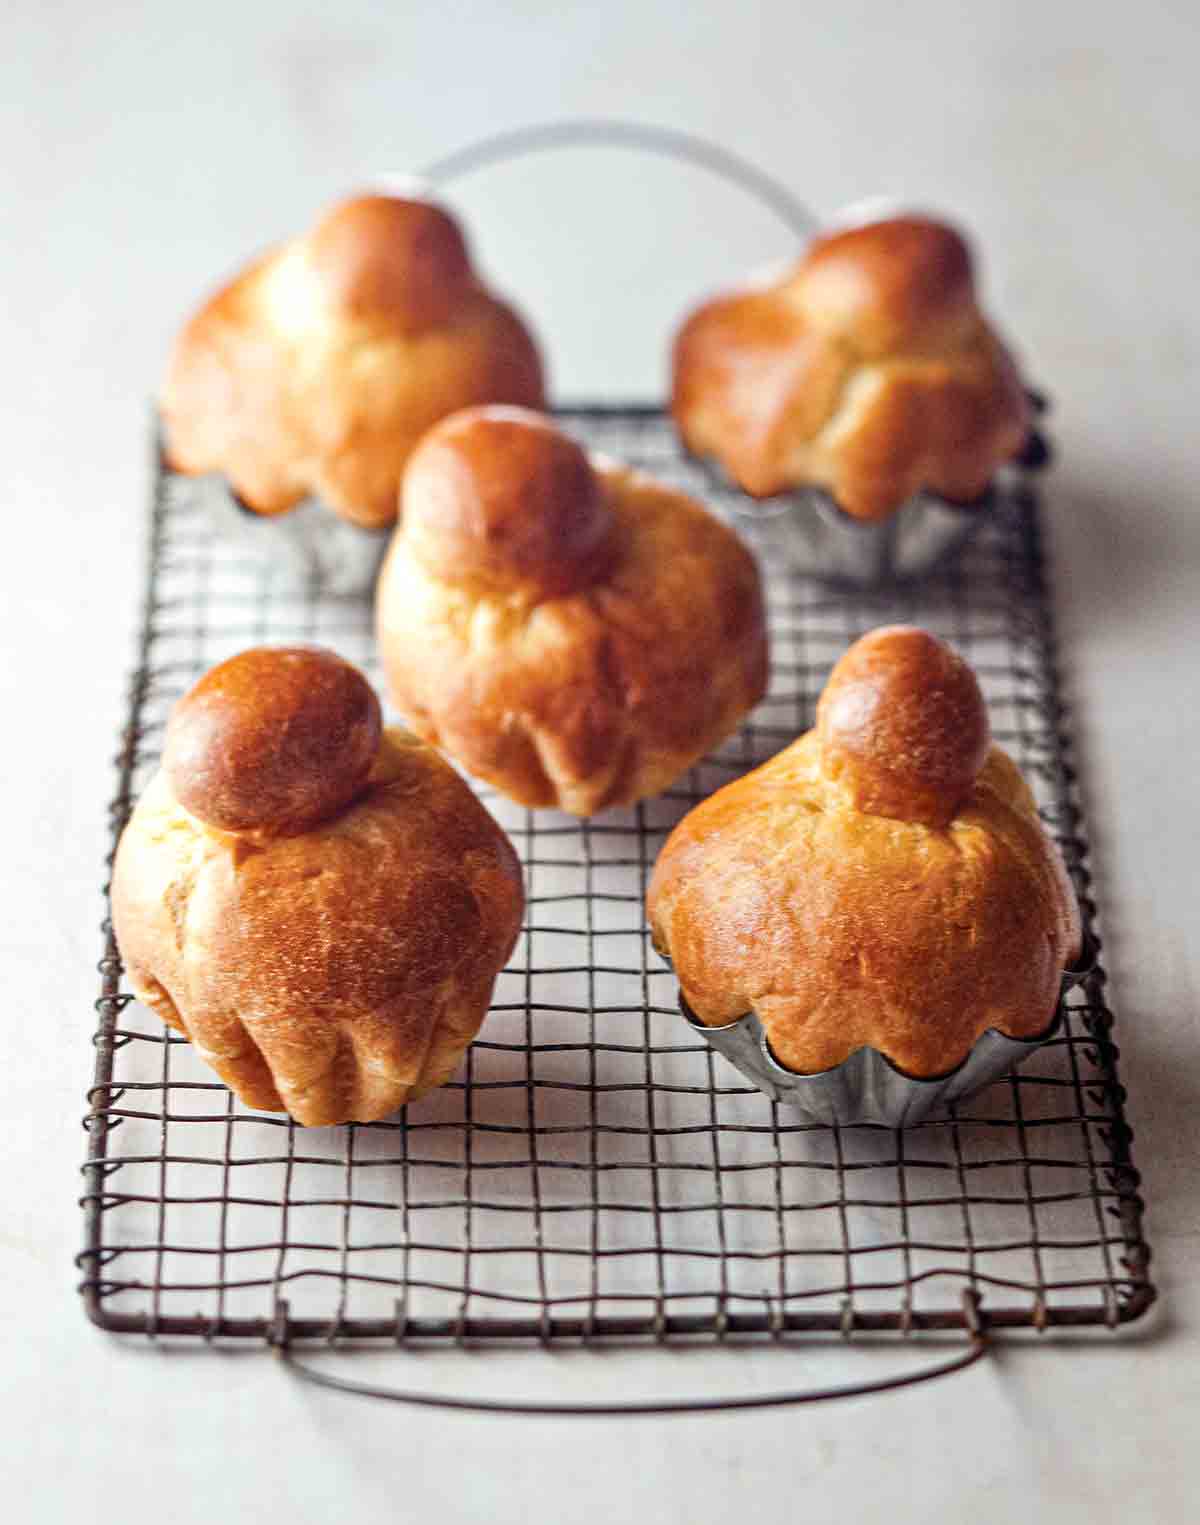
Sure, you could traipse off to the local boulangerie and bring home a bag of buttery little brioche, still warm from the oven and aromatic in that nutty sort of way, rather than make them yourself. If you live in Paris. But where’s the satisfaction in just buying them? These miniature brioche—essentially airy, buttery, rich but not heavy diminutive breads—from Sarabeth’s, the much ballyhooed brunch destination in NYC, don’t require much in the form of actual hands-on time. Although they do warrant a slight expense in the form of diminutive brioche tins. (Should you need any sort of rationale to justify this, bear in mind the little reflective metal tins work really quite well as wee tea light holders.)–Sarabeth Levine
Brioche
Ingredients
- 1 ounce (2 packed tablespoons) compressed yeast, or 3 1/2 teaspoons active dry yeast
- 2 tablespoons superfine sugar, (or just blitz granulated sugar in a blender until finely ground but not powdery)
- 1/3 cup plus 1 tablespoon whole milk, (cold if using compressed yeast, warm if using active dry yeast)
- 8 large egg yolks
- 2 1/4 cups unbleached all-purpose flour, as needed, divided
- 1/4 teaspoon fine sea salt
- 8 tablespoons (1 stick) unsalted butter, cut into tablespoons and softened, plus more for the bowl and brioche tins
- 1 large egg, well beaten with a hand blender
Instructions
- If using compressed yeast, crumble the yeast finely into the bowl of a heavy-duty stand mixer. Add the sugar and let stand until the yeast gives off some moisture, about 3 minutes. Whisk well to dissolve. Add the cold milk and yolks and whisk to combine.
If using active dry yeast, sprinkle the yeast over 1/3 cup warm, 105° to 115°F (40° to 46°C) milk in a small bowl. Let stand until softened, about 5 minutes, then stir to dissolve. Add to the mixer bowl along with 1 tablespoon cold milk, the sugar, and yolks, and whisk to combine. - Attach the bowl to the mixer and fit with the paddle attachment. With the machine on low speed, add 2 cups of the flour and the salt. Mix until the mixture forms a sticky, batter-like dough that clings to the sides of the bowl.
- Increase the speed to medium. Beat in the softened butter, 1 tablespoon at a time, letting each addition become absorbed before adding another. Remove the paddle attachment.
☞ TESTER TIP: The butter must be very soft (but not melted) so it can be incorporated into the dough. Cut it into tablespoon-size pieces and let stand at room temperature for at least 1 hour before using.
- Using a spatula, scrape the dough into the center of the bowl. Attach the dough hook to the mixer. Knead the dough on medium-high speed until it is gathers into a ball around the hook. Return to medium speed and knead, adding tablespoons of the remaining flour, until the dough is smooth but feels tacky and sticks to the bottom of the bowl, about 3 minutes.
- Generously butter a medium bowl. Turn the dough out onto a lightly floured work surface. Gently shape into a ball. Turn the ball, smooth side down, in the bowl, and turn right side up to lightly coat the ball in butter. Cover the bowl with plastic wrap and let stand in a warm place until doubled, 1 1/2 to 2 hours.
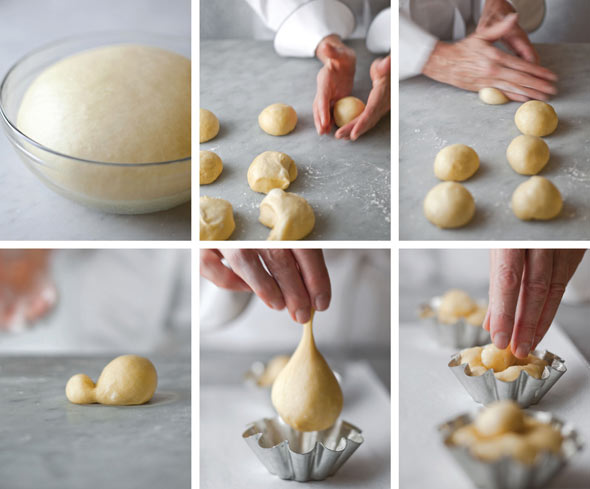
- Butter twelve 3 1/2-inch-wide brioche tins. Carefully turn the dough out onto a lightly floured work surface, but do not punch it down—its texture should remind you of a feather-filled pillow. Cut the dough into 12 equal portions. (If you have a kitchen scale, each portion will weigh 2 ounces.)
- One at a time, shape each portion into a ball on the work surface, taking care not to break the exterior of the dough. To do this, cup both hands around the dough. Carefully turn the dough in your cupped hands to gently shape it into a ball—overhandling will soften the butter too much. Place the dough on its side, with the rough underside facing one side. Lightly dust the side of your hand with flour. Place the side of your hand about 1 inch from the smooth end of the dough. Using the upper part of your hand, including the last finger, move your hand back and forth to cut into the dough, forming a small ball that is attached to the larger portion by a thin strand.
- Transfer the shaped dough to a brioche tin, holding the larger portion in one hand and the small ball in the other, taking care not to break the connection. Place the larger portion of dough in the bottom of the tin. Using your thumb and first two fingers, still holding the small ball of dough, force a hole into the center of the larger portion of dough, reaching all the way down to the bottom of the tin, and stick the smaller ball in the hole. This keeps it from popping off during baking. Repeat with the remaining balls of dough. Place the tins on a half-sheet pan. Lightly brush the tops of the brioche with some of the beaten egg, reserving the rest.
- Choose a warm spot in the kitchen for proofing. Slip the half-sheet pan into a tall “kitchen-sized” plastic bag. Place two tall glasses of very hot water near the center of the pan. Wave the opening of the bag to trap air and inflate the bag like a balloon to create “head room,” being sure that the plastic does not touch the sticky dough. Twist the bag closed. Let stand in a warm place until the brioche looks puffy, about 1 hour.
- Position a rack in the center of the oven and preheat to 350°F (176°C). Remove the glasses from the bag, and then the pan. Lightly brush the tops of the brioche again with the reserved egg. Bake until the brioche are golden brown, about 20 minutes.
- Let the brioche cool in their tins for 5 minutes. Remove the brioche from their tins and serve warm or at room temperature. (Leftover brioche—if there are any—can be frozen for up to 2 weeks. They're terrific toasted.)

Nutrition
Nutrition information is automatically calculated, so should only be used as an approximation.
Recipe Testers’ Reviews
These were phenomenal! I’m hooked. Being new to yeasted breads, I followed the directions to a T and, I must admit, they turned out perfectly.
I used active dry yeast with no problems, but I’m intrigued by the other type of yeast (which I’d never heard of) and would try it next time. Also, because I’m not that confident in my ability to guess measurements, I used my kitchen scale to weigh each portion of dough—a step I’d most likely forgo next time.
The only question I had during the process was whether the eggs should be room temperature or not. I opted to leave them on the counter while the butter was softening, but I’d love to know if they should have been cold.
These little brioche-a-tete were flavorful and extremely light.
They baked in about 15 minutes rather than the 20 minutes stated in the recipe. I used active dry yeast, which worked perfectly. My only suggestion is an easier method for shaping the dough, as I found it awkward to follow the directions in the recipe: After you form the small marble of dough, break it off then make an indentation in large round of dough and insert the small one inside. Next time, I’ll make this into a loaf, since that’s what my family prefers.


Since my brioche-a-tet tins were used so seldom, I offered them to a 13 year old baking prodigy who promptly used them and sent me photos that would put a pro to shame. At least they’ll be used more often. I live/love to share. Stu
Stu, how lovely. I, as you, feel that we are privy to certain objects only for a while before it’s time to share them with others so that they may inspire someone else anew. You’re a good man, Stu Borken.
Thank you, thank you. What a great recipe and I am so happy with my cute little brioches (not sure what correct plural would be).This is an instant add to my otherwise slowly developing bread repertoire.
Swell to hear, Michael! We’re so pleased that they worked so well for you. And we’re thankful you took a moment to drop us a note. We look forward to hearing which recipes from the site you try next…!
Someone gave me a gift certificate to a kitchen store and I bought 6 of these brioche-a-tet tins from France. That was 2 years ago. They have yet to be used. Now that i have your instructions and pictures they will be used. Thanks.
You’re quite welcome, Stu. We’re glad to be of service. As an aside, I love to use my little underused brioche tins as tea light holders, as the metal makes for a lovely reflection, whether you’re cooking, dining, or reading by candlelight….