
This recipe is for an authentic Italian cappuccino made with the perfect proportions of espresso, steamed milk, and foamed milk. (And by “perfect,” I mean approximately equal proportions of 1/3 each.) For a larger or more typical American cappuccino, double the quantities. For a milkier, or wet, cappuccino, increase the milk to 6 tablespoons. Ever wondered the difference between a cappuccino and a macchiato? The latter has just a small spot of foamed milk, as “macchiato” means “spot” in Italian.–Daniel Young
Cappuccino FAQs
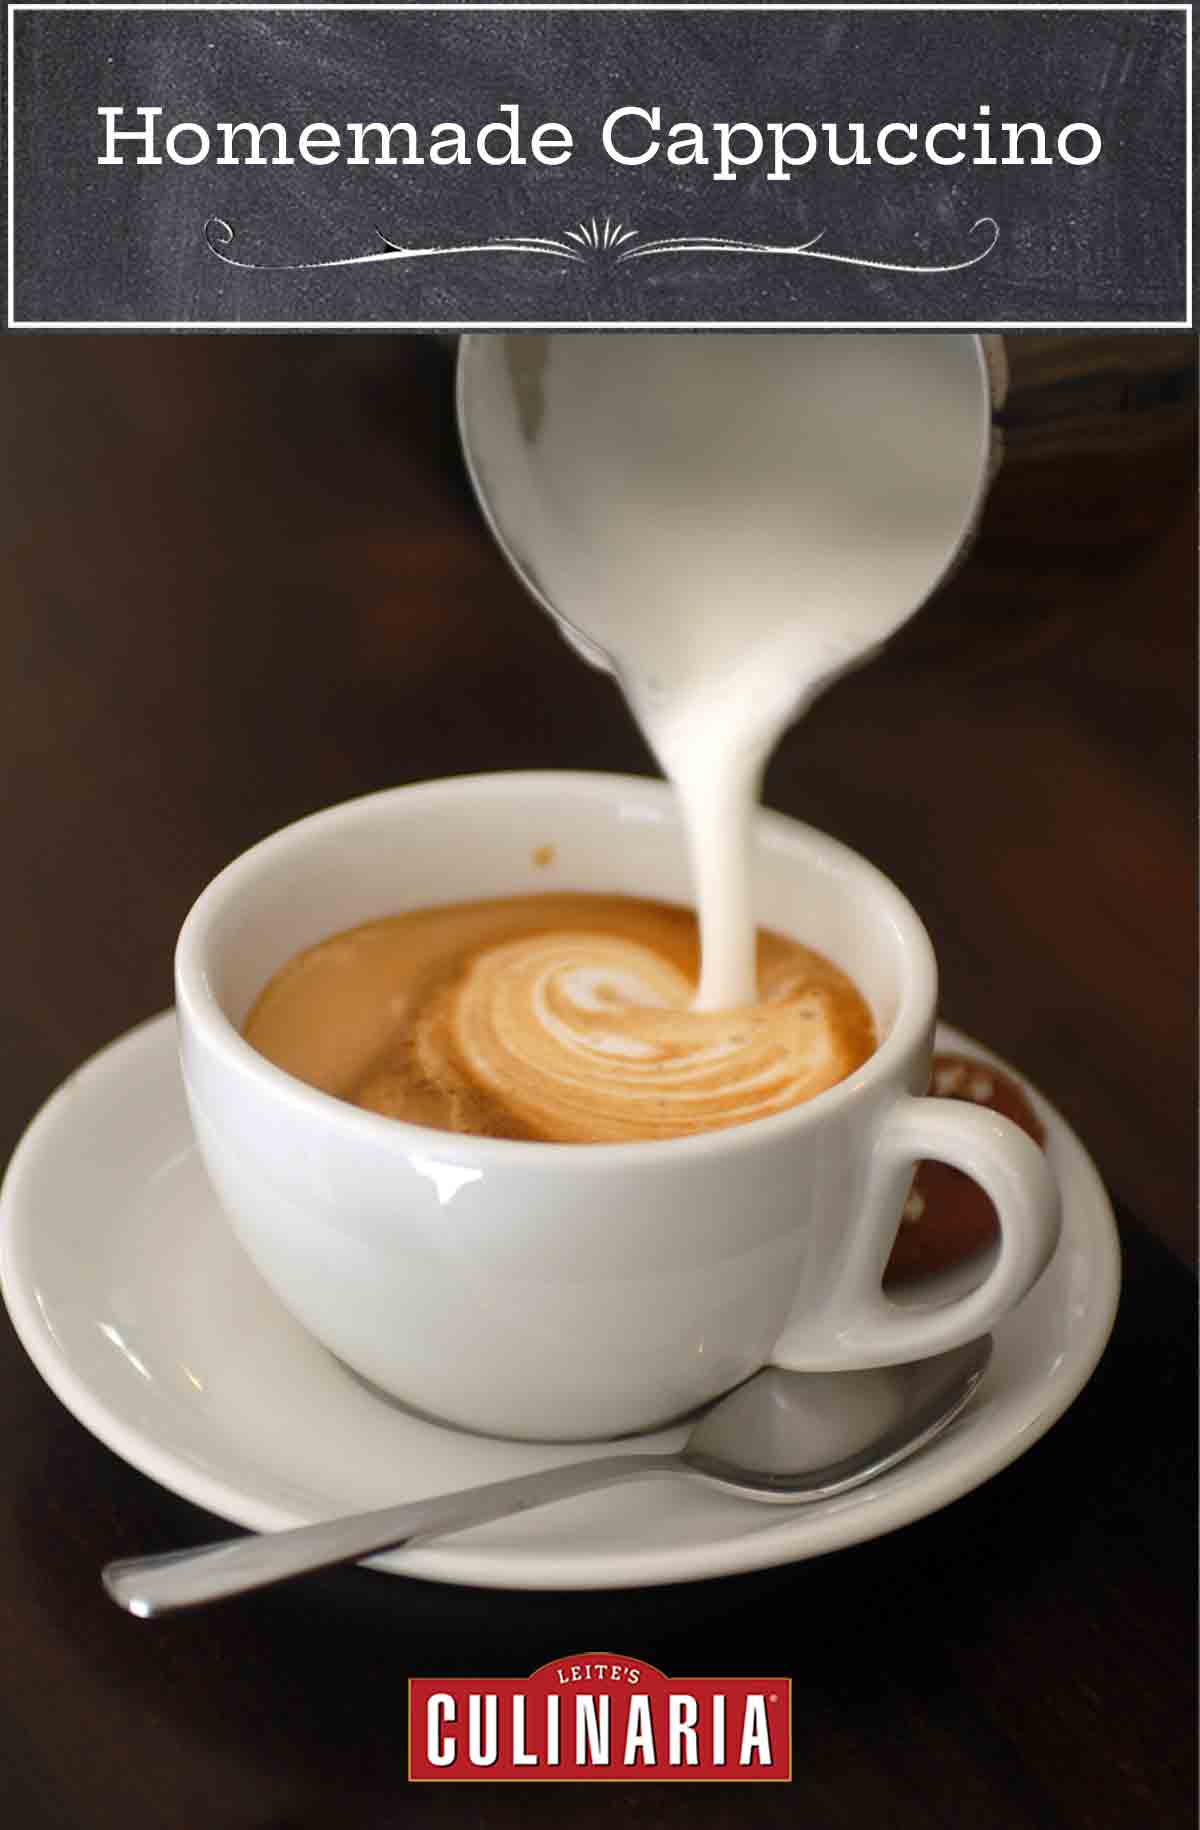
Originally from Austria (yes, Austria!), cappuccino was later developed and perfected in Italy. Its base is espresso that’s topped with steamed milk. The crema, which is the lighter frothy last bits of the espresso pour, provides a canvas for the steam milk and helps create the wavy designs baristas are known for.
Cappuccino has approximately 65g of caffeine for a regular size (1 to 1 1/2 ounces of espresso). In comparison, an 8-ounce cup of coffee has 200g of caffeine, and Coke and Diet Coke have 21g and 28g respectively. Cappuccino’s low caffeine count is due to the smaller amount of espresso.

Homemade Cappuccino
Ingredients
- 1 rounded tablespoon finely ground coffee, preferably an espresso blend
- 1/4 cup cold milk, (whole, 2%, or nonfat)
- 1 pinch cocoa powder or ground cinnamon, , optional
Instructions
- Warm the espresso machine. Put the coffee in the filter basket of the portafilter, gently but firmly tamp it down with a tamper, and secure the portafilter in the brew head. Place a 5- or 6-ounce (148- or 177-ml) cup directly under the brew head.
- Brew just long enough to yield 1 to 1 1/2 ounces (30 to 44 ml) of espresso. Turn your machine off just as it finishes pouring the last of the pale-colored crema and before the espresso becomes watery, which you’ll learn with practice. The exact time will depend on your machine.
☞ TESTER TIP: If your grind is too coarse, the water will flow through too quickly. If it’s too fine, the water can’t seem to get through. You’ll get the hang of this with time.
- Much will depend on your particular machine. Turn on the steamer and let it warm up. Meanwhile, pour the milk into a stainless steel pitcher. Submerge the tip of the steam wand at least half an inch below the milk surface and turn on the steam switch. As the foam rises, gradually lower the pitcher so the tip of the wand remains just below the milk surface. As the milk begins to heat up, tilt the pitcher slightly to swirl the milk and continue to steam until the side of the pitcher becomes almost too hot to hold. Turn off the steam while still holding the tip of the wand under the milk surface.
- Very slowly pour the milk into the cappuccino in one of two ways: For a smooth cappuccino in which both the warmed and foamed milk on top is evenly integrated throughout the beverage, gently pour the milk over the espresso in a thin, steady stream. For a cappuccino with a foamy head, hold back the foam with a spoon and gently pour the milk over the espresso. Spoon the foam over the top.
- Sprinkle with cocoa powder or cinnamon, if desired. Serve hot.

Explore More with AI
Nutrition
Nutrition information is automatically calculated, so should only be used as an approximation.
Recipe Testers’ Reviews
Did you know only 68% of the recipes we test make it onto the site? This recipe survived our rigorous blind testing process by multiple home cooks. It earned the Leite’s Culinaria stamp of approval—and the testers’ reviews below prove it.
As someone who makes them each morning, I can say that this recipe was spot on in terms of the amounts of espresso and milk. This is a very solid cappuccino although I would change the order and steam the milk before the espresso.
The timing and heating will very much depend on the user and his/her machine. We have a Delonghi K-Mix from 4 to 5 years ago and LOVE it. It’s nice and small and reliably does the trick.
I use the Red Illy Espresso Blend. (We do subscribe and save through Amazon as Whole Foods no longer reliably carries it.) I used 2% fresh milk from Longmont Dairy—YUM! I also used cinnamon.
Step 1: We have two different sized filter baskets. The 7 grams was sufficient for the smaller one but I would nearly double that for the larger one, which we use more often. Once we turn it on, it takes approximately 4 to 6 seconds for the espresso to be done pouring. You’re mostly looking for the crema to finish pouring out of the machine. Stop it at exactly that moment before it turns too watery.
Step 2: This is exactly my process for the milk and it takes 10 to 13 seconds max otherwise the frother cup gets way too hot. That’s my signal to turn it off so as not to scald it. I prefer to do the milk before the espresso and pour that into my cup last. Best would be to preheat the ultimate mug with hot water first so as not to have your drink cooled!
Step 3: I always prefer a slow pour with the foam coming at the end although I don’t use a spoon.
This made enough for 1 cappuccino. You can also use a bit of chocolate milk as a special treat for something like a mocha. You can also use more espresso with this amount of milk to make it stronger, which I actually prefer. The timing and heating will very much depend on the user and his/her machine. We have a Delonghi K-Mix from 4 to 5 years ago and LOVE it. It’s nice and small and reliably does the trick.

Justifying the purchase and counter space for an espresso machine at home meant some hard thinking. With practice, we’ve settled on a brewing routine that works for producing a very satisfying (and sometimes pretty) cup that is as good as most any cafe offers. We prefer to pull a double ristretto, producing approximately 40 ml espresso plus 10 to 15ml crema using a double portafilter in a bottomless basket and serving it in a 5-ounce cup. We steam a 136 g jug of whole milk or Oatly for each person (just over 1/2 cup), which leaves a little extra to pass at the table if you wish.
1. Preheat machine (and cups). Our dual-boiler setup allows us to run both the brew head and steam boilers, so a good 20 minutes before you plan to serve, turn on the brew head. While you are measuring and grinding it’s time to turn on the steamer.
2. We weigh 20.5 g whole beans for one person or 40.5 g for two. These will yield a prepared portafilter holding 18.5 to 19.5 g plus a bit you will brush out later. We tare the portafilter then put in back in place to stay hot while we grind coffee. We also pull a bit of hot water through, preheating the beaker we measure shots in and emptying the hot water in to preheat the cup (remember to empty before you put coffee in!). Assuming your grind is dialed in, you can grind, fill the portafilter and level it using your hand or a straight edge pastry cutter, then check the weight of ground coffee before tamping.
3. Once the portafilter is in place, we pull the brew handle and expect to see the first drip of coffee into a beaker in 4 to 6 seconds. By 30 seconds you will have about 35 to 40 ml of espresso topped with an additional 10ml of crema, just reaching the 50ml mark. Turn off the brew handle, empty the cup of preheating water and tip the beaker in while I pull the portafilter, empty and wipe it and fill the next serving, etc., or move on to steaming. If your first shot pulled fast, you might tamp a bit firmer or adjust your dialed-in grind based on humidity and the age of beans. If it was reluctant, sometimes a lighter tamp, or adjust the grind for a slightly coarser grind. This is going to change with weather, source of beans, roast and age. Some people describe the target grind as feeling somewhere between kosher salt and flour when you press it between your thumb and forefinger but most importantly you want the extraction to deliver the right balance of bitter and sweet (and all those other more complex elements).
If you don’t level the puck (the coffee in the portafilter) or there is a stray brush bristle, when you tamp there will be channels that cause the scalding hot water to shoot out in all directions, so you make a visual inspection before tamping. Because we only pull 2 shots at a time, we don’t store beans in the hopper of a grinder, preferring to safely preserve them at their best by using a vacuum-like canister (we use an Airscape).
4. Before you begin steaming your milk, blow a little steam thru your steam wand, then turn off and raise the jug so the tip of the wand is deeply buried in the milk. Turn on the steam knob, dropping the jug a little (count whoosh whoosh, 2 seconds) then raise jug to bury the tip about an inch, you will hear a louder, sucking sound in about 2 more seconds, then submerge the tip and watch the ROILING of the milk and do not allow the tip to come back up to the surface while steam is coming out. You want the texture to the thickness resemble white latex paint, what is called microfoaming, and you are just texturing the milk but not making sea foam. When the temperature is about 130℉, start turning off the steam but leave the wand tip in as the milk will rise close to 145℉ (the thermometer lags). Our goal is to not over steam the milk (no styrofoam, we want to pour a flat white style which has the right sweetness and texture).
5. Before you pour the milk into your cup of espresso, tap the jug on the counter once or twice to force any large bubbles to the surface, then holding the cup in one hand, pour slow and steady partway up, letting the milk and coffee mix, then before you reach the top, you can control the pour to pour a rosette or pattern if you like. The goal isn’t so much to make it pretty, but being able to pour a nice defined pattern is ONLY possible if you just micro-foam your milk and do not over-steam. Since that also indicates the flavor and texture profile we want, we have become a little more skilled over time and lots of practice.
6. With a clean towel wrapped around the wand, carefully turn the steamer back on briefly and then off and wipe it down. Check to see that you have emptied the spend puck of coffee from the portafilter and go drink your coffee! We steam a little extra milk rather than too little.
I use a Mazzer Super Jolly burr grinder and Izzo Alex Duetto II espresso machine (10 years old), semiautomatic, double boiler, dual PID.
I’ve written what we do for a cappuccino:
We use a the Super Jolly almost exclusively for espresso, with a semi-automatic, double boiler with an E61 brew head. We set our PID for a brew temperature of 200℉ and steam boiler to 257℉. Use fresh beans, which we start using 4 to 5 days from roast date, which allows some outgassing from the roast before opening. Once the bag is opened, we store the beans in an Airscape® canister and only weigh out the dose for one or two cups to freshly grind just before brewing. We adjust the grind based on humidity and the age of the beans. If the beans are very fresh and/or the weather is damp, the grind will be set a bit coarser, and adjusted finer as the beans are dryer or the weather is less moist. The target is sometimes described as between salt and flour if you pinch some between your thumb and forefinger. If your grind is too coarse, the water flows through too quickly. If it’s too fine, the water can’t seem to get through. The grind along with temperature can affect flavor. If your weather is changeable, you may find you adjust more often, but, generally, we can dial in a new bag of beans and stay within a close range for several days.
We steam with individual jugs for each serving, 135 to 138 g (just over 1/2 cup). Set the jug with milk (with a thermometer positioned) aside. We keep a smaller, Baratza grinder for pour over, Aeropress, and french press brewing. We do not store beans in the hopper. Any initial worry I had that I would drink more or too much coffee turned out to be a non-issue. I find generally that a single cappuccino in the morning is all I want, but of course, having this machine made it possible to adjust those ideas!
To justify the commitment we had made, we took every workshop or demo opportunity we could, both before making our final choice, and again after we became owners. It seemed overwhelming (logbooks with timing and weight notes of every shot, every batch of beans) but once we got some basic skills, we went back to any lesson or demo we could, including watching endless videos, to standing beside world barista champs for one-on-one tips to up our game. We are NOT pros. But to develop the muscle memory to confidently offer a cappuccino to guests or really, make it for ourselves, we put in the apprenticeship. After 10 years, we still watch and converse with baristas, roasters and other coffee-minded folks because we can always learn something new. Roasters and baristas often have good tips on temperature adjustments and often are willing to answer a brief question.
Gail at Seattle Coffee Gear makes some of the best how-to and review videos out there (they have a YouTube channel), and was great all thru the investigation and purchase cycle and we stop in when we are up there, but made our equipment purchase by exhaustive research and head-scratching. We NEVER regret it, (well maybe when it has to be moved, just a little) and never once have wished we had bought a Nespresso instead.


That is a great tip about pouring the foam with a spoon to get a cappuccino with a foamy head. Works great!
Thanks, Scarlet.
Do you make the espresso first and then froth the milk?
Yes, New in coffee, exactly.
Have not tried the recipe. Just bought a milk frother. Don’t have a coffee machine as yet. What do you think of using cashew milk?
Great question, Beatrice. You can make cappuccino with non-dairy milks, however, since cashew milk tends to be one of the thinnest, it’s not particularly well suited to frothing. Ideally, you’d want to use something thicker, such as oat milk. If you prefer a nut-based milk, almond milk is a little thicker than cashew and will froth better.