
TL;DR (Quick-Answer Box)
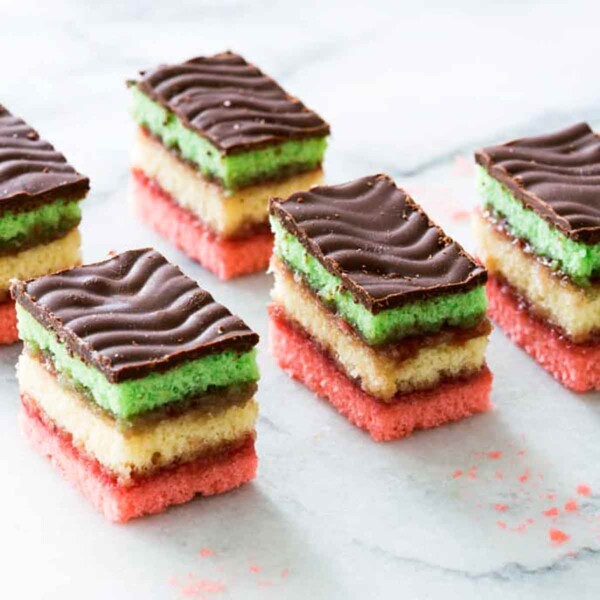
- What it is: A classic Italian layer cookie with almond-paste sponge cake in the colors of the Italian flag, layered with raspberry jam + coated in chocolate.
- Why you’ll love it: These impressive almond cookies are a decadent addition to any holiday cookie platter, especially for Christmas or Passover.
- How to make it: Bake three thin, colored cake layers, cool, spread with seedless raspberry jam, stack + compress for at least 24 hours. Trim the edges, cut the stack into five equal strips. Brush the top and sides with warm apricot glaze + coat with melted chocolate.

Jump To
Featured Review
I have been using this recipe for years. It is a perfect recipe. I couldn’t conceive of eating a commercially made rainbow cookie, ever, after making these. This is the cookie everyone looks for in the cookie tray. As I type this, I have my triple batch being weighted down. I feel like we are all in this little exclusive club. The club for those that make Carole Walter rainbow cookies. An elite club for an elite cookie lol!
Leeann Miceili
There’s a reason Italian rainbow cookies show up on just about every Italian-American cookie platter from Christmas to weddings to baby showers: they scream celebration. They’re the loud ones on the tray—the little striped extroverts in green, white, and red, posing like the Italian flag in miniature. Almond, jam, and chocolate all in one bite? That’s not a cookie, that’s a full dessert in cocktail-party form.
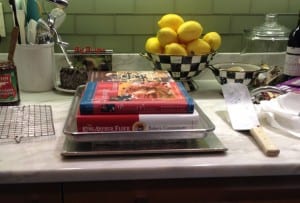
Despite the name, I treat these less like “cookies” in the chocolate-chip sense and more like a confection. They’re thin layers of soft almond sponge—tinted red, white, and green—stacked with jam. The secret to that dense, authentic texture? Pressing them together overnight. I always weigh the slab down with cookbooks (my two volumes of Julia Child’s Mastering) so the flavors marry. Then they get slathered in dark chocolate before being sliced into tidy little jewels. On an Italian bakery tray, they’re always the first thing to go…usually into someone’s purse “for later.” (I see you, Auntie Vi!)
These are often called Neapolitan or Venetian cookies, and they’re especially beloved at Christmas, but they’re far from a one-holiday wonder. I’ve swapped the flour for matzo cake meal, and they become a gorgeous addition to a Passover dessert table. I’ve also cut them into hearts or slim little bars to make a very convincing Valentine’s Day gesture. (Pro tip: a box of these says “I love you” way more convincingly than a last-minute supermarket bouquet; just ask The One.)
Yeah, yeah, there are a few steps here—three pans, some food coloring, a bit of waiting. But don’t let that ingredient list scare you; the process is entirely doable and very forgiving. The layers are thin and bake lickety-split. Because the whole slab gets weighted and chilled, it hides a multitude of sins (crooked layers are my bête noire, but the chocolate covers them perfectly). They also keep beautifully and actually improve with a few days’ worth of lounging. That means you can make them ahead, freeze them, and slice off what you need when company’s coming.
Chow,

More Showstopping Dessert Bar Recipes
Write a Review
If you make this recipe, or any dish on LC, consider leaving a review, a star rating, and your best photo in the comments below. I love hearing from you.–David
Featured Review
Rainbow cookies, what a delight. Colorful, smell so good, the taste delicious, thank you ever so much for this most precious recipe. For years I searched and tried every recipe I found. Tried them once and never again. Last year I found this one and asked everyone to have only one so everyone could at least have a taste. This year I have made two batches. I hope it will be enough, I really don’t think so. Next year there will be three batches. Thank you, again, and again. Happy holidays with blessings!!!
Marta
Italian Rainbow Cookies
Ingredients
- 12 ounces (1 1/2 8-ounce cans) almond paste
- 1 cup unsalted butter, slightly firm
- 1 cup sugar
- 4 large eggs, separated
- 1 teaspoon vanilla extract
- 2 cups all-purpose flour, spooned in and leveled or 1 1/2 cups sifted matzo cake meal, spooned in and leveled
- 1/2 teaspoon salt
- 6 to 8 drops green food color
- 8 to 10 drops red food color
- 1/4 cup seedless raspberry preserves
- Up to 1 cup apricot preserves
- 10 ounces semisweet chocolate, coarsely chopped
Instructions
Make the layers
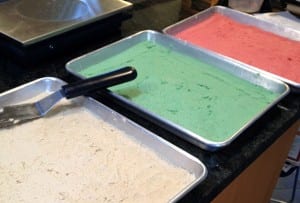
- Position the oven racks in the upper and lower thirds of the oven. Heat oven to 350°F (175°C). Lightly butter the bottom of three 12 1/4 x 8 1/4 disposible aluminum baking pans or three 1/4 sheet pans. Line the pans with parchment paper, then butter the parchment and the sides of each pan.
- Break the almond paste into pieces and place it in the work bowl of a food processor fitted with the steel blade. Process for 10 to 15 seconds, or until finely chopped. Alternatively, shred the almond paste on a box grater.
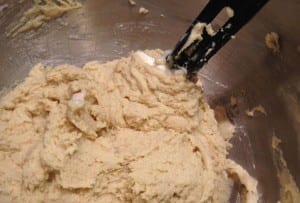
- In the bowl of an electric mixer fitted with the paddle attachment, mix the butter on medium-low speed just until smooth. Increase the speed to medium, add the grated almond paste, and beat until lightened in color, about 2 minutes. Pour in the sugar in a steady stream, beating for 1 minute longer. Then add the egg yolks and the vanilla, beating well to combine. Scrape down the bowl as needed.
- Combine salt and flour, and at low speed blend in three additions, just until incorporated.
- In a clean mixer bowl, using the whip attachment, beat the egg whites on medium speed until frothy. Increase the speed to medium-high and continue beating until firm peaks form. Using a large rubber spatula, gently fold 1/3 of the egg whites into the batter to lighten the mixture, then fold in the remaining egg whites in two more additions.

- The batter should actually be a stiff dough.
- Divide the batter into thirds (each measuring approximately 1 2/3 cups) and place into three separate bowls.
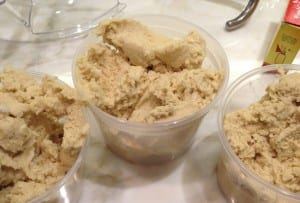
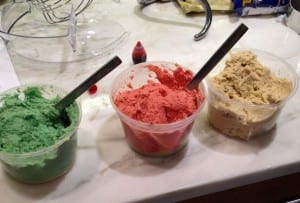
- Tint one portion with the green food coloring, blending until evenly colored. Tint another portion with the red food coloring, again blending until evenly colored. The remaining batter is not colored.
- Spread the batters in the pans, using a small offset spatula to push the stiff batter into the corners of the pan and smooth the surface. Be sure the batter is evenly distributed, especially into the corners of the pans. If the batter is tricky to spread, try lightly wetting the back of the spatula with a very small amount of water.
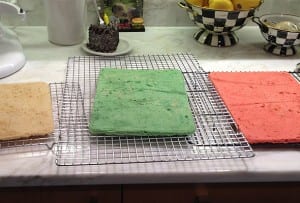
- Bake the cakes for 10 to 12 minutes, or until the tops are firm to the touch but not browned. (If you’re going to err with the baking time, it’s actually better for the cakes to be slightly underdone as opposed to overdone.) Let the cakes rest in the pans on wire racks until cool enough to handle, then invert each pan and peel off the parchment.
Assemble the layers
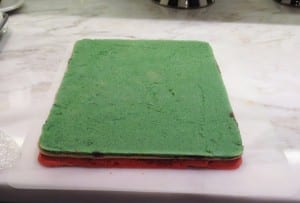
- Have ready a large sheet of plastic wrap placed on a cookie sheet. Invert the green layer onto the plastic, top side down. Using a small offset spatula, spread the surface evenly with 2 tablespoons of the raspberry preserves. Place the plain layer, again top side down, on top of the raspberry preserves. Align the two layers and press them together. Spread 2 tablespoons of the raspberry preserves over the plain layer, again using a small offset spatula. Then place the pink layer, top side up, on top of the raspberry preserves. Be sure that the three layers are evenly aligned, then press them together again.
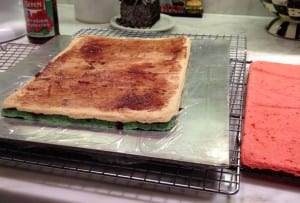
- Wrap the layered stack tightly with plastic, sealing the ends securely, and place it on a clean cookie sheet.

- Place another cookie sheet on top of the wrapped stack and weight it with two or three heavy cookbooks to compress the layers. Let the stack rest at room temperature for at least 24 hours, turning it over once or twice during the weighting period.
Glaze the layers
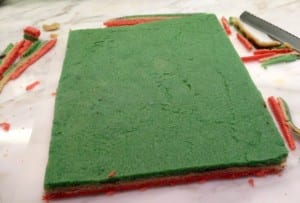
- Unwrap the stack and set it on a cutting board. Using a large serrated knife, trim 1/4 inch from all sides.
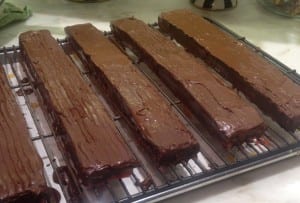
- Then cut the stack into five equal strips, each measuring approximately 1 1/4 inches wide. Separate the strips and place them on a large wire rack set over a cookie sheet. (If desired, spray the rack with vegetable cooking oil spray or slick it with a paper towel ever so gently damped with a neutral cooking oil.)
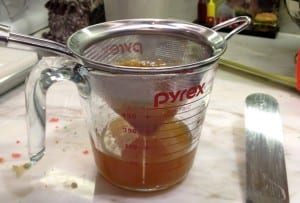
- To make the apricot glaze place the apricot preserves and 2 tablespoons water in a small saucepan. Bring to a boil, then simmer for 1 minute. Pass through a fine strainer into a bowl and discard the pulp. This can be made ahead and reheated just before using.
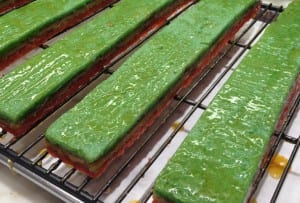
- Brush a thin layer of the warm glaze on the top and sides of each strip to seal the surface. Chances are you won't use all the glaze. Let stand for 1/2 hour or longer.
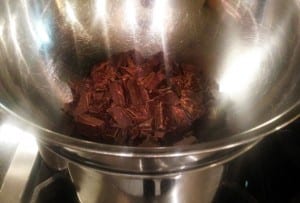
- When ready to coat the strips, fill a medium pot with 1 inch of water and bring it to a simmer. Place the chocolate in a large bowl and set it over the simmering water to melt, gently stirring occasionally with a rubber spatula. Watch carefully! The chocolate should not become too hot. When the chocolate is almost melted, remove it from the heat and allow it to stand until it is completely melted. Gently stir occasionally. It is ready to apply when it is smooth, tepid, and the consistency of chocolate syrup. (Note: If the chocolate becomes too thick, warm it over simmering water until it reaches the correct consistency.)
- Working one strip at a time, spoon about one-fifth of the melted chocolate down the length of the strip. Using a small offset spatula, spread the chocolate evenly over the top and sides, taking care to smooth all surfaces. Repeat with the remaining strips. Let the strips stand at room temperature until the chocolate hardens. This can take up to several hours, depending on the temperature of the room and climate conditions. Cut each strip into 5/8-inch slices.
Notes
Storage
Store in an airtight container, layered between strips of wax paper, for up to 3 weeks. (Note: These cookies may be frozen, preferably before slicing.) This cookie improves with age.
Explore More with AI
Nutrition
Nutrition information is automatically calculated, so should only be used as an approximation.
Recipe Testers’ Reviews
Did you know only 68% of the recipes we test make it onto the site? This recipe survived our rigorous blind testing process by multiple home cooks. It earned the Leite’s Culinaria stamp of approval—and the testers’ reviews below prove it.
These Italian rainbow cookies are wonderful. Let me elaborate. Yes, these require a good amount of effort, expensive ingredients, three pans, several mixing bowls, food coloring, chocolate, and more than one afternoon for preparation, but the outcome is well worth it.
I’ve made these cookies both with flour and with matzah cake meal so that I could serve them during Passover, and each time they turned out great. There was no significant difference between the two. These are a far cry from the dried-out commercial versions of this cookie.
I weighed the batter into equal portions before adding food coloring so the layers would be even. (Yes, I do obsess when I bake.) This batch remained weighted down for almost 48 hours as I was away for the weekend, and it didn’t hurt the cookies one bit. There was a lot of apricot jam left over after I brushed the cookie with it, so next time I would cut it back by half.
The first time I made these, I used the lesser amount of food coloring, but the color was not intense enough. This time I used even more food coloring than the recipe suggested in order to get the intense colors that I have seen when I have purchased these in bakeries. I also used the food processor to mix the almond paste rather than a grater.
These hold well in an airtight container and really do improve with age. I froze the leftover cookies (hardly any because everyone wanted to take some home), and they remained fresh and delicious even after freezing. Read the recipe carefully and don’t let the multiple steps overwhelm you…go slowly and step by step and the rewards will be amazing.


can this recipe be doubled?
Arlene, I wouldn’t double the recipe as one batch. Things get tricky when you do that with a baking recipe. What I would suggest is making two single batches at the same time. That way you can be assured all of the proportions will be correct. I find I have far fewer issues doing it this way. Happy baking!
Can this recipe be doubled? Are all the ingredients doubled and is the baking time increased. Thank you and Happy New Year.
arlene, if you’d like to double this, may I suggest making two separate batches? The size of sheet pan you’d have to use for each layer of a doubled recipe would make for very unwieldy layers and I think you might run into issues with transferring and stacking them.