
Rich, creamy, uber satisfying Greek yogurt is soooo much easier to make at home than you could imagine. That’s what we’re hearing from everyone who’s tried their hand at this simple recipe for plain yogurt that lets time—not you—do most of the work.–Renee Schettler Rossi
What’s the Difference Between Regular Yogurt and Greek Yogurt
Greek yogurt is strained for a longer amount of time than regular yogurt. That translates to less liquid in the final product and, as such, a thicker, richer, more velvety consistency than the regular yogurt you’re accustomed to finding in stores.

Homemade Greek Yogurt
Equipment
- Pressure cooker (optional)
Ingredients
- 1 quart whole milk, (do not substitute low-fat milk)
- 1 envelope yogurt culture, or 1 cup (225 grams) goat milk yogurt
Instructions
How to make homemade Greek yogurt in the oven
- Preheat the oven to 125°F (52°C).
- Gently warm the milk in a saucepan over medium-low heat, being careful not to heat it above 110°F (44°C). You’ll want to use a candy or deep-fry thermometer to check the temperature.
- Remove the pan from the heat, add the yogurt culture or goat’s milk yogurt, and stir well.
- Pour the yogurt into a large oven-safe glass container. Bake the yogurt for 3 hours. [Editor's Note: If your oven doesn't go that low or if you have a tricky time maintaining the oven temperature that low, turn the oven off occasionally to cool the temperature. It's ideal for yogurt-making to have an oven thermometer in the oven so you can monitor the temperature.
- After 3 hours, turn off the oven but leave the yogurt in it with the door closed for 5 hours.
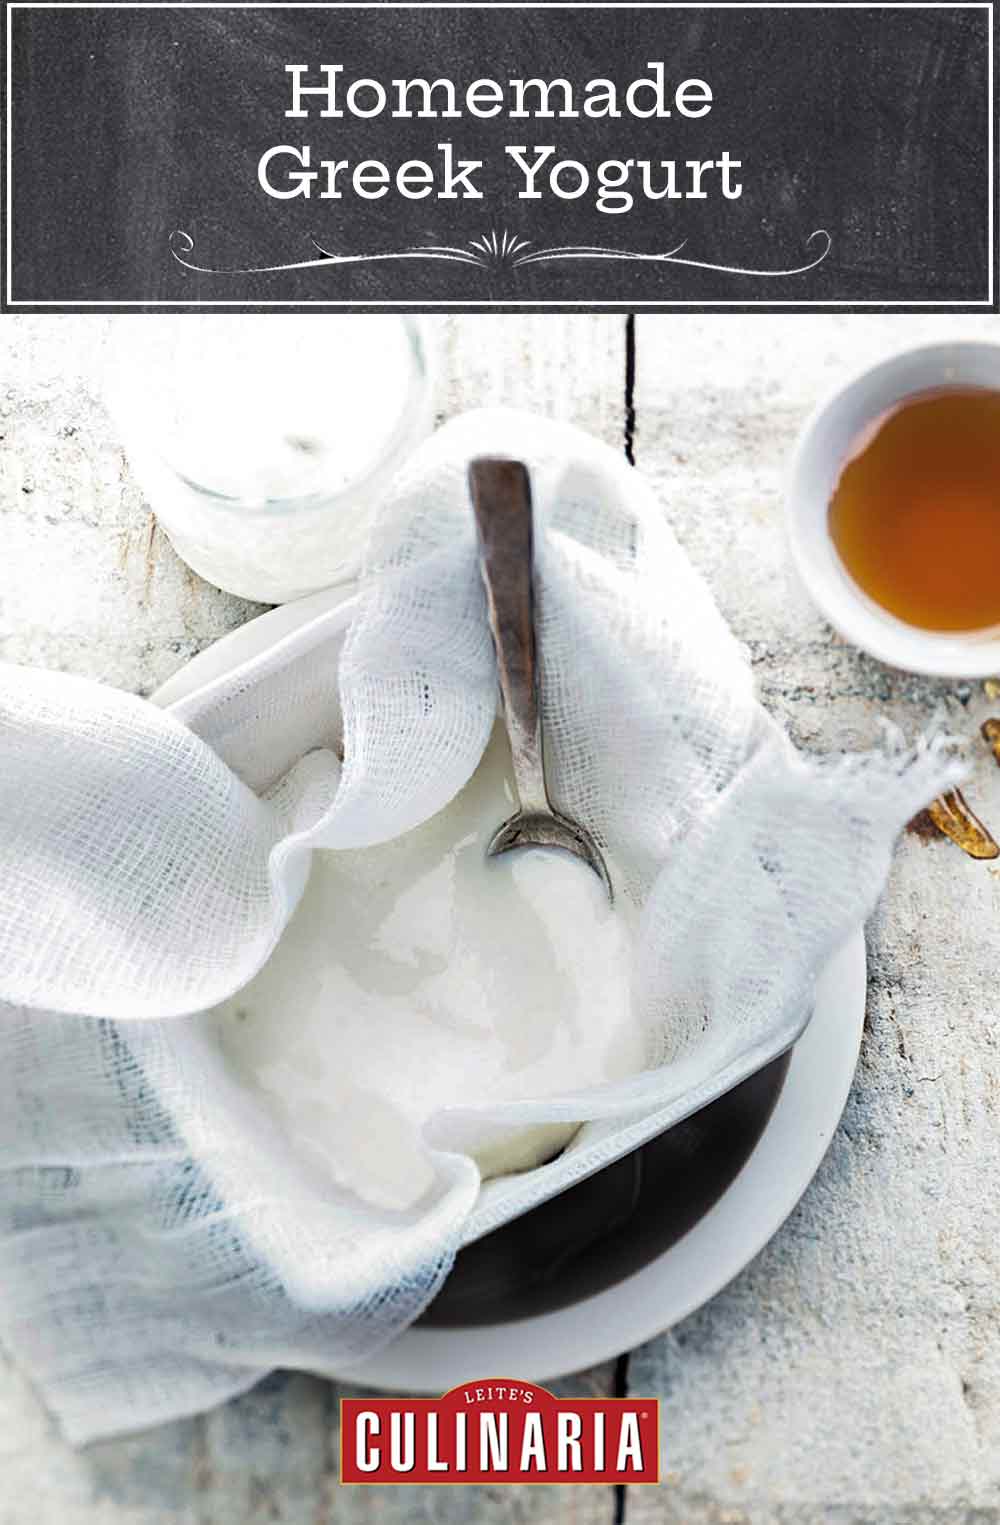
- Line a fine-mesh sieve with a piece of muslin or similar cloth, and set the sieve over a large bowl. Pour the cooked yogurt onto the cloth. Place the entire bowl, sieve, and yogurt concoction in the refrigerator for at least 2 to 4 hours and for as long as 10 hours. Don’t be tempted to rush the draining. The longer the yogurt drains, the thicker it will become.
- When the yogurt is as thick as you like it, transfer it to a sealed container or eat it immediately. The yogurt will keep for up to a week in the refrigerator.
How to make homemade Greek yogurt in the pressure cooker
- Pour 2 cups plus 2 tablespoons water into a pressure cooker, clamp down the lid, and bring to a boil.
- Gently warm the milk in a saucepan over low heat, being careful not to heat it above 110°F (44°C). Use a candy or deep-fry thermometer to check the temperature. Add the yogurt culture or goat’s milk yogurt and stir well.
- Allow the steam to escape from the pressure cooker and pour the water out. Pour the yogurt inside and clamp down the lid, replacing the valve. Leave overnight or for 8 hours in a pressure cooker.
- In the morning, open the pressure cooker, line a fine-mesh sieve with a piece of muslin or similar cloth, and set the sieve over a large bowl. Pour the cooked yogurt onto the cloth and let it drain into the bowl. Put the bowl, with the sieve on it, in the refrigerator for at least 2 to 4 hours and for as long as 10 hours. Don't be tempted to rush the draining. The longer the yogurt drains, the thicker it will become.
- When the yogurt is as thick as you like it, transfer it to a sealed container or eat it immediately. The yogurt will keep for up to a week in the refrigerator.
Explore More with AI
Nutrition
Nutrition information is automatically calculated, so should only be used as an approximation.
Recipe Testers’ Reviews
Did you know only 68% of the recipes we test make it onto the site? This recipe survived our rigorous blind testing process by multiple home cooks. It earned the Leite’s Culinaria stamp of approval—and the testers’ reviews below prove it.
This is a great and easy recipe to make your own Greek yogurt. It’s a bit time-consuming but absolutely worth it. And it’s not much hands on time, anyways.
I used goat’s milk yogurt, which is readily available in my area. I heated the milk, using a digital thermometer, to 110°F and than whisked in the yogurt. Poured the mixture into 200-ml twist-on glasses (these glasses are actually from my yogurt maker) and baked them in the oven for exactly 3 hours. My oven runs a bit higher than the mentioned 125°F, even on the lowest setting, so I switched it off and on every 30 minutes. Than I poured the yogurt, which was somewhat runny, in a sieve lined with paper towels and let it drain for 3 hours in the fridge. The yogurt turned out nice and thickened with a fresh, pleasant taste. Not goaty at all 🙂
Next batch I will make using my yogurt maker (takes longer, but is easier) and will drain it longer.

I very successfully made the very slow version of this homemade Greek yogurt, and, though it took a very long time, it resulted in some of the finest yogurt I have ever had, and I will eagerly try to replicate this in the future. It was super creamy as described. Not only was the texture superior, but the taste was excellent as well.
While the author of this recipe states the secret is in the draining, I believe the secret starts back with the ingredients. I selected a goat milk for my milk and a sheep milk yogurt for the yogurt. I did this because the goat milk yogurt I was able to locate all had stabilizing and/or thickening agents such as tapioca and/or pectin and I not only did not know how these would work as inoculators but I also did not want those additional ingredients in my yogurt. The sheep milk yogurt contained none of those unnecessary ingredients.
I used a thermometer as directed, though I feel this can successfully be done without taking the temperature every step along the way and also without precise measurements. Note that the author translates the milk measurement of 1 quart into metric as 1 liter and while such an imprecise translation would not generally work in baking, it is absolutely fine here.
I heated the milk to 110°F, though I have previously heated to a higher temperature in this step of making yogurt. I added the goat’s milk yogurt and stirred well. I poured into the large, ovensafe glass container as directed and placed into the pre-warmed oven. Because my oven did not set to as low as 125°F, I initially went with the method of briefly turning the oven on periodically to keep it warm inside. I also wrapped my glass container in a big blanket to help keep it warm. At 3 hours, the changes were imperceptible. Ultimately, I kept this process going for just over three DAYS (yes, for nearly 77 HOURS), at which time I was satisfied with the thickness of my yogurt. It may seem scary to folks who feel a need to keep everything under refrigeration, but remember, these are live cultures!
Then it was on to straining. It is my preference to use a T-shirt but I did not have this available. Remember, my yogurt was not very thick or solid at this point. I used an entire package of cheesecloth (9 square feet) folded over and over and then set into a very fine mesh strainer, allowing the yogurt to drain, but being carefully to set it up so I did not drain away too much of my valued product! I refrigerated for 3 hours and checked it, but it was still very loose, as it was also at 4 hours. At 24 hours, I had moderately thick yogurt.
What happened as I began to unwrap it was magical—I opened the cheesecloth to find the creamiest most lovely yogurt ever, almost a custard! Glisteningly beautiful. Melt-in-your-mouth deliciousness. Rich. Creamy. A little goat-y underneath the richness.
I have made yogurt using a variety of methods and none have yielded the quality yogurt that I achieved with this batch. This is the best yogurt I have ever had in the United States.


Can you use almond milk?
Alyse, we didn’t try it with almond milk, and so I’m very hesitant to suggest it as there are different proteins in the different sorts of milk, and I suspect they won’t behave themselves as they should.
Hi Alyse and Renee! Yes, you can make almond milk yogurt, but not with this recipe! This recipe would achieve a cultured non-dairy product, and it would have probiotics, but it would not gel/set/thicken without an additional ingredient added for this purpose.
Thank you, Elsa! I KNEW you’d have the answer.
I have great luck with my yogurt by putting my filled jars in an insulated lunch bag in the cavity of my microwave overnight after I’ve inoculated it with the live culture. I don’t turn it on, of course, I just rely on the well insulated cavity to allow the mixture to cool very, VERY slowly while resting undisturbed.
That method is simple and has never failed me.
Have you tried adding nonfat milk powder? I find it thickens up the yogurt wonderfully without the need to strain. I mix a very small amount of my warm milk into the powder to form a paste so it will, then, dissolve in more milk and then I add that to the whole volume.
Another nice addition is some sweetened condensed milk. This is yogurt Vietnamese style and I learned about it from comments to David Lebovitz’ blog.
Great tips, Rainey. Thanks so much for letting us know about the nonfat milk powder. We will have to give it a try!
I’ve been reminded of this recipe twice over the past couple of days and wondered if it really was as simple and as easy as I recollected…and it is! I’m now eager to try a couple of new iterations using this recipe, including non-goat dairy (that would be cow milk!) and/or a vegan version(s). Stay tuned!
Can’t wait to hear about your variations, Elsa. Please let us know!