Yes, you can make your own homemade yogurt, and it’s actually quite easy. You don’t even need a fancy yogurt maker. All you really need is the step-by-step how-to information below, some milk, a little yogurt to use as a starter, and a thermometer. Toss everything together in the evening and the magic happens while you snooze. [Editor’s Note: We’ve attempted many, many a homemade yogurt recipe over the years. Most were disasters. This is the only recipe that answered all our questions and worked without a hitch time after time. At a glance, the recipe may seem long and intimidating, but actually, it’s quite the contrary given all the helpful advice the author includes.]–Angie Zoobkoff
What kind of milk should I use for homemade yogurt?
A few insightful words from Janet Fletcher, the creator of this recipe and author of Yogurt, on what sort of milk to use when you make homemade yogurt:
You can make yogurt with any type of milk
You can make yogurt with nonfat, low-fat, or whole milk; and with milk from cows, goats, or sheep. (Fortunate is the person with access to sheep milk. It is exceptionally high in fat and protein and makes luscious yogurt.) I use whole milk because I like the richer flavor and body that fat provides. The higher the milk fat, the creamier and richer the yogurt feels in your mouth. You can even add some half-and-half or cream for extra-rich yogurt—perhaps if you intend to use the yogurt for dessert. Start with 10 percent half-and-half or cream to 90 percent milk and see if you like the results.
You can make yogurt as thick as you please
While full-fat milk yields yogurt that makes a voluptuous impression, it’s largely protein that makes yogurt thick. If you choose to use reduced-fat milk (nonfat or low-fat), I recommend adding instant nonfat dry milk in the ratio of 2 tablespoons per 1 quart of milk. The dry milk boosts the solids content (mostly protein) in your milk base, yielding firmer, thicker yogurt and partly compensating for the lack of fat. A little instant nonfat dry milk even makes whole-milk yogurt firmer and more satisfying, so I almost always add it. I prefer instant dry milk, which dissolves readily. Regular dry milk works, too, but it takes a lot of whisking to get it to dissolve in fluid milk. Boosting the solids in this way is comparable to what commercial yogurt makers do when they concentrate the milk with reverse osmosis before culturing. Goat’s milk has fewer solids than cow’s milk, so it yields a more delicate and thinner yogurt. (That’s why most goat-yogurt manufacturers add stabilizers.) You can make a thicker yogurt from goat’s milk by whisking in two tablespoons instant nonfat dry milk per quart of milk. Dry cow’s milk is fine to use—unless you are allergic to it, of course. Dry goat’s milk is available from online sources, but it is expensive.
Make certain your milk is fresh
Always start with fresh milk from an unopened container.
Want to save this?
Mind your food safety Ps and Qs
And one last thing. Even if you are using a freshly opened container of pasteurized milk‚ you should heat it to at least 185°F (85°C) before culturing as in the instructions below. Pasteurization kills pathogens but it doesn’t sterilize the milk. By heating the milk to at least 185°F (85°C), you eliminate competitors to the desirable bacteria in your culture. Just as important‚ you denature more milk proteins so that they coagulate as a single mass rather than as clumpy curds. Also, yogurt made from heated milk is more stable and less likely to release whey.

How To Make Homemade Yogurt
Equipment
- Instant-read thermometer; incubation setup of some sort (see below How To Choose An Incubation Method For Your Homemade Yogurt)
Ingredients
- 1 quart milk of any type
- 2 tablespoons instant non-fat dry milk (optional but recommended if you’re using low-fat or non-fat milk)
- 2 tablespoons plain yogurt with live active cultures, at room temperature
Instructions
- Assemble all the necessary equipment (see below How To Choose An Incubation Method For Your Homemade Yogurt). You don’t want to be rummaging around for jar lids when your milk is ready to culture. Make sure that all equipment is scrupulously clean with no soap residue that could damage the culture.
- In a 2- to 3-quart (1.8- to 2.8-liter) stainless steel saucepan add in milk and whisk in the instant nonfat dry milk, if using. Set the pan over medium-low heat. For thicker yogurt, heat until the milk registers 195°F (91°C) on an instant-read thermometer, whisking often to prevent the milk from scorching, about 10 minutes. Adjust the heat as needed to keep the milk at or near 195°F (91°C) and cook, whisking often, for 10 minutes. Remove from the heat. (For thinner yogurt, heat until the milk registers 180°F (82°C) or 185°F (85°C) on an instant-read thermometer, whisking often to prevent the milk from scorching, about 10 minutes.) Adjust the heat as needed to keep the milk at or near 195°F (91°C) and cook, whisking often, for 10 minutes. Remove from the heat.
- Cover the saucepan and let the milk cool to between 110°F (43°C) and 115°F (46°C), about 1 1 ⁄ 4 hours. You can dramatically accelerate the cooling by placing the saucepan in a large bowl or sink full of ice water and stirring constantly. The milk temperature will plummet to the culturing range in less than 5 minutes, so monitor the temperature often. If it drops too low (below 110°F [43°C), return the saucepan to the stove and gently rewarm the milk over low heat just until it reaches 110°F (43°C) to 115°F (46°C).
- While the milk cools to the proper culturing temperature, prepare the jars. Choose a 1-quart (946 ml) jar or several smaller jars with a total capacity of 1 quart (946 ml) or use the jars that come with your yogurt maker. Wash well and then fill the jars with hot water and let stand until you need them. Replace the hot water if it cools so the jars will be warm when you fill them and drain just before filling. Alternatively, heat the jars with hot water, and then drain and place in a preheated electric yogurt maker to keep warm until you are ready to fill them. Note that you don’t have to use jars. You can incubate yogurt in a glass or earthenware bowl, or in any nonreactive (nonaluminum) container. You can even incubate it in the saucepan you heated the milk in. However, once the yogurt has set, you need to chill it to stop the fermentation and firm the curd, so make sure your incubation container will fit in the fridge. You don’t want to move just-set yogurt to other containers or you will damage the fragile curd.
- Put the yogurt in a small, clean bowl and whisk in about 1 cup of the cooled milk. Pour this mixture back into the saucepan, straining it if desired, and whisk gently but thoroughly. You want to incorporate the culture without creating a lot of foam. Immediately move the milk into the prepared jar or jars and cover.
- Incubate the yogurt according to your chosen method—see How To Choose An Incubation Method For Your Homemade Yogurt below—until the yogurt thickens and firms. Avoid moving or otherwise agitating the yogurt while it ferments. Check for set after 4 hours and at least once per hour after that. Yogurt can take anywhere from 4 to 12 hours, or even longer, depending on the incubation temperature and the strength of the culture. The longer it takes, the more tart your yogurt will be, as the culture continues to produce lactic acid. If you prefer mellow yogurt, try to stop the incubation as soon as the yogurt has firmed.
- To check your homemade yogurt for set, tilt the jar slightly. If the yogurt looks like baked custard and doesn’t flow, it has set sufficiently. If it is jiggly and you want it firmer, let it incubate longer. Incubating longer should make it a little more tart and firm, but you can over-incubate it. If whey has collected on the surface, the yogurt probably fermented a little too long or too fast and is starting to separate. Either pour off the surface whey or, after chilling the yogurt, stir it back in. Don’t try to stir the whey in before chilling the yogurt, as the curd will be too fragile. Cover the yogurt and place it in the refrigerator until chilled through, at least several hours.
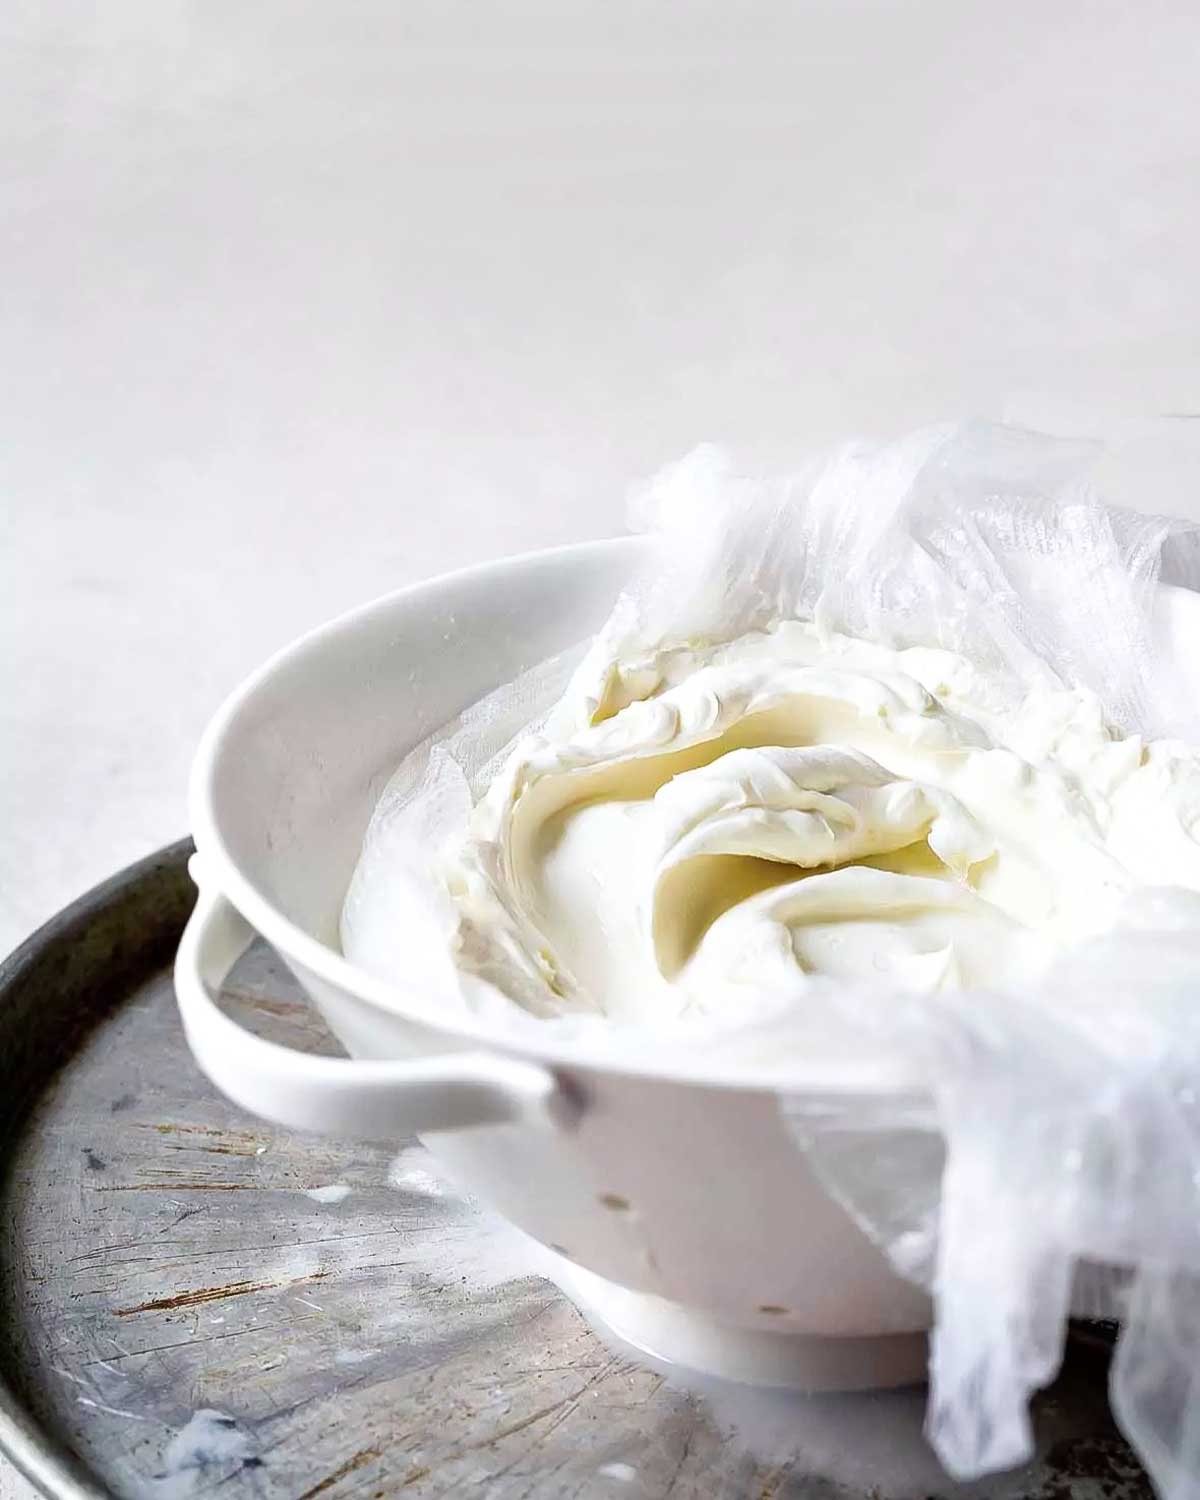
- After the yogurt has been in the fridge for several hours, take a taste. If a thicker yogurt is desired, drain it. Draining yogurt dramatically improves its texture, making it thicker, creamier, and more mellow by removing the whey. Draining yogurt also extends its life. And if you are lactose-sensitive, you should find drained yogurt more digestible.To drain your yogurt, gently pour the chilled yogurt into a colander or strainer lined with three layers of dampened cheesecloth. Cover with a plate or cloth—you’re protecting the yogurt, not pressing it—and place it in the fridge. Drain the yogurt until it has the consistency you like. After an hour, the yogurt will be noticeably thicker. If you drain the yogurt more than you’d intended, no problem, simply whisk some of the whey back into the yogurt, adding as much as it takes to attain the texture you desire. Scrape the drained yogurt into a container, cover, and refrigerate.To make Greek yogurt, which is essentially drained yogurt, instead of stopping after an hour of draining, keep going. Depending on the yogurt you started with, it may take 3 to 4 hours to achieve the thick, palate-coating consistency of Greek yogurt.Don’t be concerned if each batch of yogurt you make is a little different. Unlike commercial producers with their controlled processes, your home yogurt “factory” is subject to variability: in the milk and culture used, the way you heated and cooled the milk, the length of the fermentation, and the fermentation temperature. Experiment, make notes, and over time you will find the combination of culture, time, and temperature that produces yogurt with the texture and flavor you like.
Notes
How To Choose Your Incubation Method
Your challenge as a homemade yogurt-maker is coddling the culture, keeping it in the desired range for the several hours it takes to do its job. Yogurt bacteria tolerate a range of roughly 105°F (41°C) to 115°F (46°C). A temperature of 118°F (48°C) or higher will kill most cultures. If the incubation temperature falls below 105°F (41°C), the culture will produce more polysaccharides and the yogurt will likely be slimy or “ropy” or may not set at all. Know where and how you are going to incubate the yogurt before you start, and test to make sure you can maintain that temperature. To test, fill a jar with water at 115°F (46°C) and “incubate” it in your chosen manner as if it were cultured milk, taking its temperature with an instant-read thermometer every hour or so. If you’re using a yogurt-making appliance, follow the manufacturer’s directions. Before you use it for the first time, and occasionally thereafter, verify the incubation temperature using a jar or two of water, as described above. Of course, if the machine is producing yogurt reliably for you, you don’t need to question its thermostat. But if you are having trouble getting batches to set, it could be because the device is malfunctioning. If you are not using a yogurt-making appliance, you will need to create a warm environment for incubating your yogurt. The target temperature range is not easy to maintain for several hours. Some people successfully incubate yogurt in their gas oven with only the warmth of the pilot light. (Alas, many newer ovens do not have pilot lights.) If you want to try this, preheat the oven to the lowest setting first, and then turn it off. Test the temperature after half an hour and then hourly to see if the oven remains within the target range for at least 5 hours. If it does, it should work as an incubator. Some people use an insulated container, such as a picnic cooler, partially filled with warm water as an incubator. Others wrap yogurt jars in an electric blanket or set them on a heating pad or in a jury-rigged Styrofoam container with a low-wattage light bulb. You can also keep the incubating yogurt in a consistently warm spot in your house, such as near a radiator or sunny window. A food dehydrator with removable shelves can work as an incubator if the temperature can be set low enough. Some people use a countertop slow cooker, heating the milk slowly in the device and then unplugging it to cool the milk to the culturing temperature. Wrapping the pot with towels after culturing helps maintain temperature. When I don’t use an electric appliance, I incubate my yogurt the way home cooks have for centuries: wrapped in blankets. (I use small throw blankets.) First, I wrap my warm, just-filled quart jars in kitchen dish towels so they won’t soil the blankets. Then I snuggle the jars into a blanket nest—a blanket underneath and another on top and, if the house is cold, another blanket around them for good measure. Then I ignore the heap for 4 to 5 hours before unwrapping it to check for set. If the milk has not set yet, I check it every half hour or so thereafter. Whichever incubation method you choose, avoid jostling the yogurt as it incubates. It prefers to be undisturbed.
Explore More with AI
Nutrition
Nutrition information is automatically calculated, so should only be used as an approximation.
Recipe Testers’ Reviews
Did you know only 68% of the recipes we test make it onto the site? This recipe survived our rigorous blind testing process by multiple home cooks. It earned the Leite’s Culinaria stamp of approval—and the testers’ reviews below prove it.

I really appreciate this homemade yogurt recipe with all its helpful notes and information. Making homemade yogurt is as simple as can be, but there are many variables that can affect the final outcome, and the author really tried to cover all the bases. Let’s get to my results-—this was the BEST yogurt I’ve ever made!
What caught my attention about this recipe were two notes that I hadn’t seen in other recipes. One was to use milk powder for a thicker result. The other was the direction to heat the milk to 195°F and sustain it for 10 minutes if a thicker product is desired. In my previous attempts at making yogurt, I have ended up straining it to obtain a thicker yogurt. I don’t like doing that for a couple of reasons—you lose product and also it’s a pain.
I tested my first batch using four 1-cup canning jars and they took about 5 1/2 hours to complete. I used whole milk and instant milk powder. The incubating temperature seemed to range from 115°F to 120°F. My incubation method was to place the jars in a warm water bath in a large pot, cover it with a lid, and place it in a slightly warm oven. One step that I would recommend is to strain the milk before ladling it into jars as there’s always a bit of flotsam and jetsam. I strained the mik into a 1-quart measuring cup so that it was easy to pour into the jars. I call this a good recipe and method to follow for perfect yogurt.

Although this homemade yogurt recipe looked intimidating because there was a lot of information to read, the recipe was in fact simple and was not particularly time-consuming.
Hands-on time was about 37 minutes, which was heating the milk up rather slowly on my electric cooker. I incubated the yogurt overnight in an airing cupboard. Total time taken was 37 minutes to heat the milk, 1 hour of cooling to about 43°C, and then overnight incubation to set the yogurt, so in total about 15 and a half hours. I opted for the thicker version of the yogurt and so heated it to 91°C for 10 minutes. I left the mix to cool for 1 hour at room temperature. I checked the incubated yogurt after 4 hours but it had not set at all, and I thought perhaps it would not set, but by the next day it was smooth and set. Total incubation time was about 13 hours.
The yogurt was softly set, more runny underneath the surface than on top, and so perhaps it could have been left to set for longer. The yogurt alone tasted quite mild and not at all bitter as some homemade yogurt I’ve made in the past. I made a fruit compote with frozen berries and sugar and stirred this through the finished yogurt. The texture was really smooth and without lumps. I think the recipe gives interesting details on the process of making yogurt.


You can just heat up ultra pasteurized milk BUT! When the milk protein is heated again to 180F for 30 minutes you get a thick creamy mild yogurt without having to use a thickener of any kind. I tried it once and never looked back! If I have to add milk powder, gelatin, pectin and/or drain it sort of defeats the purpose. I incubate at 107 F for 9-10 hours in turned off preheated gas stove with vent covered!! You can leave longer for a more tart yogurt! I always use the best cream top milk I can find
Nice, Missy! Thanks so much for sharing this with us.
Once I’ve inoculated my milk I place the jars in an insulated lunch bag and place that in my microwave cavity overnight. Easy peasy and I’ve never had a failure to produce the yogurt matrix.
I also prefer whole milk yogurt and I sometimes add both nonfat milk powder for a thicker yogurt and sweetened condensed milk to counterbalance some of the tang. I understand that’s the Vietnamese style.
I use wide-mouth pint size jars and fill them about halfway so I can top the yogurt with whatever I like and have a convenient take-away ready in my fridge. My favorite combo is lemon curd, a handful of fresh blueberries, and a sprinkle of granola. It’s practically dessert.
Lovely, rainey. Thank you so much for sharing your tricks and techniques!
May I share my lazy yogurt secret here? I use ultra pasteurized organic 1% milk. That means I can skip the heat up/cool down step. I use wide mouth quart size canning jars. Heat the milk in the microwave to 99 degrees. Add 3TBS yogurt from my last batch, stirring well with a whisk. Wrap in dishtowels, set into a large pot, cover with another dishtowel and put in my oven with the light turned on. Leave overnight, next morning, yogurt. It can be drained if you want it thicker, but I usually use as is, and it does set up a bit more after refrigeration. It is mild and delicious.
Stacey, thank you! Love it.