

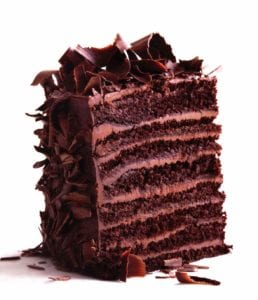
This Red Eye Devil’s Food cake is a riff on an American classic takes its name from the coffee in the batter. “Like the Red Eye coffee drink in espresso bars that’s punched up with an extra shot of espresso,” explains its creator, former White House Executive Pastry Chef Bill Yosses. “Here, coffee gives the chocolate cake a lightly bitter edge that cuts the sweetness of the chocolate. The coffee-enhanced cocoa layers sandwich a surfeit of fudgy, bittersweet ganache. If this is not the ultimate birthday cake, I can’t imagine what is.” Actually, it’s the ultimate cake for any occasion. Including no occasion other than a craving for chocolate cake.–Renee Schettler Rossi
Red Eye Devil’s Food Cake
Ingredients
For the chocolate cake
- 3 cups all-purpose flour
- 2 teaspoons baking soda
- 1/2 teaspoon baking powder
- 1/2 teaspoon salt
- 1 cup Dutch-processed unsweetened cocoa powder
- 2 cups strongly brewed coffee
- 2 (4-ounce) sticks unsalted butter, softened, plus more for the pans
- 3 cups granulated sugar
- 4 large eggs, at room temperature
For the ganache
- 14 ounces coarsely chopped dark chocolate (minimum 70% cacao content)
- 3 cups heavy cream
For decorating and serving
- 1/2 pound block bittersweet chocolate for chocolate curls for decorating, optional
- Whipped cream for serving, optional
- Fresh berries for serving, optional
Instructions
Make the chocolate cakes
- Preheat the oven to 350°F (176°C). Position a rack in the center of the oven. Butter two 9-inch round cake pans with unsalted butter. Line the bottoms of the pans with parchment or waxed paper rounds and butter the rounds.
- Sift the flour, baking soda, baking powder, and salt onto a piece of parchment paper or into a large bowl.
- Place the cocoa in a small bowl and whisk in the coffee, a little at a time, until smooth.
- In the bowl of an electric mixer fitted with the paddle attachment, beat the butter until fluffy and then beat in the sugar. Mix on high speed until very light and fluffy, 6 to 8 minutes.
- Add half the flour mixture to the butter mixture and mix on low speed just until incorporated. Add the eggs, 1 at a time, beating to incorporate after each addition. Add the cocoa-coffee mixture and beat to incorporate. Add the remaining flour mixture and mix just until incorporated.
- Divide the batter evenly between the 2 pans and bake on the center rack, turning the pans from back to front during the baking, until a cake tester inserted into the center of the cakes comes out completely clean, about 45 minutes.
- Let the cakes cool in the pans on racks for about 30 minutes.
- Slide a thin knife or offset spatula around the sides of the pans and gently turn them over onto the wire racks to unmold the cakes. Carefully peel the paper rounds from the bottoms and let the cakes to cool completely, at least 30 to 40 minutes more. Cover and refrigerate the layers to make the cake less crumbly and easier to slice when cutting the layers.
Make the ganache
- While the cakes cool, place the chocolate in a heatproof bowl.
- In a medium saucepan over medium-high heat, bring the cream to a boil. Pour the hot cream over the chocolate and let it sit for 3 minutes.
- Whisk until the cream and chocolate are thoroughly combined and smooth and slightly cooled. Cover tightly with plastic wrap and refrigerate for at least 4 hours. Once the ganache is chilled, whisk just until fluffy.
Assemble the cake
- Using a long serrated knife, cut each cake horizontally into 4 thin layers. To do this, place 1 hand flat on top of a cake. Slice into the cake about 1/2 inch from its top and use a sawing motion to slowly move the knife into the cake about 1 inch. Then, still slicing back and forth, turn the cake (counterclockwise if you are right-handed, clockwise if you are left-handed) on the table, going around the circumference of the cake but not cutting into its center. After the first full outer circle is complete, hold the knife level, dig into the cake another inch, and turn the cake again in the same direction. Repeat until you have sliced all the way through the cake. Carefully remove this top layer and repeat to obtain 4 layers from each of the 2 cakes.
- Place 1 of the bottom cake layers on a platter or cake stand and spread a thin layer of ganache over the top. Repeat with the rest of the layers. Use some of the remaining ganache to apply a very thin coat on the sides of the cake, giving it a “crumb coat” that seals in the crumbs and prevents them from appearing on the outside of the finished cake. Refrigerate the cake with its crumb coat for 1 hour. Then slather the cake with the remaining ganache.
- Sprinkle the chocolate curls on the top of the cake and gently press them against the sides. Voila.
Notes
What You Need To Know About Making This Cake Simpler
Before you get all scared off by this chocolate cake’s stunning and slightly imposing countenance, let’s discuss its darn near countless layers. Impressive, are they not? They’re accomplished by slicing two round chocolate cake layers into several layers each. But honestly? The cake tastes just as swell if you forego all the slicing and layering and instead slap one round layer cake on top of the other, slather them with ganache, and call it a day. The chocolate curls are still a nice touch, though, if you ask us. Which you didn’t. But we tend to have an opinion on most things.
Explore More with AI
Nutrition
Nutrition information is automatically calculated, so should only be used as an approximation.
Recipe Testers’ Reviews
Did you know only 68% of the recipes we test make it onto the site? This recipe survived our rigorous blind testing process by multiple home cooks. It earned the Leite’s Culinaria stamp of approval—and the testers’ reviews below prove it.

If you love chocolate, then you’ll love this red eye devil’s food cake. It’s moist and full of great chocolate flavor. Yes, it took time and was labor intensive. But it was so worth the work. It’s a delicious cake and my family loved it!
Making the chocolate curls as suggested was also a bit of a problem: I tried with a vegetable peeler, and then with a cheese shaver, and nothing worked. Next time, I’ll go back to my old ways of making chocolate curls by melting and spreading a thin layer on waxed paper and then peeling it off in strips.
I did have a problem with the ganache—it was a bit stiff.
This red eye devil’s food cake is delicious! I didn’t go through the work of making 4 layers and frosting them all, but the 2 cake layers were absolutely perfect. Not only was it dark, moist, and full of flavor, but the cake settled into flat layers—no slicing off the hump.
It does take a bit of work, though, with the coffee/cocoa mix, then the creaming and mixing here and there, but the end result is worth it. You’ll never look at a devil’s food box mix again.
The only problem I had was with the ganache: I couldn’t get it thick enough to spread or hold up to the weight of a layer of cake on top of it. Maybe too much cream? I ended up whipping it and it became mousse-like, but with just enough heft to frost the cake. The flavor was great, though.


Hi, I was wondering what the texture of the cake is like? The last few times I’ve made cakes they’ve been super moist but also SOOOO dense. I was wondering if this cake was more light (like a cupcake or store-bought cake mix) or denser?
Thanks!
I will try to do a fake answer to see if this does it again. What happens is automatically it will flip to the finder, and something weird will happen.
Of course, it’s not happening. Why is that? sdfbi4s
Liv, this will be denser, like the ones you made. This isn’t an airy cake!