TL;DR (Quick-Answer Box)
- What it is: Authentic Portuguese custard tarts, (pasteis de nata), featuring a rich, creamy egg custard baked in crisp, layered pastry shells.
- Why you’ll love it: These exquisite tarts deliver incredible flavor and texture, perfectly recreating the beloved Lisbon pastry experience in your own home.
- How to make it: This isn’t just puff pastry—it’s a special Portuguese lamination that creates a shatteringly crisp spiral. Use the traditional “thumbs-up” method to shape them before filling with a 220°F syrup-infused custard. See the step-by-step guide below.
Jump To
- TL;DR (Quick-Answer Box)
- Why this pastel de nata recipe works
- What’s a pastel de nata?
- Your pastel de nata questions, answered
- Storage & reheating
- Pastel de nata pro tips & troubleshooting
- Learn more
- More must-make Portuguese dessert recipes
- Write a review
- Pasteis de Nata ~ Portuguese Custard Tarts Recipe
- Recipe Testers’ Reviews
Featured Review
Just getting back from a first trip to Portugal and discovered these delicious treats 2 days before leaving. Had to find a recipe, and this one had the most best reviews, and I see why. Delicious and for someone who is terrible with pastry, mine came out half decent. I impressed myself! 🤣
sarah
Captain Ahab had the great white whale. I have the pastel de nata—the famous Portuguese egg tart. This little pastry has dogged me for years, taunting me, daring me to figure out its secret.
My quest started when I reported about them for the Los Angeles Times more than 20 years ago. Since then, I even visited the Antiga Confeitaria de Belém—three times!—where pasteis de Belem been sold since 1837.
The recipe has been a close-guarded secret for 187 years! Only six people know it, and they all meet behind locked doors to make both the custard and pastry dough. (Yes, they’re serious about their pasteis, my friend.) No matter what, I couldn’t get into that room.
Still, as I skulked around the confeitaria’s kitchens, I picked up some clues: the consistency of the uncooked custard, the texture and stretch of the pastry dough, the technique for making the pastry shells. (It’s all in the thumbs.)
All those clues and observations have been added to this recipe over the years. And it seems to have helped! It’s been shared on social media more than 65,000 times and has been mimicked (*cough* “ripped off”) by just about as many food bloggers. And I have it on good authority that a certain British judge on a certain British baking show used my recipe as the basis for a baking challenge. (I can’t hide it; I’m wicked flattered!)
Still, I’m working diligently, tweaking this recipe so that it comes as close as possible to the original.
So, Dear Reader, meet the Queen of all Portuguese Pastries. My Queen, meet Dear Reader. My work here is done!
Chow,


Why this pastel de nata recipe works
This custard tart recipe works for several reasons. First, size matters. In Belem, the tarts are large, and the ovens blast at blistering-hot 800°F (400°C). By making the tarts smaller, they bake perfectly in a home oven. Then there’s the sugar syrup. Cooking the syrup to the precise temperature of 220°F (104°C) ensures the custard sets perfectly. Last, the folding and rolling of the dough gives you that shatteringly crisp spiral of countless layers.
What’s a pastel de nata?
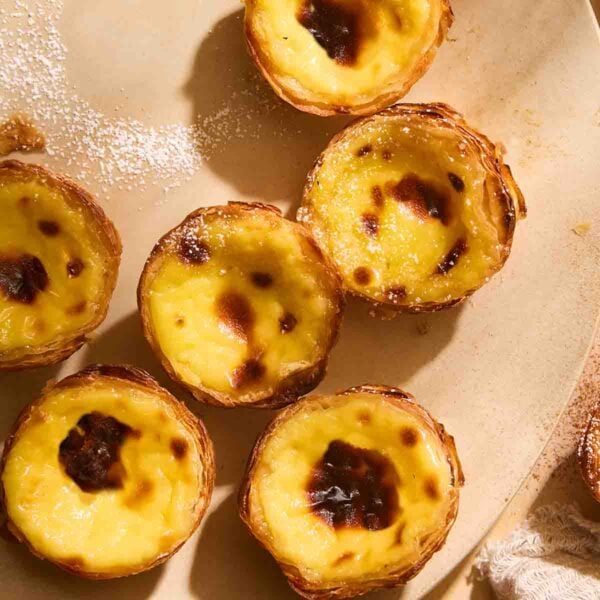
Pasteis de nata are devilishly luscious Portuguese custard tarts made with flaky pastry shells filled with rich egg-yolk custard. They were first made by monks at Lisbon’s Jerónimos Monastery sometime before 1834.
Like many Portuguese convent sweets, these tarts made use of surplus egg yolks, as egg whites were used for various purposes throughout Portugal, including starching clothes and clarifying wine.
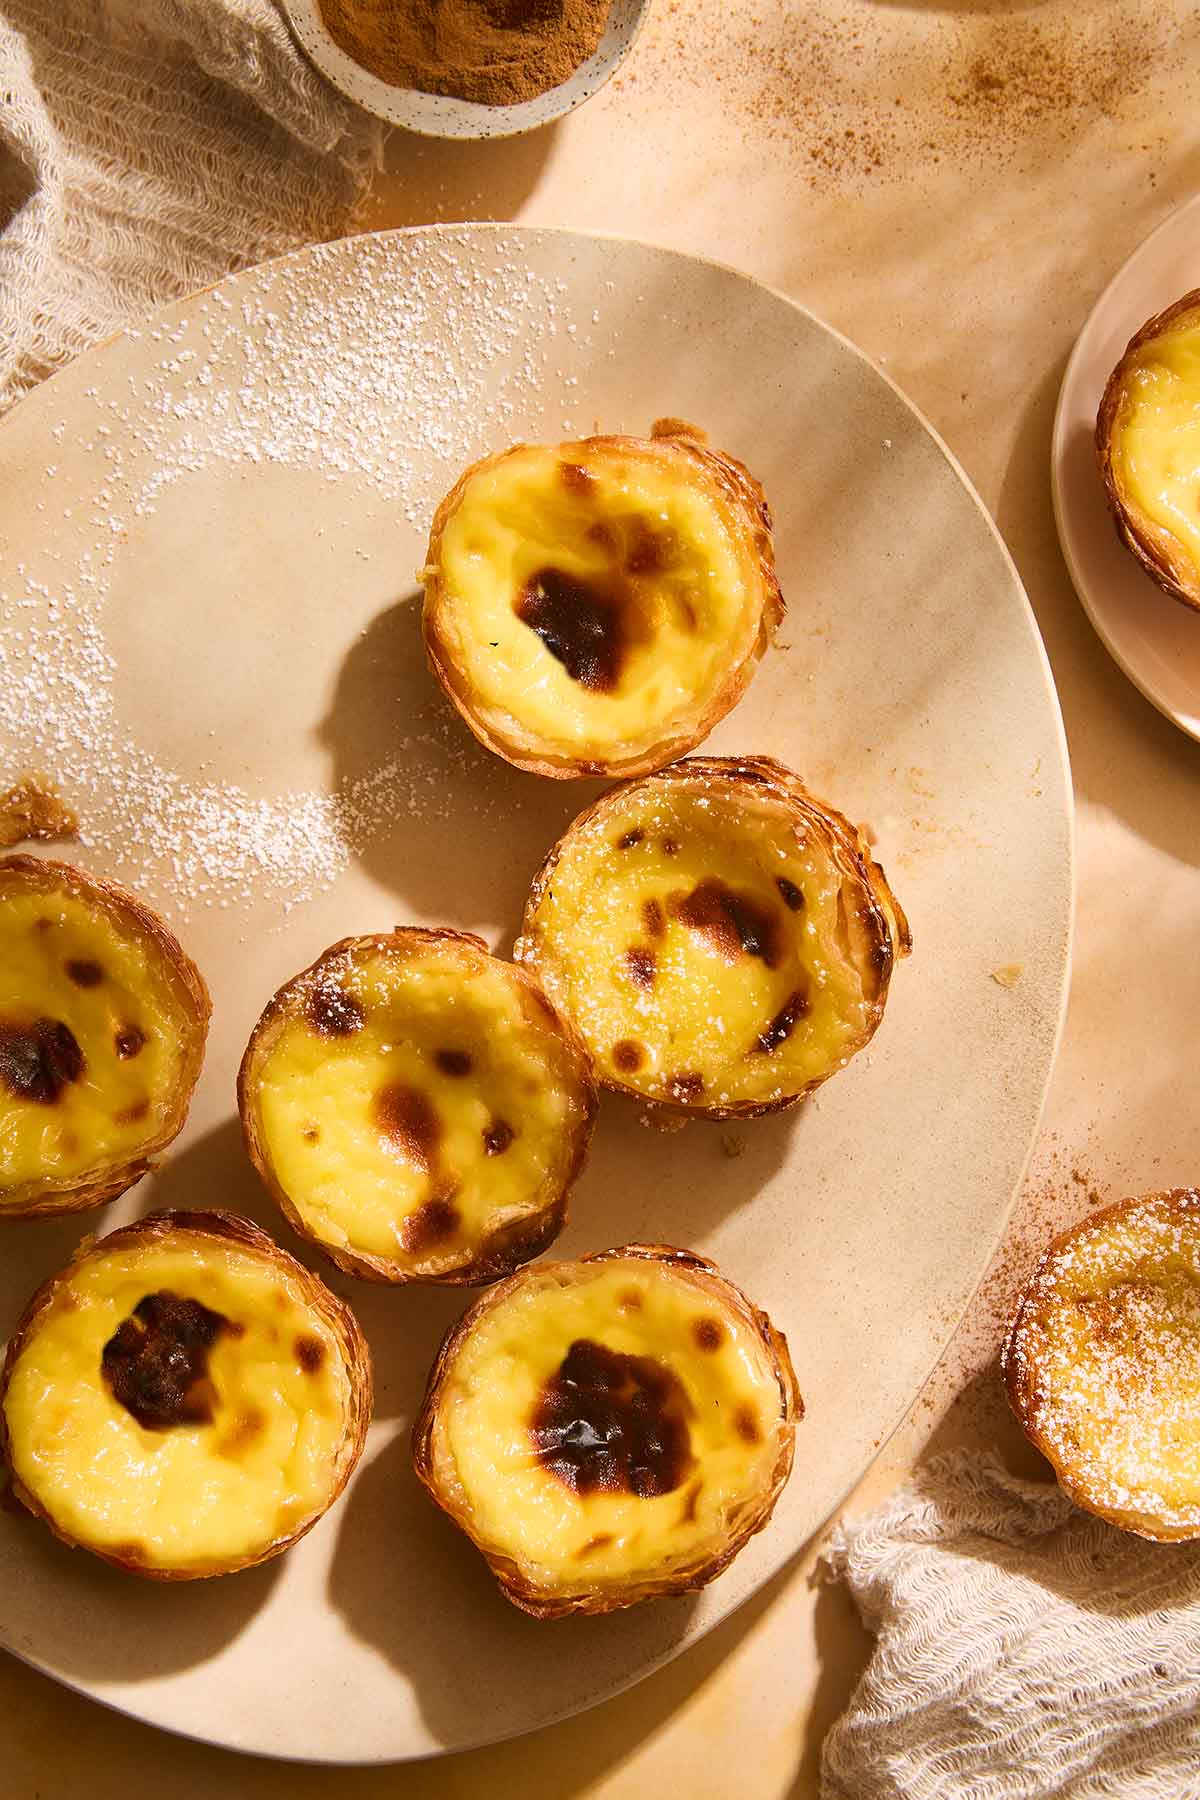
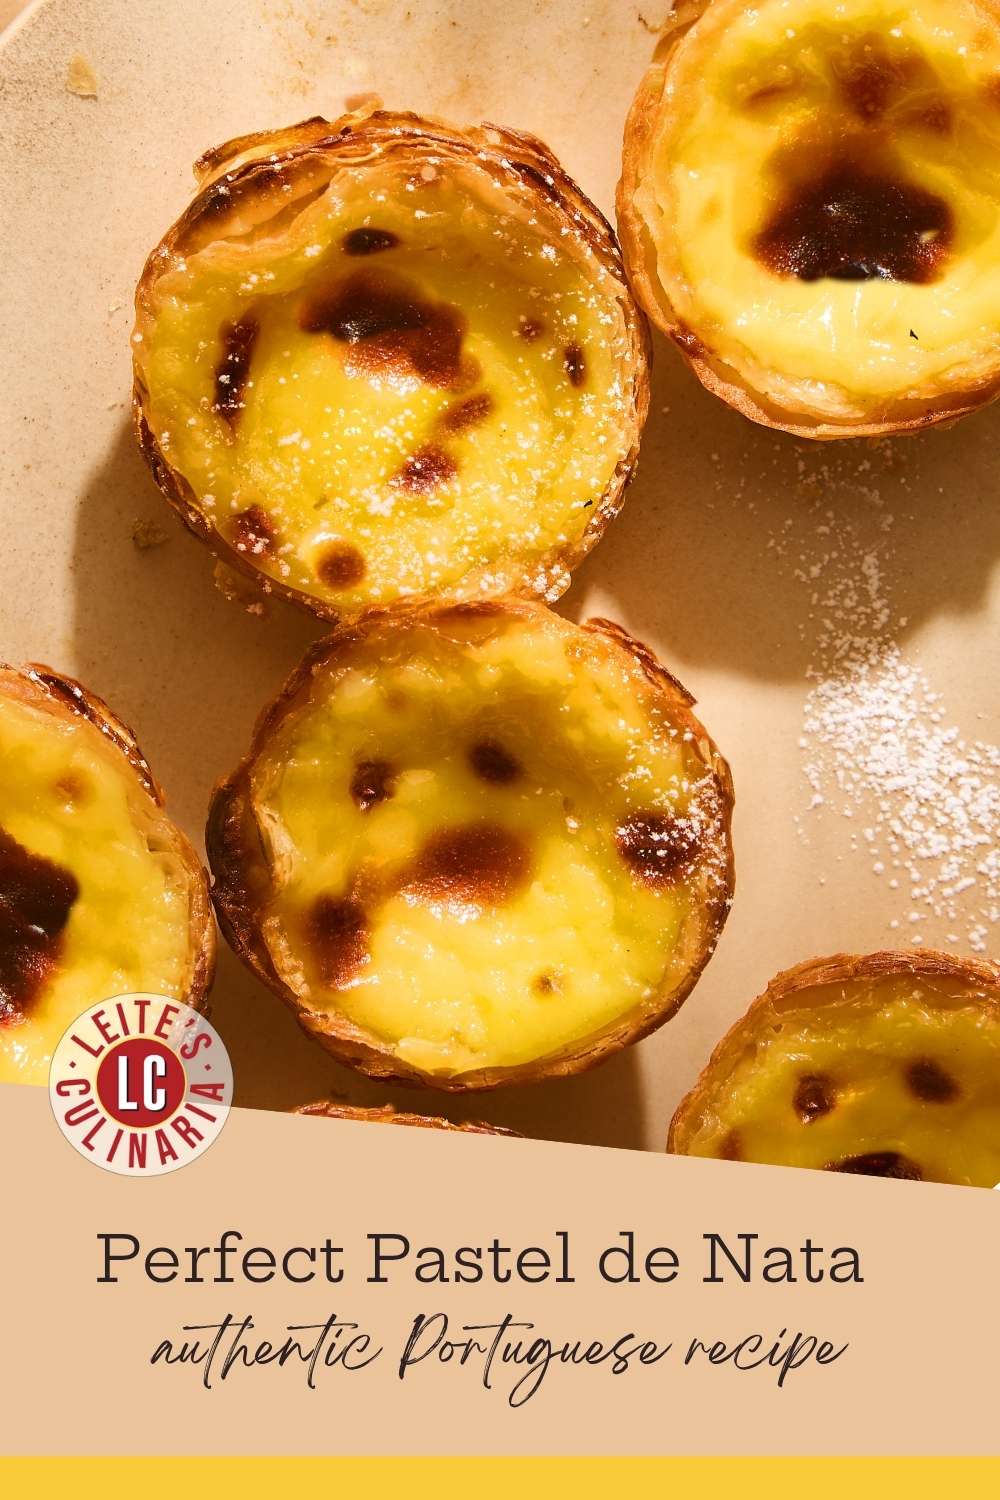
The custard is poured into spiraled shells made from spiraled dough, similar to puff pastry, and baked until the tarts develop dark caramelized spots on top. They’re served warm with a dusting of cinnamon and powdered sugar. Alas, sadly for us, the original recipe remains a secret at the Antiga Confeitaria de Belém, where they’ve been sold since 1837.

Your pastel de nata questions, answered
Great question! I know it can seem confusing. Pastel de nata is a single pastry, while pasteis de nata are several tarts. Basically, pasteis is the plural of pastel. (Tomato, to-mah-to, you know?)
Serve these delightful egg tarts warm, ideally warm from the oven. Dust them generously with powdered sugar and cinnamon—this is the traditional way. The perfect temperature brings out the contrast between the crispy, flaky pastry and the creamy custard filling.
They’re fantastic with a bica, Portugal’s answer to espresso. Or you could opt for my favorite, a galão—a tall glass filled with a shot of coffee and lots of milk and foam, kinda like a caffè latte.
Ah, the holy grail of pasteis—those black spots! Over the past 25 years, I’ve tried all kinds of techniques to get those burnt patches on top. I baked the custard on the highest rack of the oven. I heated a baking steel and slid the pastries underneath. I even broiled them, and none gave me the “look.”
I found the only reliable way to get those beautiful spots on top is to use a convection oven (or the fan setting in European ovens).
If your oven has a convection or fan setting, drop the temperature 25°F (15°C) from what’s listed, and start checking halfway through baking. Convection cooks faster and more evenly, so it’s easy to go from perfectly mottled to charcoal in no time.

Storage & reheating
- Up to 24 hours, cover them loosely with plastic wrap at room temperature, though the pastry may soften.
- For longer storage, pop them in an airtight container in the fridge for up to 3 days, but beware, the pastry will definitely lose its crispness.
- Freezing? Nope. I don’t recommend it, as it can change the custard texture and make the pastry tough.
- To reheat, warm them in a 350°F (175°C) oven for 5 to 7 minutes. Nix the microwave; it makes them soggy. Blech.
Pastel de nata pro tips & troubleshooting
☞ Neatness counts
When making the pastry, make sure the butter is evenly layered, all excess flour is removed, and the dough is rolled very thin and folded neatly.
☞ Take your temperature
You’ll need a thermometer to gauge the egg tart custard accurately. Don’t guess, se faz favor.
☞ No pastel gets better with age.
These are best eaten warm the day they’re made. Seriously.
Learn more
Read my article The History of the Pastel de Nata to discover the delicious backstory of Portugal’s iconic dessert. Want a detailed deep dive into a foolproof way to make these treats? Take my pasteis de nata recorded online masterclass.
More must-make Portuguese dessert recipes
Write a review
If you make these pastel de nata, or any dessert on LC, consider leaving a review, a star rating, and your best photo in the comments below. I love hearing from you.–David
Featured Review
After spending 10 days in Portugal this past Spring, and eating two Pastéis de Nata everyday in Lisbon, I’ve been craving them since.
I made these yesterday, and this recipe is spot on. The pastry was flaky, and the custard was perfectly set. This was my first time ever attempting laminated dough AND custard, yet both were exactly what I wanted.
As long as you take the time, care, and focus on precision, this recipe should deliver everything you’re wanting.
Rich Reinhardt
Well, bakers, I finally did it. I improved on my pastel de nata recipe. I took me the better part of a year, but I crafted a recipe that 1.) is way easier to make (none of that endless rolling), 2.) has a creamier, foolproof custard that doesn’t curdle, 3.) sports more frilly, crispy layers, and 4.) can be frozen and enjoyed whenever your heart desires.
Get the replay of the 3-hour class, equipment list, shopping list, and recipe.
Pasteis de Nata ~ Portuguese Custard Tarts
Video
The delightful and charming London pastry queen Cupcake Jemma uses my pastel recipe to make delicious custard tarts.
Equipment
- 1 Mini-muffin tin or…
Ingredients
For the pastel de nata dough
- 2 cups minus 2 tablespoons all-purpose flour, plus more for the work surface
- 1/4 teaspoon sea salt
- 3/4 cup plus 2 tablespoons cold water
- 2 sticks (8 oz) unsalted butter, room temperature, stirred until smooth
For the custard
- 3 tablespoons all-purpose flour
- 1 1/4 cups whole milk, divided
- 1 1/3 cups granulated sugar
- 1 cinnamon stick
- 2/3 cup water
- 1/2 teaspoon vanilla extract
- 6 large egg yolks, whisked
For the garnish
- confectioners' sugar
- ground cinnamon
Instructions
Make the pastel de nata dough
- In a stand mixer fitted with a dough hook, mix the 2 cups minus 2 tablespoons all-purpose flour, 1/4 teaspoon sea salt, and 3/4 cup plus 2 tablespoons cold water until a soft, pillowy dough forms that pulls away from the side of the bowl, about 30 seconds.
- Generously flour a work surface and pat the dough into a 6-inch (15-cm) square using a pastry scraper. Flour the dough, cover with plastic wrap, and let it rest at room temperature for 15 minutes.
- Roll the dough into an 18-inch (46-cm) square. As you work, use the scraper to lift the dough to make sure the underside isn't sticking to your work surface.
- Brush the excess flour off the top of the dough, trim any uneven edges, and, using a small offset spatula, dot and then spread the left 2/3 portion of the dough with a little less than 1/3 of the 2 sticks (8 oz) unsalted butter being careful to leave a 1 inch (25 mm) plain border around the edge of the dough.
- Neatly fold the unbuttered right 1/3 of the dough (using the pastry scraper to loosen it if it sticks) over the rest of the dough. Brush off any excess flour, then fold over the left 1/3 of the dough. Starting from the top, pat down the dough with your hand to release any air bubbles, and then pinch the edges of the dough to seal. Brush off any excess flour.
- Turn the dough 90° to the left so the fold is facing you. Lift the dough and flour the work surface. Once again roll it out to an 18-inch (46-cm) square, then dot the left 2/3 of the dough with 1/3 of the butter and smear it over the dough. Fold the dough as directed in steps 4 and 5.
- For the last rolling, turn the dough 90° to the left and roll out the dough to an 18-by-21-inch (46-by-53-cm) rectangle, with the shorter side facing you. Spread the remaining butter over the entire surface of the dough.
- Using the spatula as an aid, lift the edge of dough closest to you and roll the dough away from you into a tight log, brushing the excess flour from the underside as you go. Trim the ends and cut the log in half. Wrap each piece in plastic wrap and chill for 2 hours or preferably overnight. (The pastry can be frozen for up to 3 months.)
Make the custard
- In a medium bowl, whisk the 3 tablespoons all-purpose flour and 1/4 cup of the milk (60 ml) until smooth.
- Bring the 1 1/3 cups granulated sugar, 1 cinnamon stick, and 2/3 cup water to a boil in a small saucepan and cook until an instant-read thermometer registers 220°F (104°C). Do not stir.
- Meanwhile, in another small saucepan, scald the remaining 1 cup milk (237 ml). Whisk the hot milk into the flour mixture.
- Remove the cinnamon stick and then pour the sugar syrup in a thin stream into the hot milk-and-flour mixture, whisking briskly. Add the 1/2 teaspoon vanilla extract and stir for a minute until very warm but not hot.
- Whisk in the 6 large egg yolks, strain the mixture into a bowl, cover with plastic wrap, and set aside. The custard will be thin; that is as it should be. (You can refrigerate the custard for up to 3 days.)
Assemble and bake the pastries
- Place an oven rack in the top third position and crank the oven to 550°F (290°C) for at least 30 minutes. The oven needs this time to maintain this blazing hot temperature.
- Remove a pastry log from the refrigerator and roll it back and forth on a lightly floured surface until it's about an inch (25 mm) in diameter and 16 inches (41 cm) long. Cut it into scant 3/4-inch (18-mm) pieces. Place 1 piece pastry dough, cut side down, in each well of a nonstick 12-cup mini-muffin pan (2-by-5/8-inch [50-by-15-mm] size).
☞ TESTER TIP: If using classic egg tart tins, cut the dough into generous 1-inch (25-mm) pieces. Allow the dough pieces to soften for several minutes until pliable.
- Have a small cup of water nearby. Dip your thumbs in the water, then straight down into the middle of the dough spiral. Flatten it against the bottom of the cup to a thickness of about 1/16 inch (1.5 mm), then smooth the dough up the sides and create a raised lip about 1/8 inch (3 mm) above the pan. The pastry bottoms should be thinner than the tops.
- Fill each cup 3/4 full with the cool custard. Bake the pastries until the edges of the dough are frilled and brown, about 8 to 9 minutes for the mini-muffin tins, 15 to 17 minutes for the classic tins.
- Remove from the oven and allow the egg tarts to cool a few minutes in the pan, then transfer to a rack and cool until just warm. Sprinkle the pasteis generously with confectioners' sugar, then ground cinnamon and serve. Repeat with the remaining pastry and custard. These are best consumed the day they're made.
Notes
- Pastry making—When making the pastry, make sure the butter is evenly layered, all excess flour is removed, and the dough is rolled very thin and folded neatly.
- Tending to the custard—You’ll need a thermometer to gauge the custard accurately.
- Timing—Portuguese egg tarts are best eaten warm the day they’re made.
- Using convection—If baking with a convection or fan oven, lower the temperature by about 25°F (15°C) from what the recipe lists, and keep a close eye near the end of the bake time.
Variation
If you’d like a citrus hit to your custard, add two 2-inch lemon peels along with the cinnamon stick in step 10.
An LC Original
View More Original RecipesExplore More with AI
Nutrition
Nutrition information is automatically calculated, so should only be used as an approximation.
Recipe Testers’ Reviews
Did you know only 68% of the recipes we test make it onto the site? This recipe survived our rigorous blind testing process by multiple home cooks. It earned the Leite’s Culinaria stamp of approval—and the testers’ reviews below prove it.
According to my Portuguese dad, I can make these pasteis de nata again and again and again! I am pretty chuffed with how they turned out since I had doubts throughout the entire process of making these traditional tarts. First of all, pasteis de nata are the epitome of the classic Portuguese sweet treat. So, no pressure!
In following the recipe, when mixing the flour, salt, and water in the stand mixer, my dough never achieved the soft pillowy stage I was hoping, or rather thinking, what it would be. My dough did pull away from the sides slightly but remained sticky; hence I feel I should have added more flour, which I didn’t at this stage.
Doubt started to set in! When working with the dough on the work surface, I needed to add a very generous amount of flour to stop the dough from sticking. At this stage, I probably added so much flour that I actually increased the amount of flour added to the dough significantly.
I found working with the dough a test of extreme patience! I remained calm (yet doubtful) and just kept working with it gently. I was never able to achieve the 18-by-18-inch square, no matter how hard I tried. It was closer to 14 inches.
The custard seemed quite thin, and even though the recipe mentioned it would be, I had my doubts it would firm up into a creamy custard.
While the tarts baked, the butter bubbled and oozed out of the dough and over the edge of the minis tin, causing lots of smoke in the extremely hot oven. I baked the minis for 9 minutes, and the custard was set, and the pastry was golden brown. I expected the custard to have a brown-speckled appearance (like the ones you buy commercially), but it remained an eggy yellow. For the larger tins, I baked the tarts for 15 minutes, and they, too, remained an eggy yellow with a golden brown pasty.
To my surprise, the pastry was super flaky and crispy, and it had that perfect crackly crunch that is the true mark of a great pastel de pata! And the custard? It set and was creamy, sweet, and deliciously perfect.
When my Portuguese mom said they tasted just like the pasteis de Belem (the most famous and original Portuguese custard tarts), then I knew we had a winner!
Talk about the best compliment ever! It was quite a bit of work to produce these little gems, but the end result was definitely worth the effort!


Hello. I would love to try this recipe i saw an interesting one on a website by a Portuguese lady, she actually cooked the flour and some of milk together first to create a thick paste then added the egg yolks sugar syrup and milk which had been simmered with the cinnamon and lemon. I have tried many versions of this and filling wise i found the method of pre cooking the flour was pretty good texture wise. Although my main issue is the pastry, it’s never the same as the ones you see in the shops in London, they have an almost filo type texture, whats the key to that pastry?!
Thanks for your recipe!
Elan, it would be hard to find a recipe for the pastry like the kind you find in Lisbon shops. The reason is the pastry is made in huge, huge sheets of alternating layers of pastry and a margarine-like fat. Then the sheets are rolled into large logs and chilled. The logs, which are about 15 inches in diameter, are pulled and tugged until they’re about an inch in diameter. So that’s what creates all those crazy circular layers.
Try this recipe and see if you like it. It does create thin crispy layers.
Hi my name is Tina, I have a question to ask you. May I ask what kind of flour will I use for my Portuguese Custard? Thank you for your time take care and have a wonderful day.
Dear Tina, I use all-purpose flour. I like the King Arthur brand.
In the UK we use plain flour or self raising flour. What is ‘all purpose’ flour, I’m guessing plain flour and what the heck is King Arthur brand? Never heard of it. And we don’t use cups, we use grams. For liquids we use ml (milli litres). If you converted your measurements to the international metric standard it could be used by all, including those little corners of the world outside the States like, er, Europe!
Finally, this is a verbose recipe, it really needs shortening down a bit, or make a video 🙂
rich, thanks for the input. King Arthur Flour is a popular brand in the US. And as far as the length, folks who are new to baking have found it a comfort!
Hi David –
Have also had this recipe bookmarked for “some day.” Yesterday was that day, and they turned out beautifully. My Tia (Aunt), age of 91, Portuguese and never a baker, had the surprise of her life today when I brought these to her. Of course, my husband and I did taste test them yesterday just to make sure they were good. I have a cousin coming from Portugal in February for a visit and I will make them again. Thanks for sharing.
How wonderful to hear, Helena! Thank you. Please give your tia um grande abraço for me. And I wish you, your husband, and tia a wonderful Christmas!
David what is the book’s name I would love to have a authentic Portuguese cook book. And yeahhh this is a recipe I’ve been looking for all my life others make u make a thick pastry cream stove top, I am soooooo trying these today, and cavacas request of my husband.
christina, there isn’t a book with this recipe. I got it from the restaurant Alfama in New York City. These are an adaptation, as they’re made in a mini-tart pan, not the traditional pastéis de nata tins.