Want to save this?
TL;DR (Quick-Answer Box)
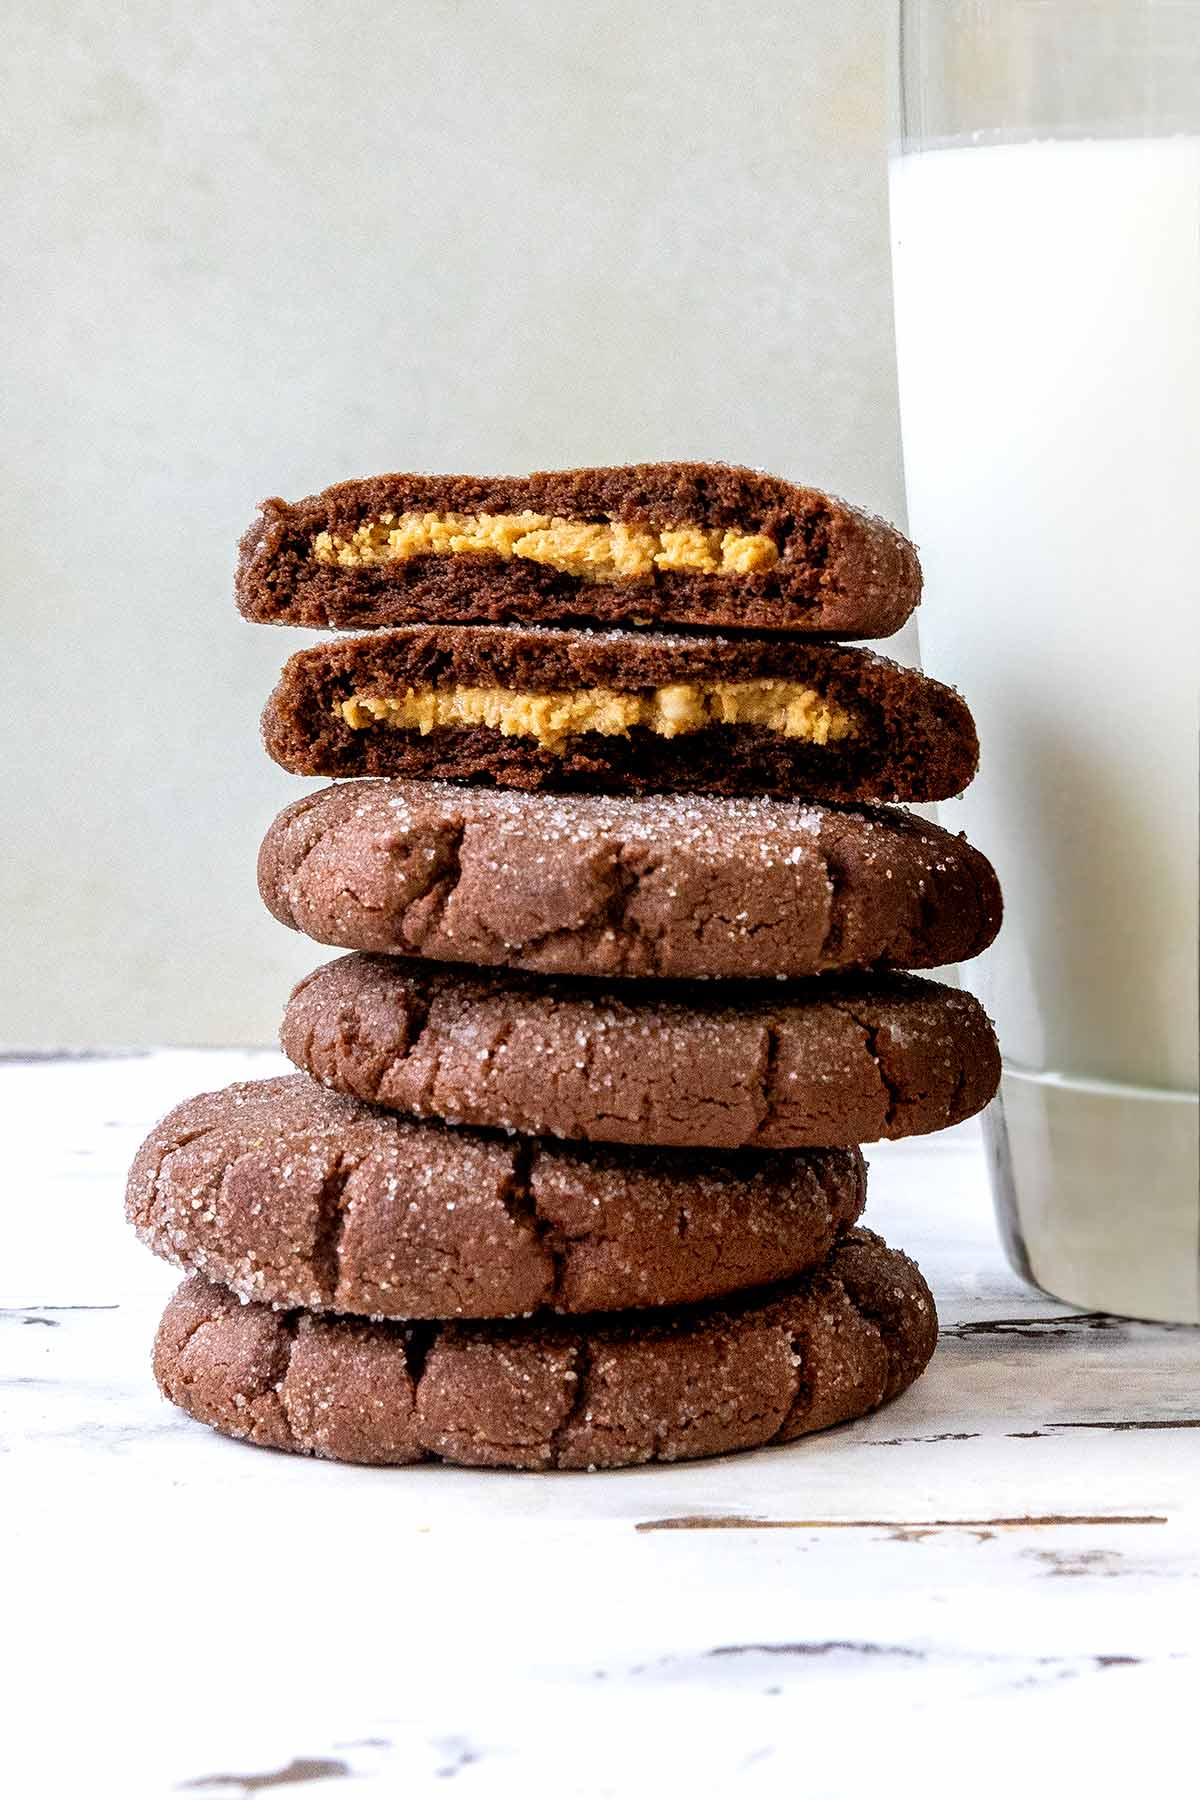
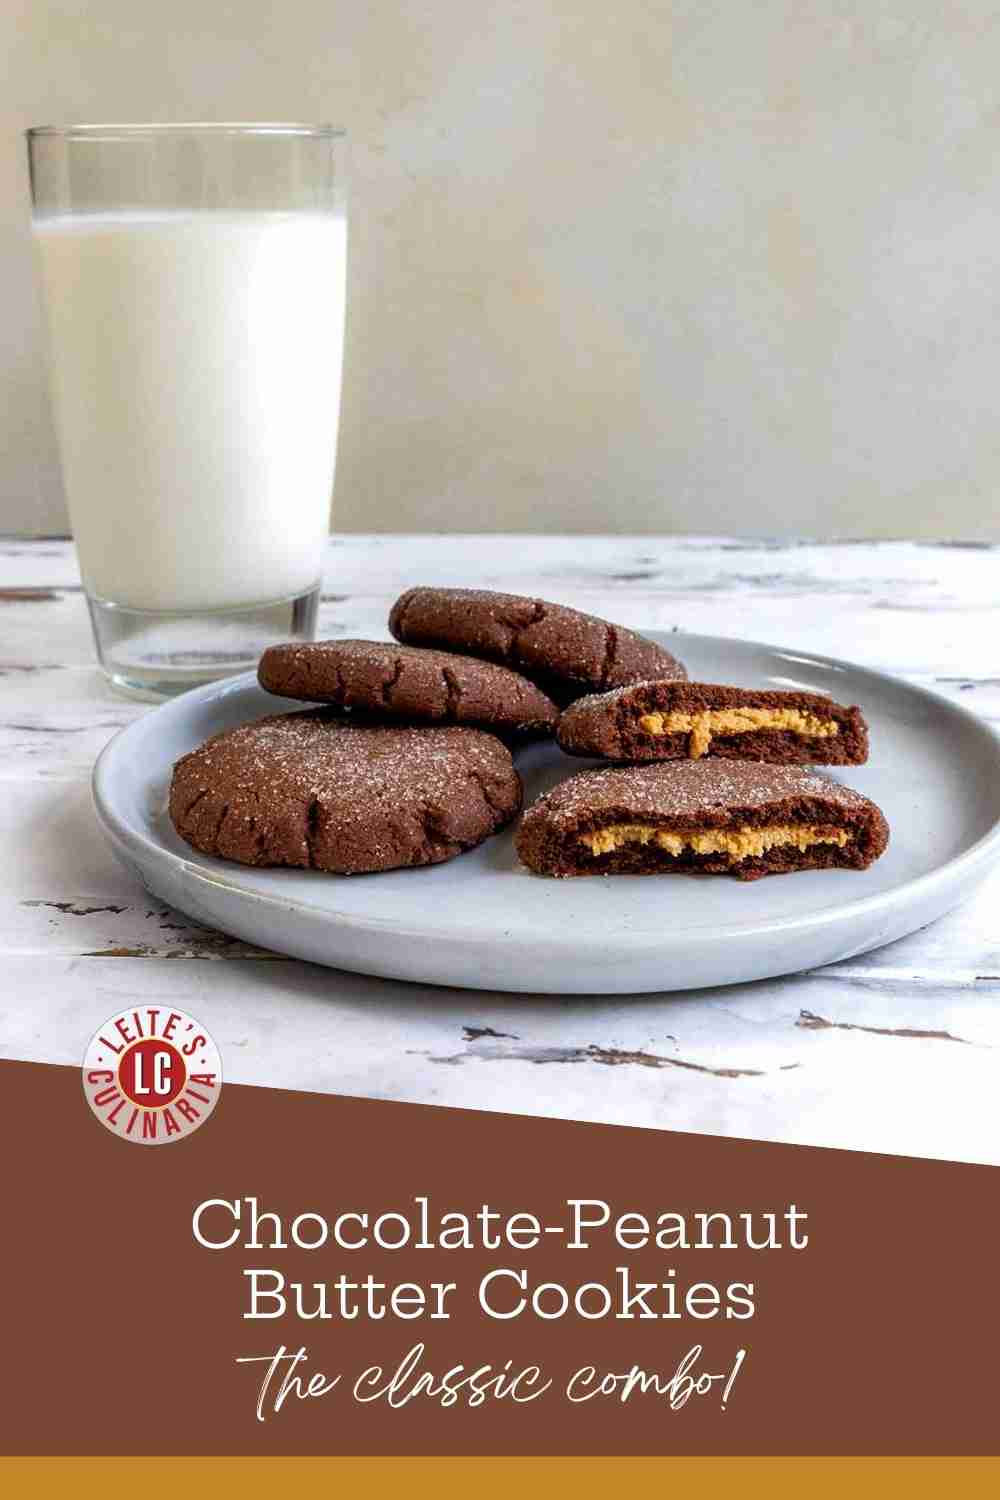
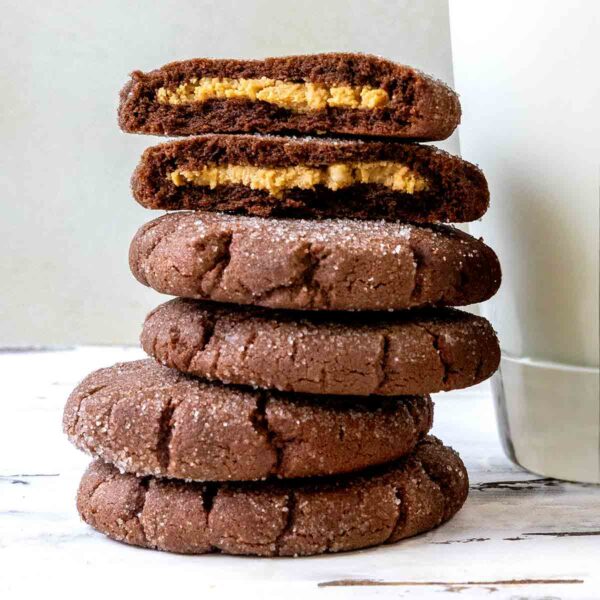
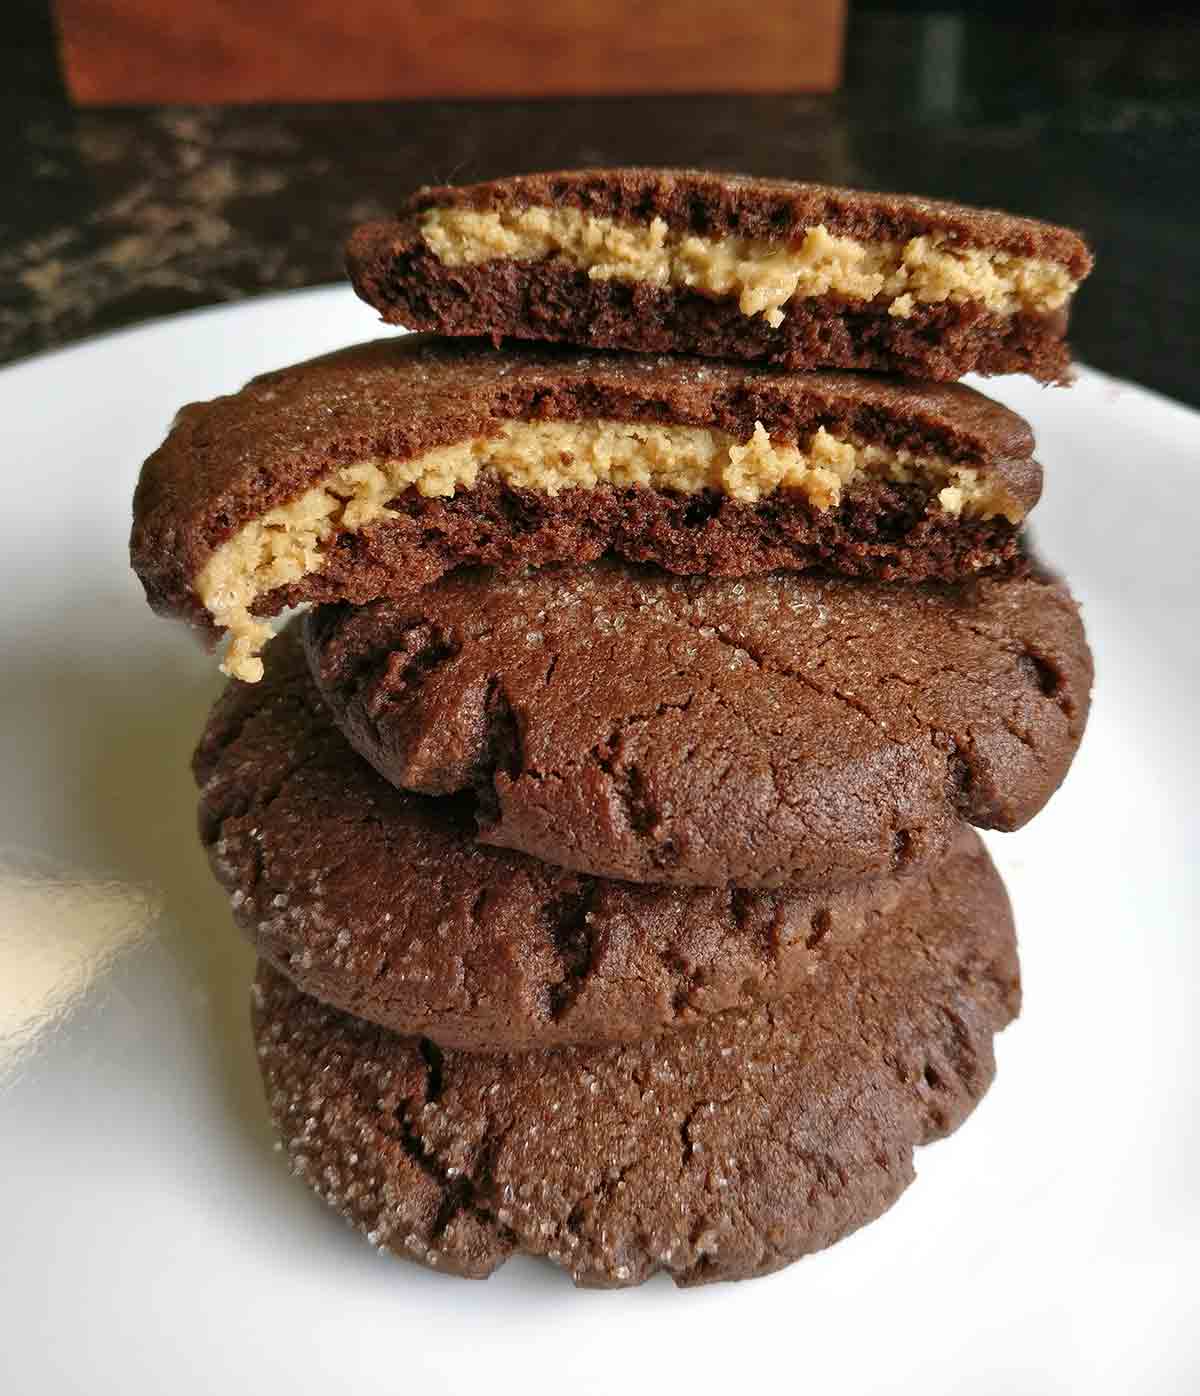
- What it is: A tender, deeply chocolate cookie hiding a creamy, sweet peanut butter filling, with the top dipped in sugar, and flattened before baking for a delightfully crisp edge.
- Why you’ll love it: This easy, magical cookie delivers the perfect balance of salty-sweet chocolate and peanut butter in every perfect, chewy bite.
- How to make it: Prepare a chocolate dough with peanut butter mixed in, and a separate peanut butter filling. Wrap a small peanut butter filling ball inside the chocolate dough, dip the top in sugar, flatten it, and bake until set.
Jump To
- TL;DR (Quick-Answer Box)
- Why Our Testers Loved This
- Notes on ingredients
- Visual Step-by-Step Guide: Chocolate-Peanut Butter Cookies
- Your Peanut Butter-Chocolate Cookies Questions, Answered
- Pro Tips & Troubleshooting
- More Amazing Chocolate Cookie Recipes
- Write a Review
- Chocolate Peanut Butter Cookies Recipe
- Recipe Testers’ Reviews
I love peanut butter cookies, and I love chocolate cookies. So, natch, it follows that I’d love these. And I’m not the only one. Recently, a dinner guest pronounced, through a very full mouth, “They’re like a Reese’s Peanut Butter Cup in cookie form.”
The cookies are easy to make but surprisingly complex in flavor. That’s because the chocolate dough has both cocoa and peanut butter, plus brown sugar for molasses-y depth and vanilla to round it out.
The filling? Well, That’s all peanut butter and powdered sugar. Last, the sparkling sugar coating adds just the right amount of crunch and sweetness.
And these aren’t crunchy, biscuit-like cookies. Rather, they’re tender, with just the right bite.
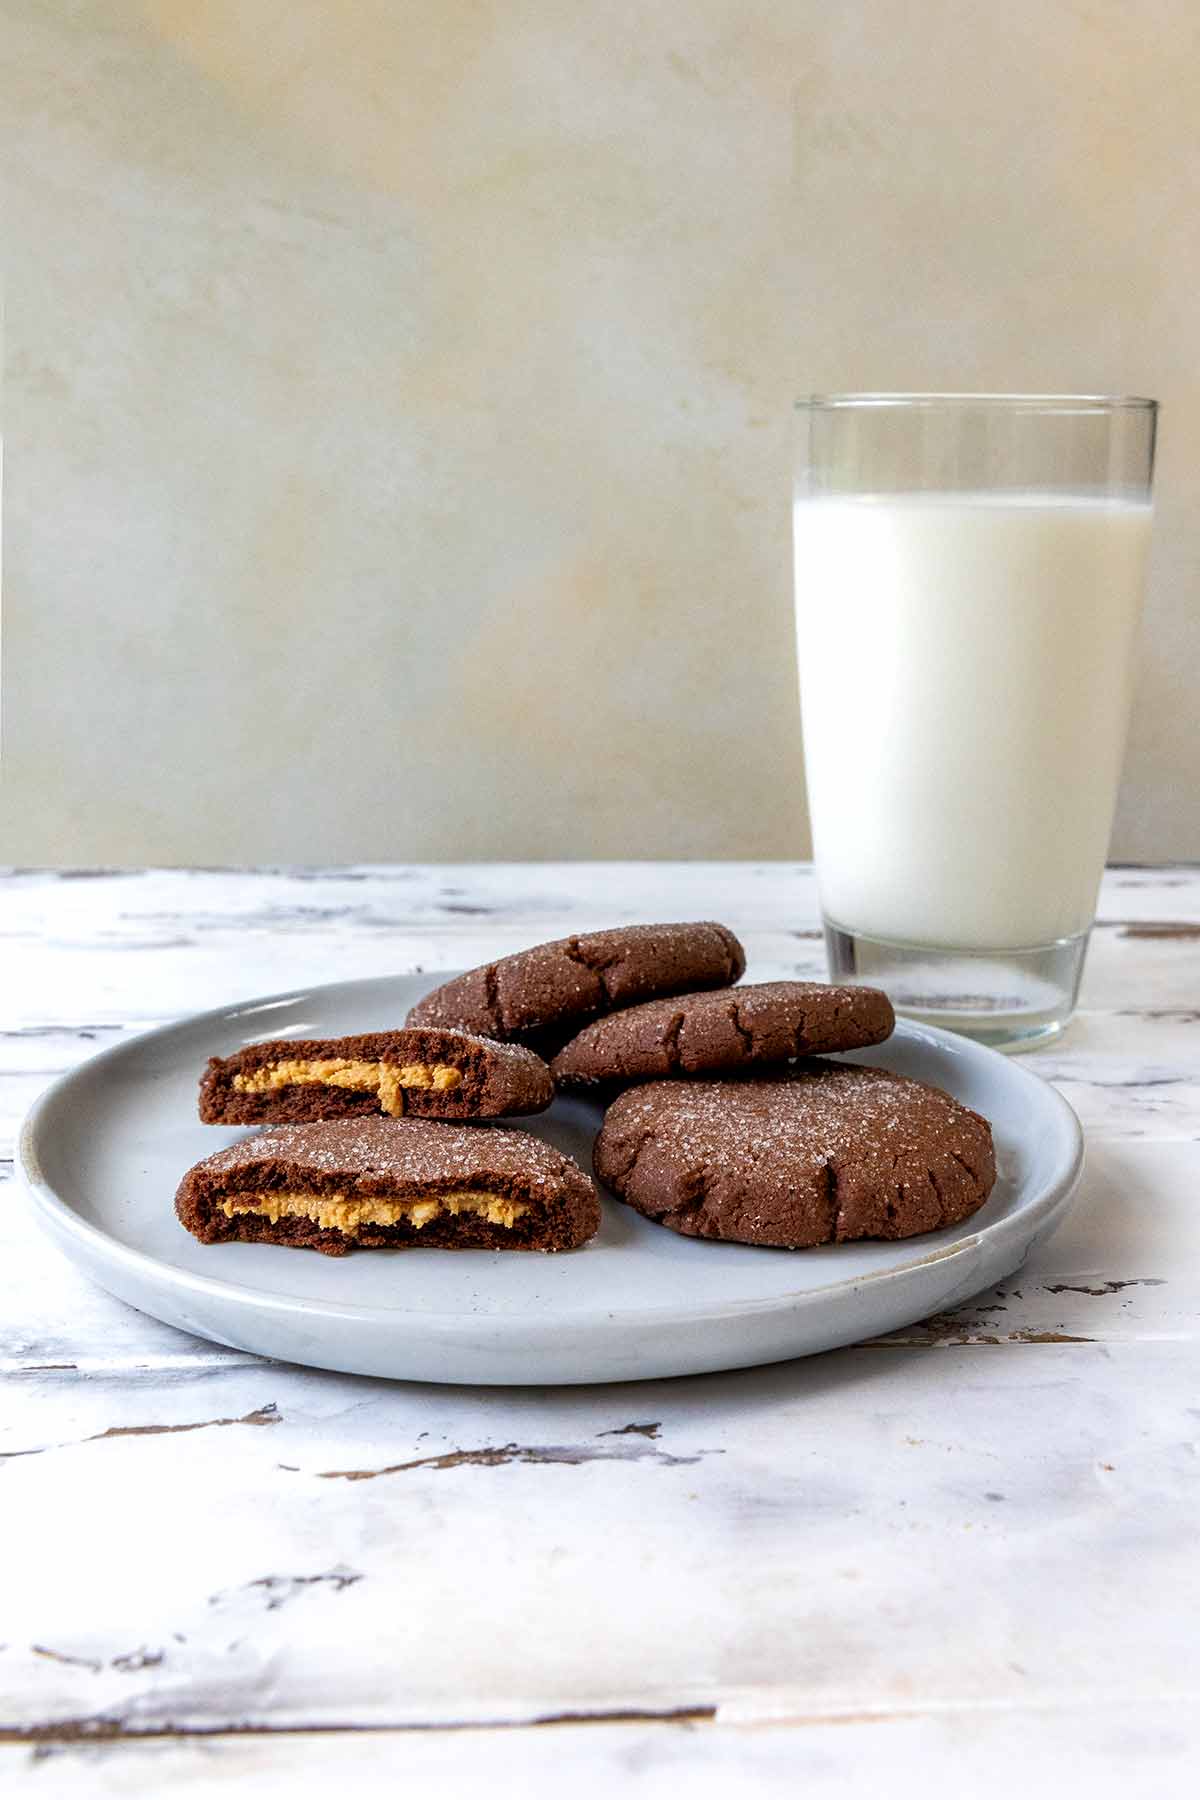
The real treat, though, is watching your guests bite into cookies and discover the hidden layer of peanut butter. Priceless.
Chow,


Why Our Testers Loved This
The testers loved how easily these chocolate cookies with peanut butter centers came together and were delighted that the finished cookies were “crisp on the outside and chewy inside.” Terri Lyons described these treats as “fantastic cookies that taste as good as they look.”
Terri Leker joined the chorus of thumbs-up: “This recipe hits the mark for both beauty and taste and was deemed “uniformly excellent” by my local testers, who raved from the first bite to the last.”
Notes on ingredients

- Unsalted butter—If you add need to use salted butter in your cookie dough, don’t add the 1/4 teaspoon of table salt to the batter in step 2.
- Cocoa powder—Use unsweetened natural cocoa powder for these chocolate peanut butter cookies. Dutch process cocoa can’t react with the baking soda in the dough and should NOT be substituted.
- Peanut butter—To achieve an even peanut butter filling layer in your cookies, stick with smooth peanut butter. Pass on chunky style.
Visual Step-by-Step Guide: Chocolate-Peanut Butter Cookies
- Heat the oven to 375°F. Line two baking sheets with parchment or silicone baking mats.
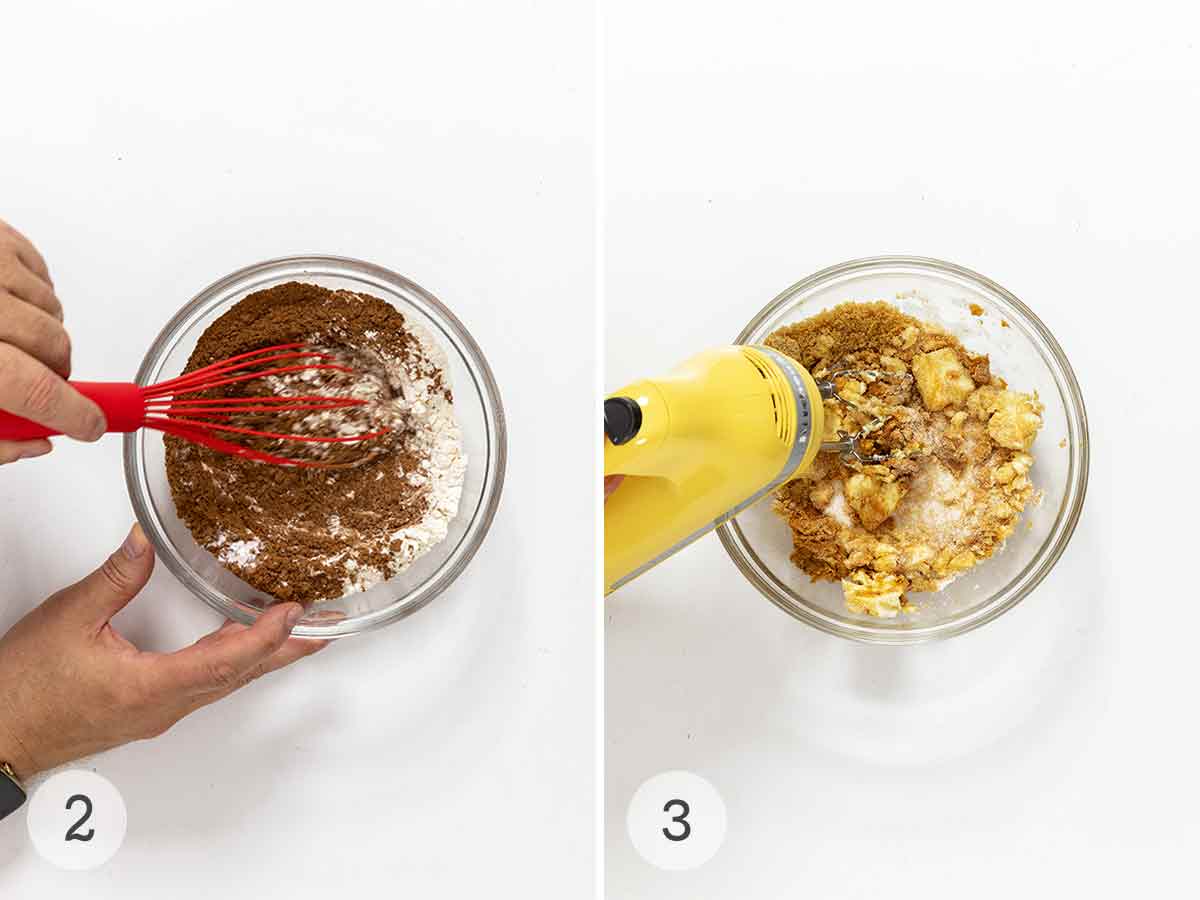
- Whisk the flour, cocoa, baking soda, and salt together.
- Use a hand mixer to beat together the sugars, butter, and peanut butter until fluffy.
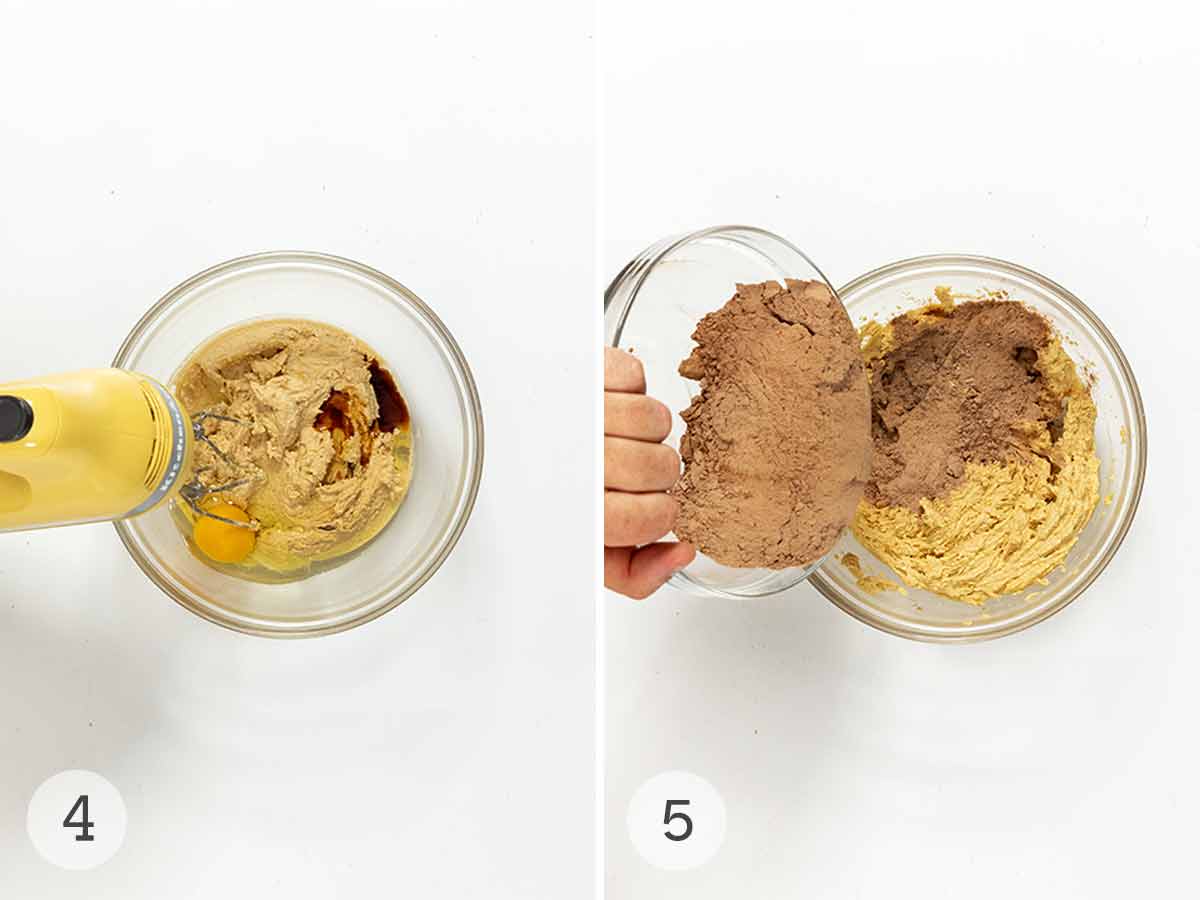
- Add the vanilla and egg and beat to combine.
- Stir the dry ingredients into the butter-sugar mixture.
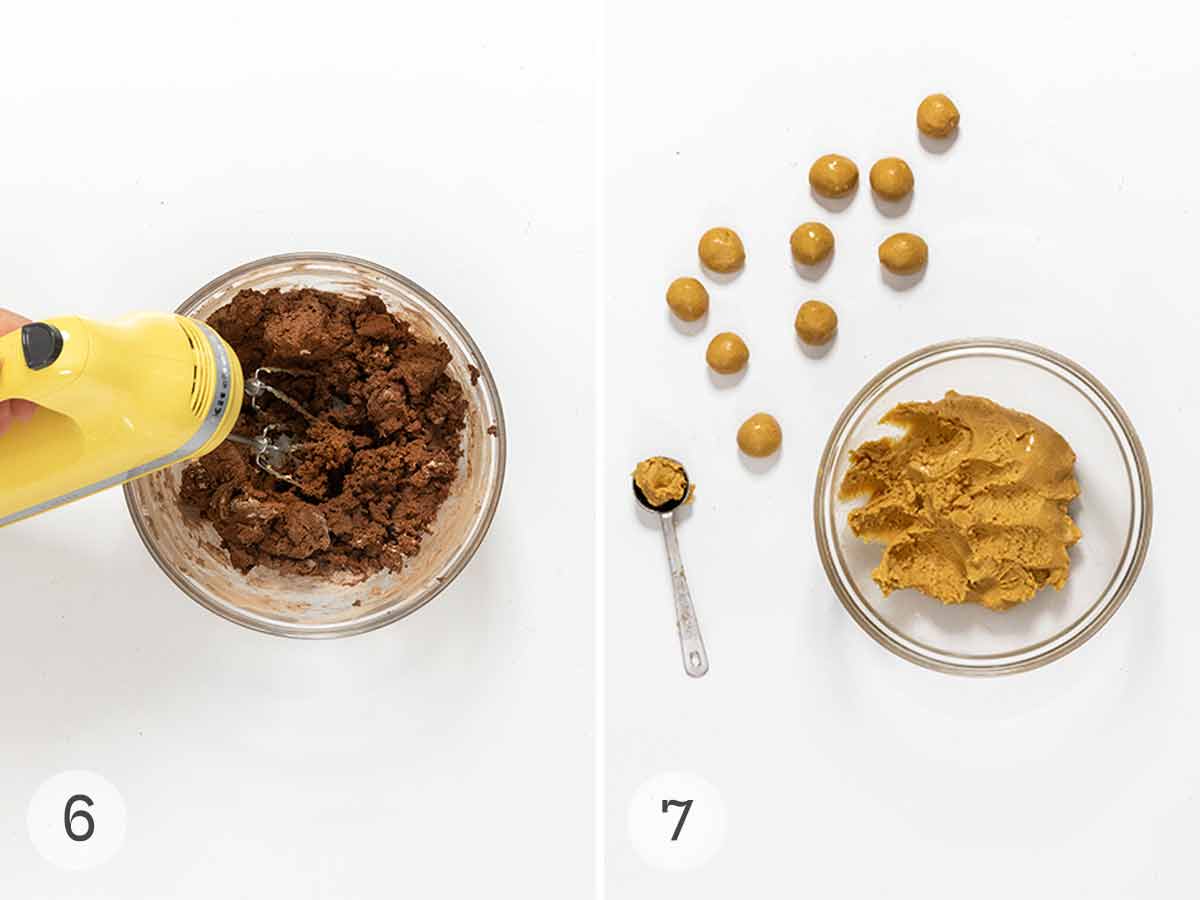
- Use the hand mixer to beat the dry ingredients into the butter mixture until well combined.
- Make the peanut butter filling. Stir the peanut butter and confectioners’ sugar together. Roll the mixture into teaspoon-sized balls.
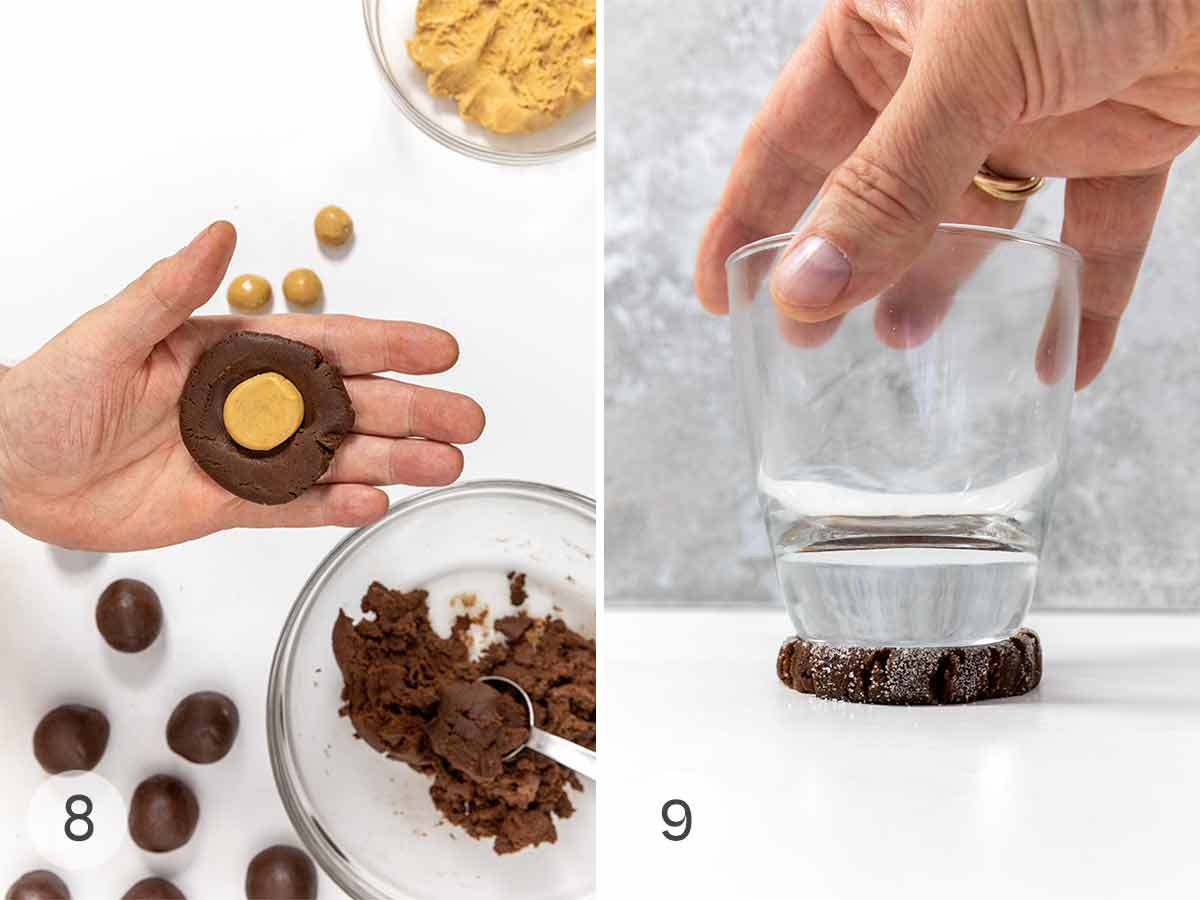
- Shape the chocolate cookie dough into tablespoon-sized balls. Working with one at a time, flatten the chocolate dough and place a peanut-butter ball in the center of the cookie. Bring the cookie dough up and around the filling to enclose it, and roll it between your hands to smooth it out.
- Dip the cookie balls in granulated sugar. Use the bottom of a buttered drinking glass to flatten each cookie.
- Bake the cookies until set. Cool completely on a wire rack.
Your Peanut Butter-Chocolate Cookies Questions, Answered
If you’re making this dough ahead of time, add 2 tablespoons of milk to the chocolate dough and press plastic wrap tightly against the surface. It can dry out a bit, and the extra moisture will keep the outside dough from cracking as you shape the cookies.
If you want to make sure you have the same amount of peanut-butter filling and chocolate dough for your cookies, grab cookie scoops. A teaspoon scoop yields 26 fillings, and a tablespoon scoop makes 26 chocolate dough balls. Just make sure to level the dough across the top.
We couldn’t agree more, they’re darn good. Go ahead and double the recipe but add an extra egg to the chocolate dough to keep it moist.
Pro Tips & Troubleshooting
- For best results, weigh your ingredients, particularly the flour. If you don’t have a scale, use the modified dip and sweep method for measuring flour. Overpacking your measuring cup can result in dry, crumbly cookie dough.
- If your peanut butter filling seems a little dry, stir in a teaspoon of peanut oil or other neutral oil to moisten it.
- Make sure all your ingredients are at room temperature, especially the butter. You want the chocolate dough to be soft and pliable to wrap around the peanut butter center.
- If you’re having trouble enclosing the filling, really flatten the chocolate dough balls as well as the filling. It makes things so much easier.
- For soft and chewy cookies, bake for 7 minutes. For crisper cookies, bake for 9 minutes.
- The peanut butter chocolate cookies can be stored in an airtight container at room temperature for up to 1 week or frozen for up to 3 months.
More Amazing Chocolate Cookie Recipes

Write a Review
If you make this recipe, or any dish on LC, consider leaving a review, a star rating, and your best photo in the comments below. I love hearing from you.–David
Featured Review
These baked up exactly like the photos! The most disheartening thing about baking is when the end result looks nothing like the cookie on the recipe (that got your taste buds watering and raised your hopes high!). But this one did not disappoint! The ONLY change I made – I added a pinch of salt to the PB dough for the middle (salty/sweet thing) and a teeeeeeny sprinkle of it on top of the cookies before baking. Otherwise these are amazing. I baked them 9 minutes and perfection. Thank you for the recipe!
Amy G.
Chocolate Peanut Butter Cookies
Ingredients
For the dough
- 1 stick (4 oz) unsalted butter, at room temperature
- 1 1/2 cups unbleached all-purpose flour
- 1/2 cup unsweetened natural cocoa powder
- 1/2 teaspoon baking soda
- 1/4 teaspoon table salt
- 1/2 cup granulated sugar
- 1/2 cup light brown sugar
- 1/4 cup creamy peanut butter
- 1 teaspoon vanilla extract
- 1 large egg
For the filling
- 3/4 cup creamy peanut butter
- 3/4 cup confectioners’ sugar
For the coating
- Granulated sugar
- Butter, for shaping
Instructions
Make the dough
- Preheat the oven to 375°F (190°C). Line two baking sheets with parchment or silicone baking mats.
- In a medium mixing bowl, whisk together the flour, cocoa, baking soda, and salt.
- In the bowl of a stand mixer fitted with the paddle attachment, or, if using an electric hand mixer, in a separate medium mixing bowl, beat together the sugars, butter, and peanut butter until light and fluffy. Add the vanilla and the egg, beating to combine, then stir in the dry ingredients, blending well.
Make the filling
- In a small bowl, stir together the peanut butter and confectioners’ sugar until smooth. With floured hands, roll the filling into 1 teaspoon-sized balls.
Shape the cookies
- Break off 1 heaping tablespoon of the dough, make an indentation in the center with your finger and press one of the peanut butter balls into the indentation. Bring the dough up and over the filling, pressing it closed. Roll the cookie between your palms to smooth it out. Repeat with the remaining dough and filling.
- Spread some granulated sugar on a plate. Dip the top of each cookie in the sugar and place it on the prepared baking sheets about 2 inches (5 cm) apart. Butter the bottom of a drinking glass and use it to flatten each cookie to about 1/2-inch (12-mm) thick.
- Bake the cookies until they’re set, 7 to 9 minutes. Take them out of the oven and let them cool completely on a rack.
Notes
-
- Weigh your ingredients–For best results, weigh your ingredients, particularly flour. If you don’t have a scale, use the modified dip and sweep method for measuring flour. Overpacking your measuring cup can result in dry, crumbly cookie dough.
- To soften the filling–If your peanut butter filling seems a little dry, stir in a teaspoon of peanut oil or other neutral oil to moisten it.
- Keep it at room temp–Make sure all your ingredients are at room temperature, especially the butter. You want the chocolate dough to be soft and pliable to wrap around the peanut butter center.
- For help shaping the cookies–If you’re having trouble enclosing the filling, really flatten the chocolate dough as well as the filling. It makes things so much easier.
- Chewy vs. crunchy–For softer, chewier cookies, bake for 7 minutes. For crisper cookies, bake for 9 minutes.
- Storage–The peanut butter chocolate cookies can be stored in an airtight container at room temperature for up to 1 week or frozen for up to 3 months.
Explore More with AI
Nutrition
Nutrition information is automatically calculated, so should only be used as an approximation.
Recipe Testers’ Reviews
Did you know only 68% of the recipes we test make it onto the site? This recipe survived our rigorous blind testing process by multiple home cooks. It earned the Leite’s Culinaria stamp of approval—and the testers’ reviews below prove it.

These chocolate peanut butter cookies are fantastic cookies that taste as good as they look. A surprise centre is always impressive.
I found the easiest way to make these was to prep both the dough and the filling. For the dough, I made 30 one-tablespoon balls using a cooking scoop and 30 one-teaspoon balls of filling. I flattened out the dough into a disc and then wrapped it around the filling.
I thought it was going to be finicky, but the dough was easy to work with, and once you get going they come together fairly quickly.

This chocolate and peanut butter cookie recipe has moved to the top of my cookie list. I’ll take (or bake) a chocolate chip cookie recipe any day, but give me a little time, and it’ll be these ones. Chocolate and peanut butter are about the best combination on Earth, in my opinion, and baking the two into a cookie that manages to be light, with a nice crisp on the outside and chewy inside is genius.
The cookie dough comes together easily and is easy to work with, which is good when you have to cover the peanut butter balls. The peanut butter inside came together quickly too. I didn’t need to flour my hands to make the peanut butter balls. It took a few cookies to get a method down to easily get the peanut butter ball surrounded by cookie dough.
I used the flat side of my meat pounder to flatten the cookies and that worked out great…no buttering the surface and no sticking. I was worried that the peanut butter would ooze out when I flattened the cookies but that didn’t happen. I love the sugar coating too…that helped lend that nice crisp to the finished cookie.

These chocolate peanut butter cookies, which I know as magic in the middle cookies, have a good flavor, and people who didn’t know that there’s some peanut butter in the middle were pleasantly surprised.
The chocolate peanut butter cookie recipe uses many ingredients that people have in their pantry already. For example, I used up some cocoa that my daughter had brought back with her from school.
The only issue might be that forming the dough around the balls needs to be done quickly because the peanut butter starts to stick to the chocolate dough part pretty quickly. Something was pretty dry about the filling for me; if you find the filling dry, you can add some peanut oil (or other flavorless oil) to moisten it a little.


These baked up exactly like the photos! The most disheartening thing about baking is when the end result looks nothing like the cookie on the recipe (that got your taste buds watering and raised your hopes high!). But this one did not disappoint! The ONLY change I made – I added a pinch of salt to the PB dough for the middle (salty/sweet thing) and a teeeeeeny sprinkle of it on top of the cookies before baking. Otherwise these are amazing. I baked them 9 min and perfection. Thank you for the recipe!
Amy, I love this! I completely get that moment of joy when what comes out of the oven actually looks like the dreamy photos—we’ve all had those “wait, what?” moments when they don’t. And I love your salty-sweet twist with that pinch of salt in the filling and on top. That’s the kind of detail that makes a cookie go from delicious to unforgettable.
Fantabulous baking instincts. Thanks so much for sharing—and I hope you keep the sweet hits coming!