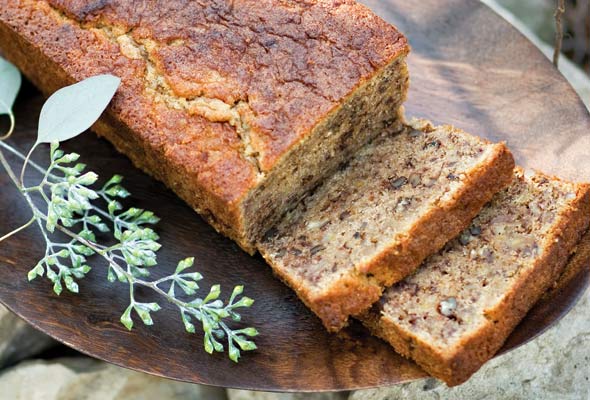
This is not the classic banana bread recipe of your childhood. It is, however, quite similar in many ways. Like the loaves your mom made from her batter-splattered recipe and turned out of her dented metal loaf pan, it’s certainly moist and banana-y. It’s ridiculously aromatic. It presents a terrific use for those bananas you picked up on sale that are now forlornly browning on the counter. It’s got a familiar ingredient list that calls for pantry staples including butter, eggs, sugar, buttermilk, vanilla, and not much else. It’s quite a sight to behold. And, in the words of the talented baker who created this banana bread recipe, it is “divine right out of the oven with melted butter, supreme when toasted with a little butter and honey, and sinful with your favorite cream cheese frosting.”
Sound familiar? This really quite lovely banana bread recipe ingeniously calls for roasting the bananas whole prior to incorporating them into the batter. The technique sort of intensifies the banana-y flavor. (Clever, huh?) Although truth be told, we consider this step to be optional—especially those days when you want as little time as possible to elapse between the anticipation of banana bread and the actual incarnation of said banana bread.
Yet this banana bread is quite different in one important way. It’s gluten-free. Because of that, it simply can’t possess quite the same texture or mouthfeel as the loaf to which you’ve grown accustomed. It’s just a little denser, a little crumblier. We don’t think that’s such a bad thing. Not at all. Though it may not be quite the same in taste and texture as you’re accustomed, trust us when we say it’s the same in terms of temptation. Because perhaps what’s more important than what goes into a recipe is what comes out. Karen Morgan, who created this gluten-free banana bread, recalls that when she first tasted this bread, it inspired her to believe that “maybe, just maybe, life was going to be beautiful once again.” We don’t know how to improve upon that.–Renee Schettler Rossi
Gluten-Free Banana Bread
Ingredients
- 4 very ripe bananas, roasted (recipe follows)
- 1 1/2 cups Bob’s Red Mill all-purpose gluten-free flour
- 1 cup granulated sugar
- 1 teaspoon baking soda
- 1 teaspoon kosher salt
- 1 stick unsalted butter, at room temperature, plus more for the pan
- 2 large eggs
- 2/3 cup buttermilk, (either low-fat or full-fat)
- 2 teaspoon vanilla extract
- 2/3 cup chopped pecans
Instructions
- Position an oven rack in the center of the oven. Preheat the oven to 350°F (176°C). Butter a 9-by-5-inch loaf pan.
- In a stand mixer fitted with the paddle attachment, combine the flour, sugar, baking soda, and salt and mix on low speed until blended. Add the butter and continue to mix on low speed until blended. Add the eggs, increase the speed to medium and blend until smooth. Reduce the speed to low, immediately add the buttermilk, and gradually bring the mixer up to high speed. Continue to mix until the batter is light and fluffy, stopping once or twice to scrape down the sides of the bowl.
- Stir in the bananas, vanilla, and pecans just until combined. Scrape the batter into the prepared pan and cover loosely with aluminum foil.
- Bake the banana bread for 1 hour, 15 minutes, or until a knife or wooden skewer inserted in the center of the loaf comes out clean. Let the banana bread cool in the pan on a wire rack for 10 minutes. Run a knife around the sides of the pan and then carefully turn the loaf onto the wire rack. Let cool for at least 15 minutes before slicing. If serving the banana bread with cream cheese frosting—an act we heartily endorse—then let the banana bread cool completely before slicing. (Any leftover bread ought to be wrapped in aluminum foil or plastic wrap and refrigerated for up to 5 days.)
Notes
To Roast Bananas
Preheat the oven to 350°F (176°C). Line a rimmed baking sheet with aluminum foil. Arrange the bananas in a row on the prepared baking sheet. Using a paring knife, make 6 small slits in the top side of each banana peel. Roast until the peels are black and bulging, with juices oozing from the vents you created prior to roasting, about 15 minutes for regular-size bananas. Remove from the oven and let the bananas cool completely on the pan. Hold one of the roasted bananas over a bowl and begin peeling the roasted banana. The flesh of the banana should fall out seamlessly. Holding the peel of the banana over the bowl, run your fingers or a spoon along the interior of the skins, as you would a squeegee down a window pane, to extract the caramelized juices. Mash the bananas in the bowl with a fork or a potato masher until no large clumps are visible.
Nutrition
Nutrition information is automatically calculated, so should only be used as an approximation.
Recipe Testers’ Reviews
While this wasn’t my favorite banana bread ever, this was the best gluten-free banana bread I’ve ever eaten. The recipe is easy to follow and creates a texture to regular banana bread that’s nearly spot on— without requiring fun with molecular gastronomy to achieve the results. My co-workers were big fans, too.
We’re into muffins and cupcakes as they’re easy to store and a treat for the kids, so I made these as muffins, using King Arthur gluten-free flour mix. I roasted the bananas (as well as the pecans), and found that the roasted bananas made the flavor jump, and also sweetened the bread quite a bit. For future reference, I think 3/4 cup of sugar would be better for me. I froze the rest of the muffins so I can have them for longer than the five days. I am new to gluten-free baking, and this was a good choice.
WOW! As one who has friends and family who are gluten intolerant, I’m always on the the search for what I call “crossover recipes,” AKA food that I can serve that will delight all of my guests—those without allergies and those with sensitivities included. This recipe is fabulous.




Hi! Glad you did not give up on the first try. I have celiac disease and have made this recipe a few times now because I enjoy it so very much. It certainly is one of the most flavourful gluten-free banana breads I have ever made. Let’s see if we can help you here.
When you mentioned the texture being too moist after baking, my first thought was the size of the bananas. Karen mentions that small bananas should be used in this recipe and that truly makes a big difference. It really does. This is likely the biggest deciding factor as per your trials. As an aside, next time try roasting them if you have the time – it really concentrates the banana flavour – sort of like roasting garlic mellows it. That makes a difference in the colour as well – it becomes darker. If your texture did not look the same as the photo perhaps you overmixed? When I make banana bread I strive for sort of a “tweed” look. Weird description, I know, but it’s true! 🙂
Another tip – were all your ingredients at room temperature? They should be for GF baking. Oh, and one more thing. Measuring GF flour is different than regular wheat flour – you measure by the spoon from the bag into the cup rather than scooping up the flour in the cup from the bag/container.
I spray the tent with oil first and barely tent the loaf.
Please don’t give up on this recipe as it is sooooo good! I, too, own the book and have made many delicious things from it. It is one of my favourite GF baking books to be sure.
Have you tried toasting your bread or even using it as French Toast as it sounds as though it still is too moist?
Hopefully your third try is IT. Let us know how it goes!
I was reminded of this recipe when I was given a copy of the gorgeous Blackbird Bakery Gluten Free Cookbook for Christmas (score!).
On this second try, I followed the recipe except for adding lemon zest and sunflower seeds on top; I used 4 medium-sized very ripe bananas, unbaked. This time I did the foil tent as instructed. Oven calibrated. Good to go.
At 75 minutes I pulled the pan out. The foil tent meant that the bread steamed rather than baked, so the top didn’t brown as it did on my first try. I popped it back in the hot oven without the foil for 15 minutes to crisp it up a bit… that helped a little with appearance.
I patiently waited 15 minutes for cooling and then took a slice off the end. Verdict: it tastes great but it is still VERY wet in there. No crumb at all, more like a dense steamed pudding; no sign of the texture or colour shown in the image. And there’s Tom, omitting key ingredients yet still finding success…argh!
I welcome your thoughts… I would love for this recipe to work for me, but one more strike and its out!
We put the question to our panel of recipe testers, Teri. Let’s see what they can do to help you.
Ok, I made this bread last night. Although, I don’t have a problem with gluten, I thought I’d try it.
A. I only used three bananas and I did not roast them. Didn’t have any more than that, nor time to roast.
B. I forgot to add the butter and by the time I realized it, it was too late.
Despite all that, the bread was superb and people didn’t even notice the lack of butter, but were able to add it if they wanted.
Ok. While I’m not a fan of people freelancing when making a recipe, especially for the first time, I think it’s fantastic that the bread turned out and that you and your guests liked it. It’s a sign of a great recipe when it can take such “punishment,” if you will, and still come out well.
Ok, kids wanted me to make the banana bread again, but they were ok with me leaving out the butter. So, I made it AND I FORGOT TO PUT IN THE BUTTERMILK!! It was too late for me to take it out of the oven, by the time I figured it out, and warned the kids that we may be eating banana bread pudding. Guess what?! It turned out great! OMG, I wonder what I’m on to?
We add butter when we eat it, if we want. The kids are getting a taste of what life will be like when I’m REALLY old.
Tom, your comment has made my day. Definitely appreciate the chuckle–and the curiosity it’s inspired! What sort of other empty-pantry hijinx can this bread withstand?!
That’s swell, Tom! And unlike David, I am a tremendous proponent of freelancing–so long as you’re aware of the potential perils. Love what you did…
Shame, shame, Renee!