
TL;DR (Quick-Answer Box)
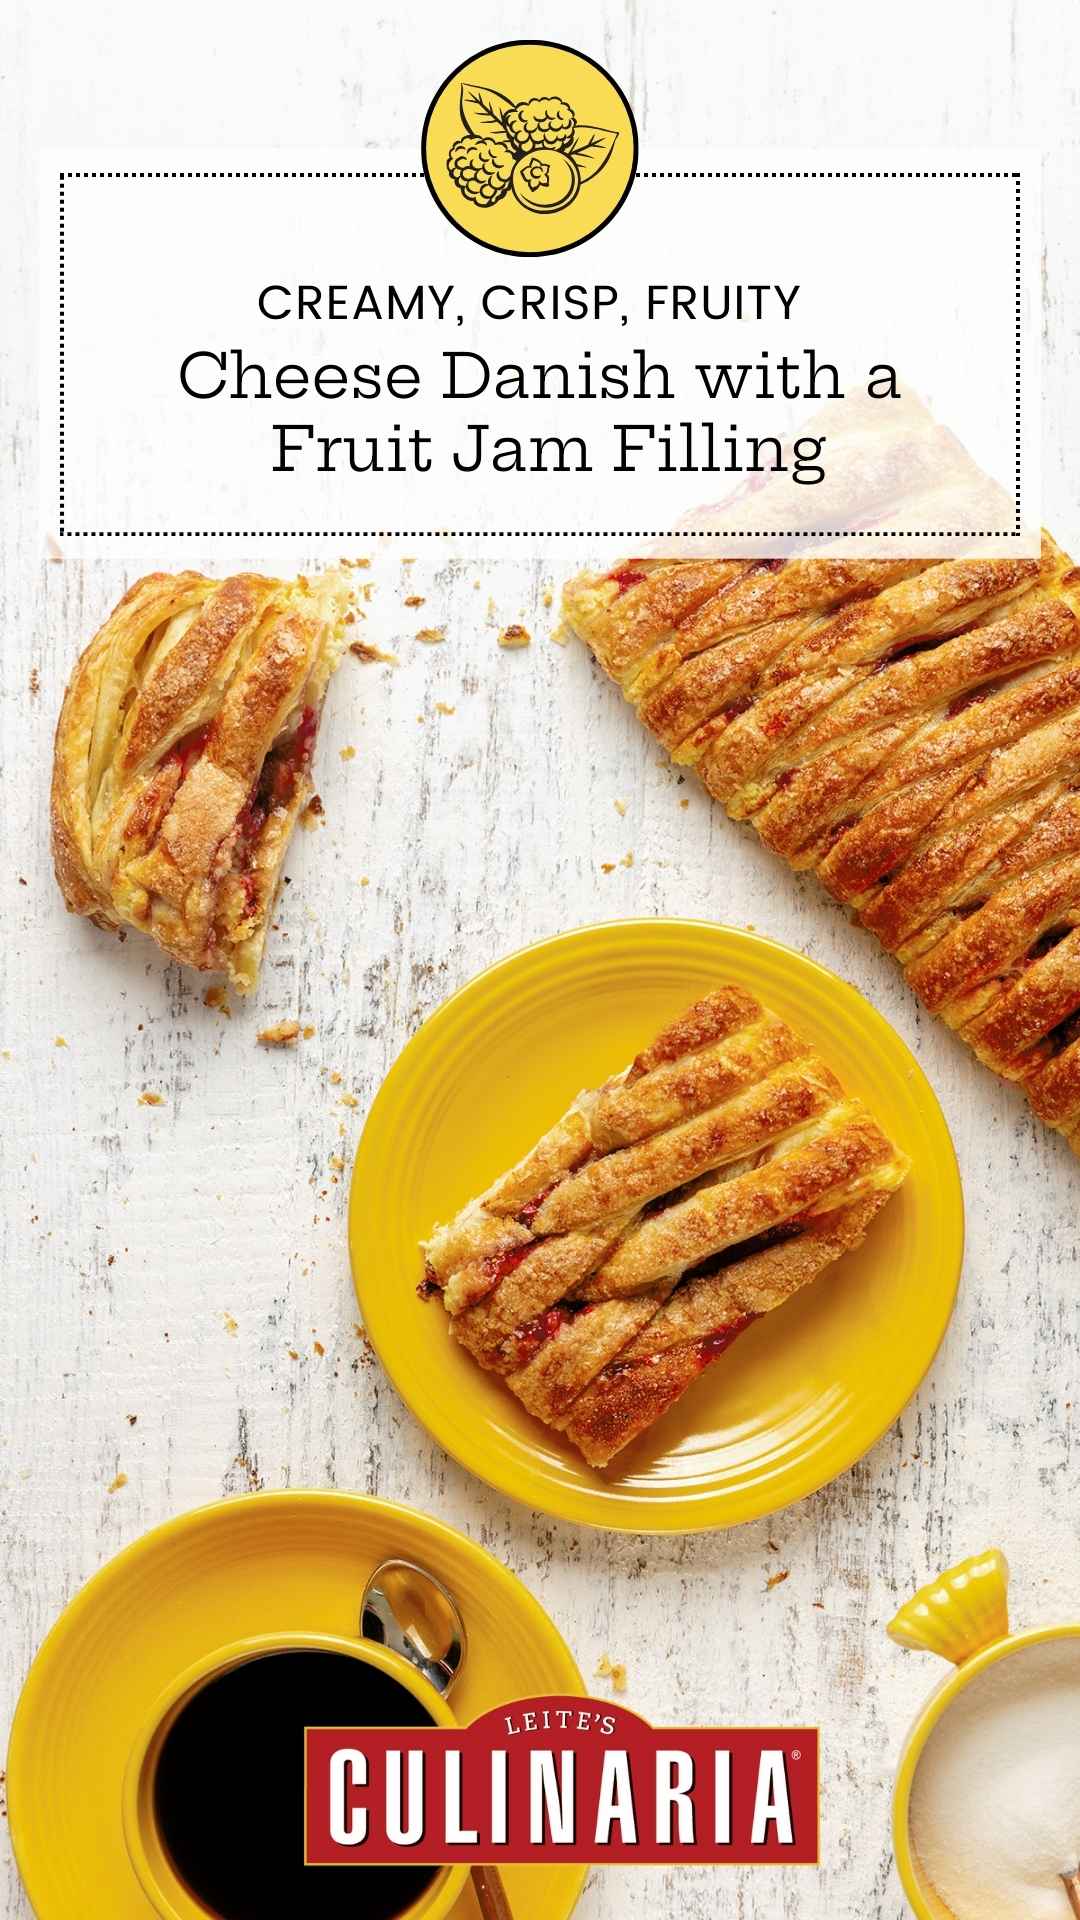
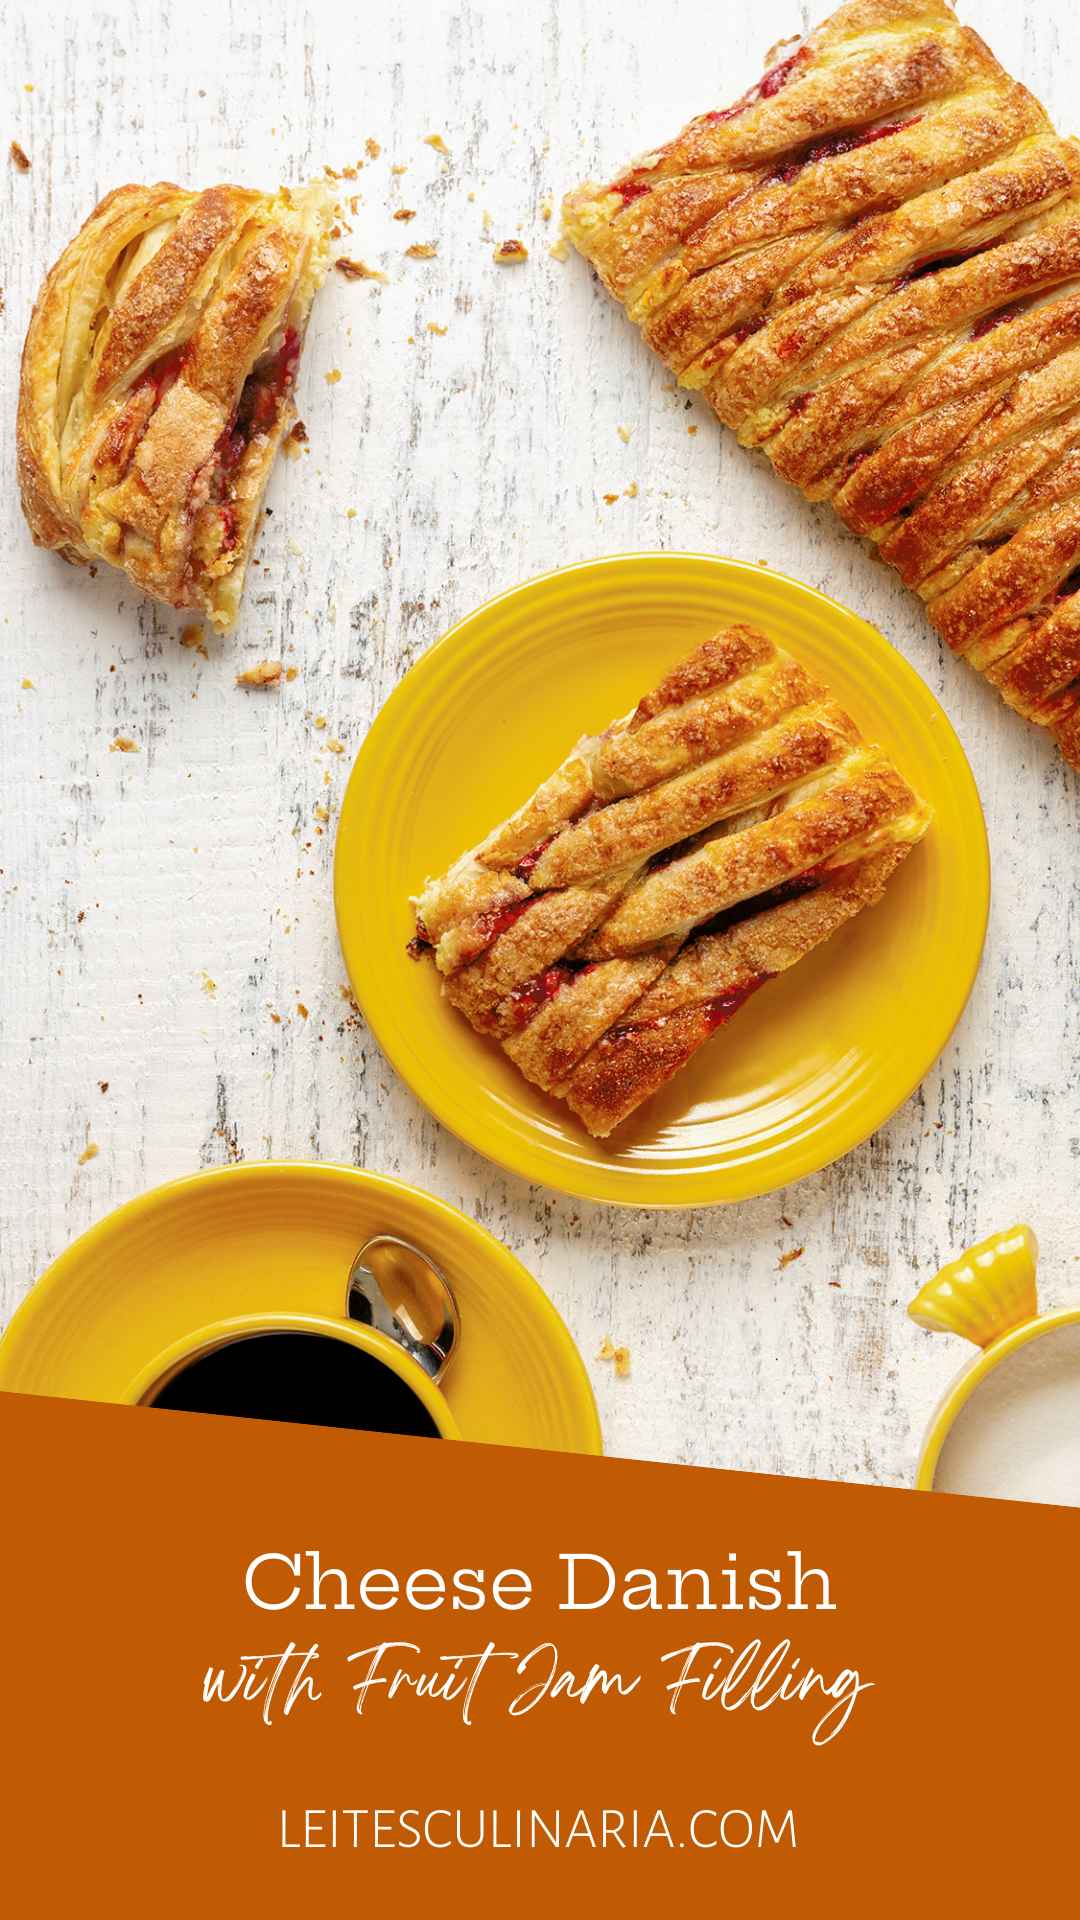
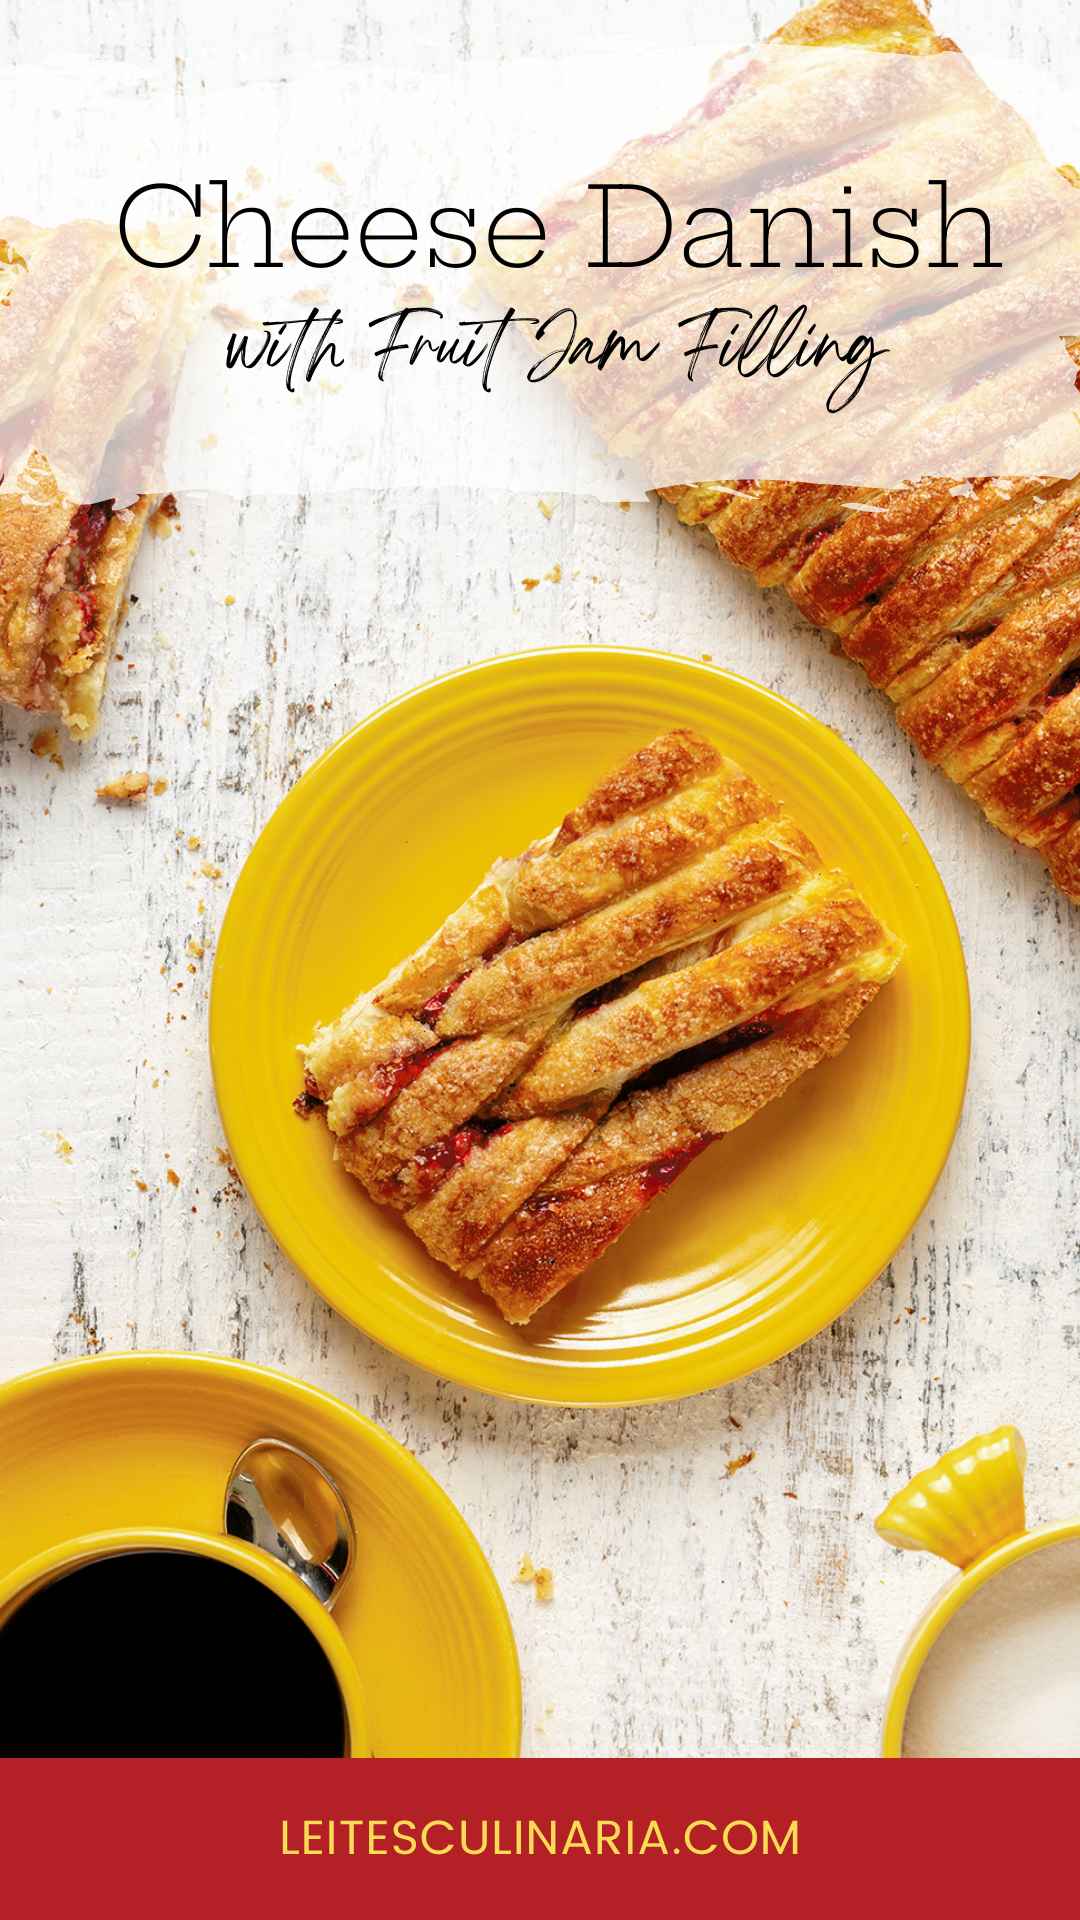
- What it is: A buttery, flaky danish made easy with store-bought puff pastry, a creamy vanilla-scented cream cheese filling, and your favorite sweet fruit jam.
- Why you’ll love it: This spectacular homemade Danish is surprisingly simple, perfect for a decadent holiday breakfast, an elegant brunch, or a weekend treat.
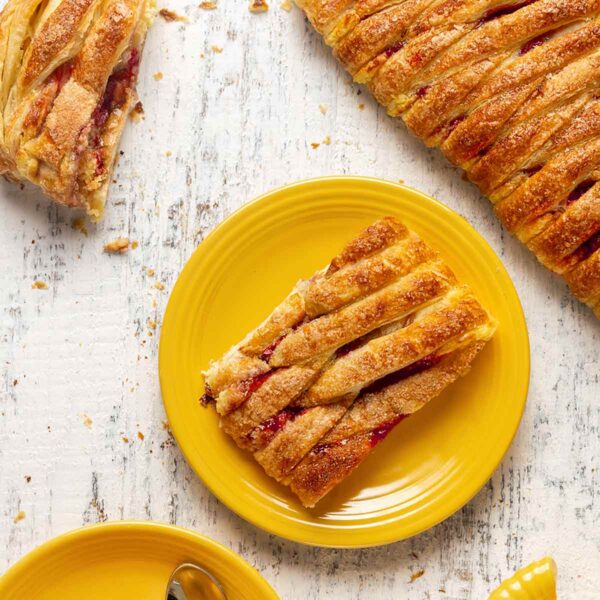
- How to make it: Roll out the pastry, mix the cream cheese with egg yolk, sugar, vanilla, and salt. Spread the cheese mixture and jam down the center, fringe the sides, then braid and bake until golden brown. Brush with egg white and sprinkle with sugar before baking.

Featured Review
I used this recipe to make danish for the very first time, and it was a smashing success! The second time I added cherry pie filling to one of them and that turned out really well also… I love it and so does my family!
Kaylee Smith
Jump To
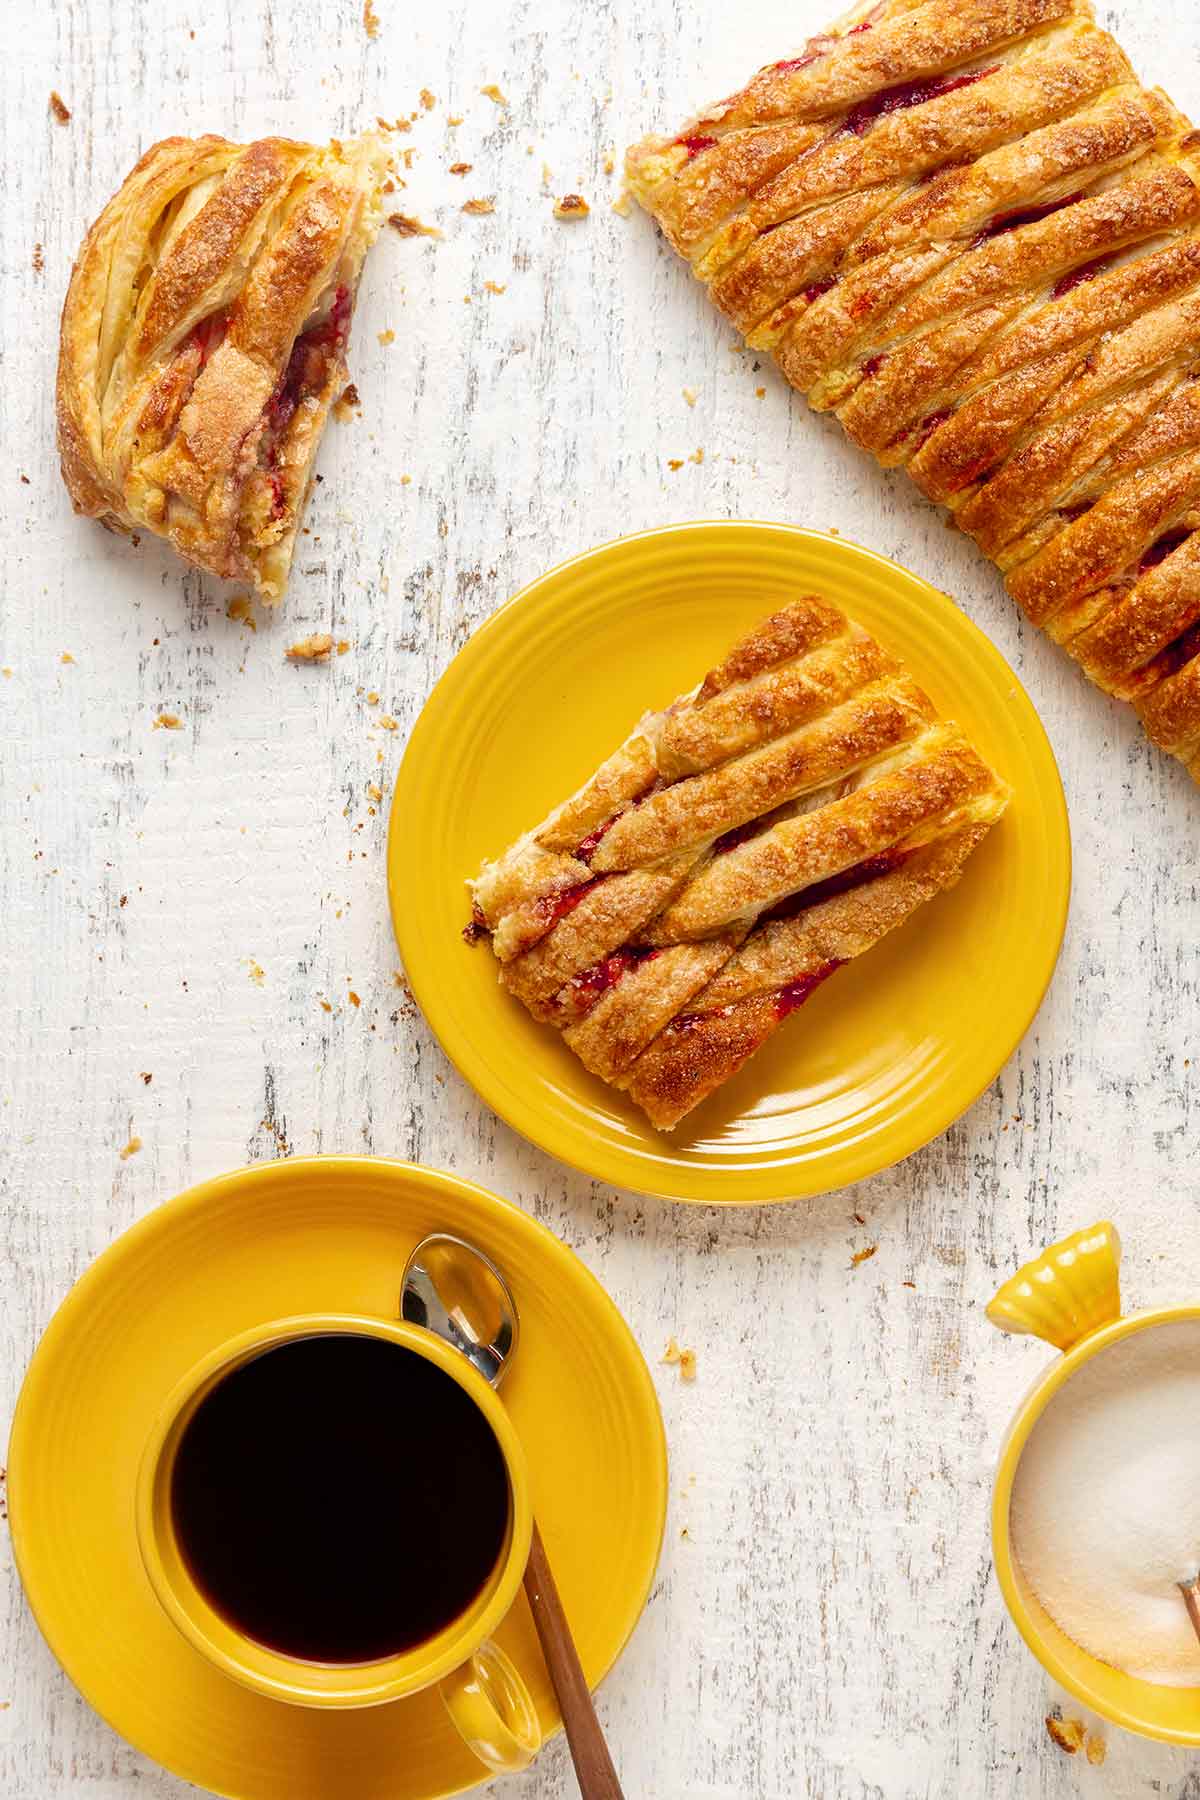
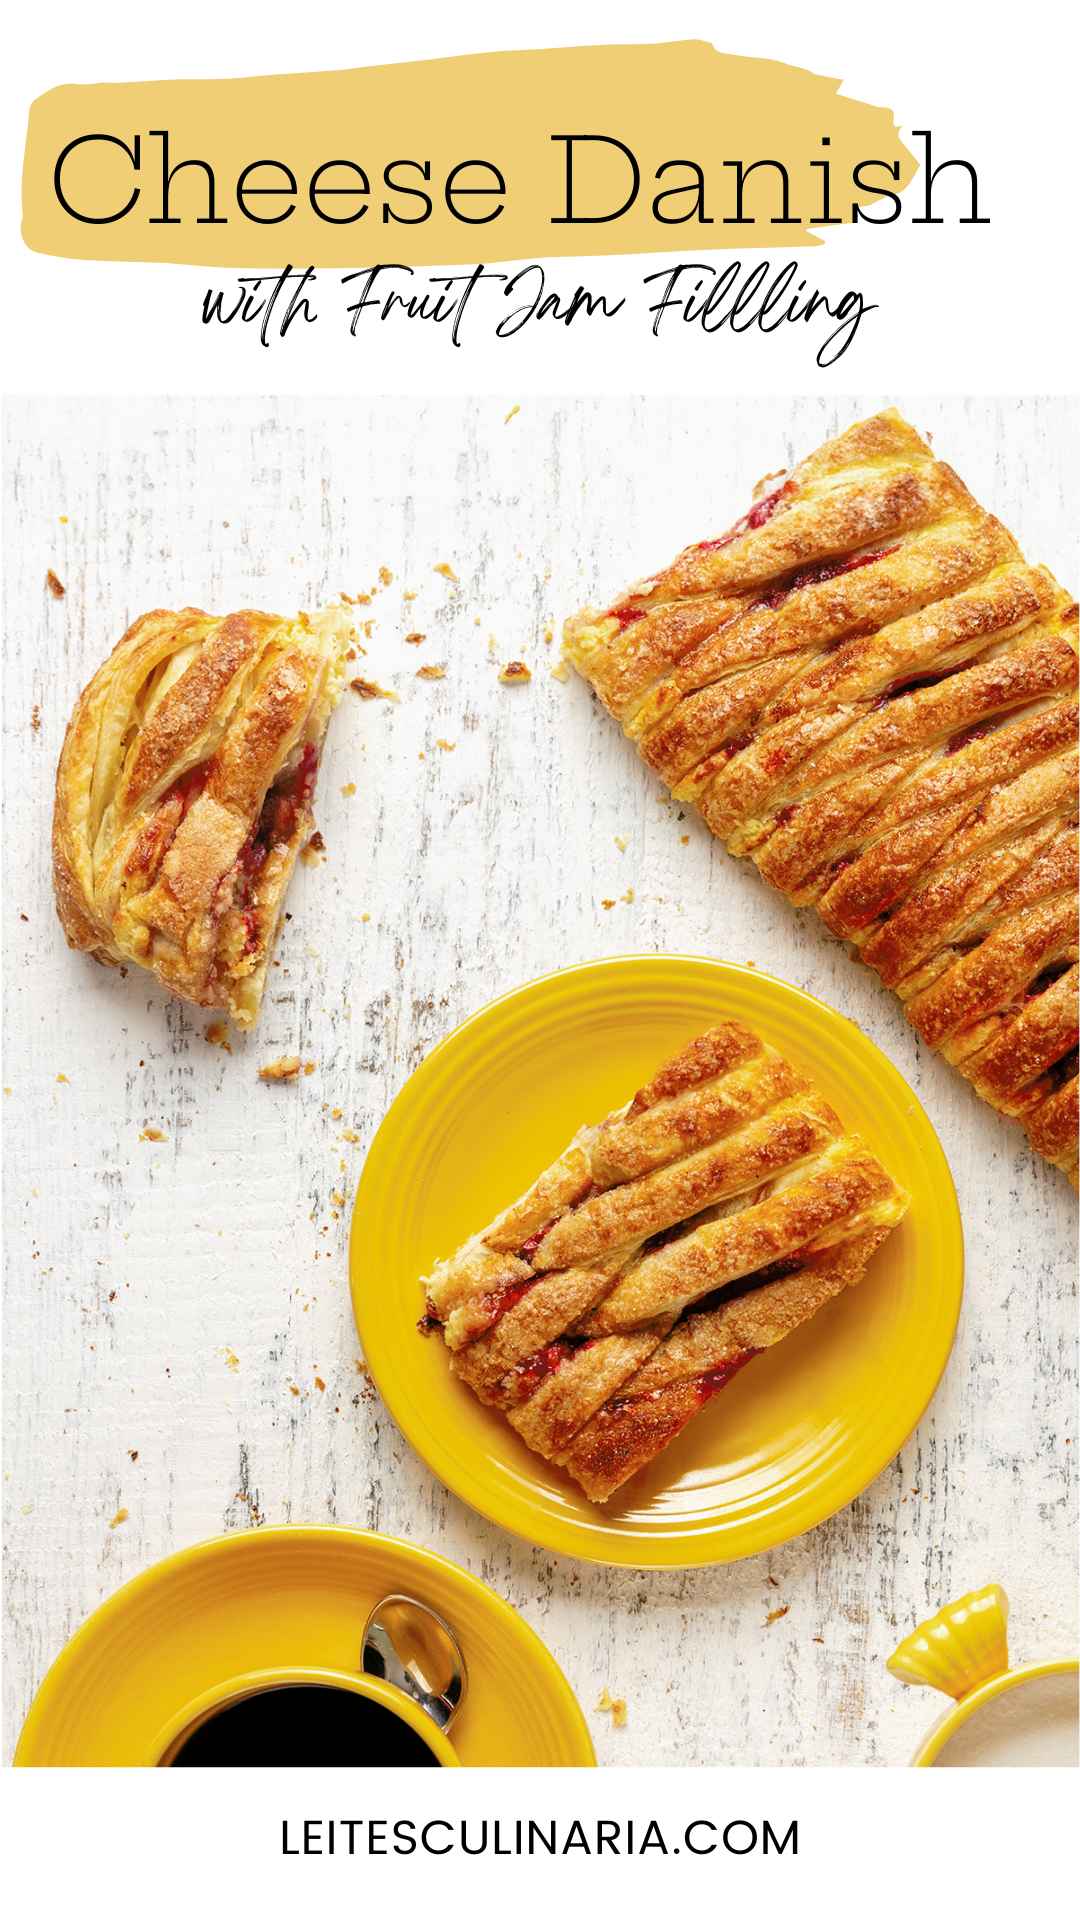
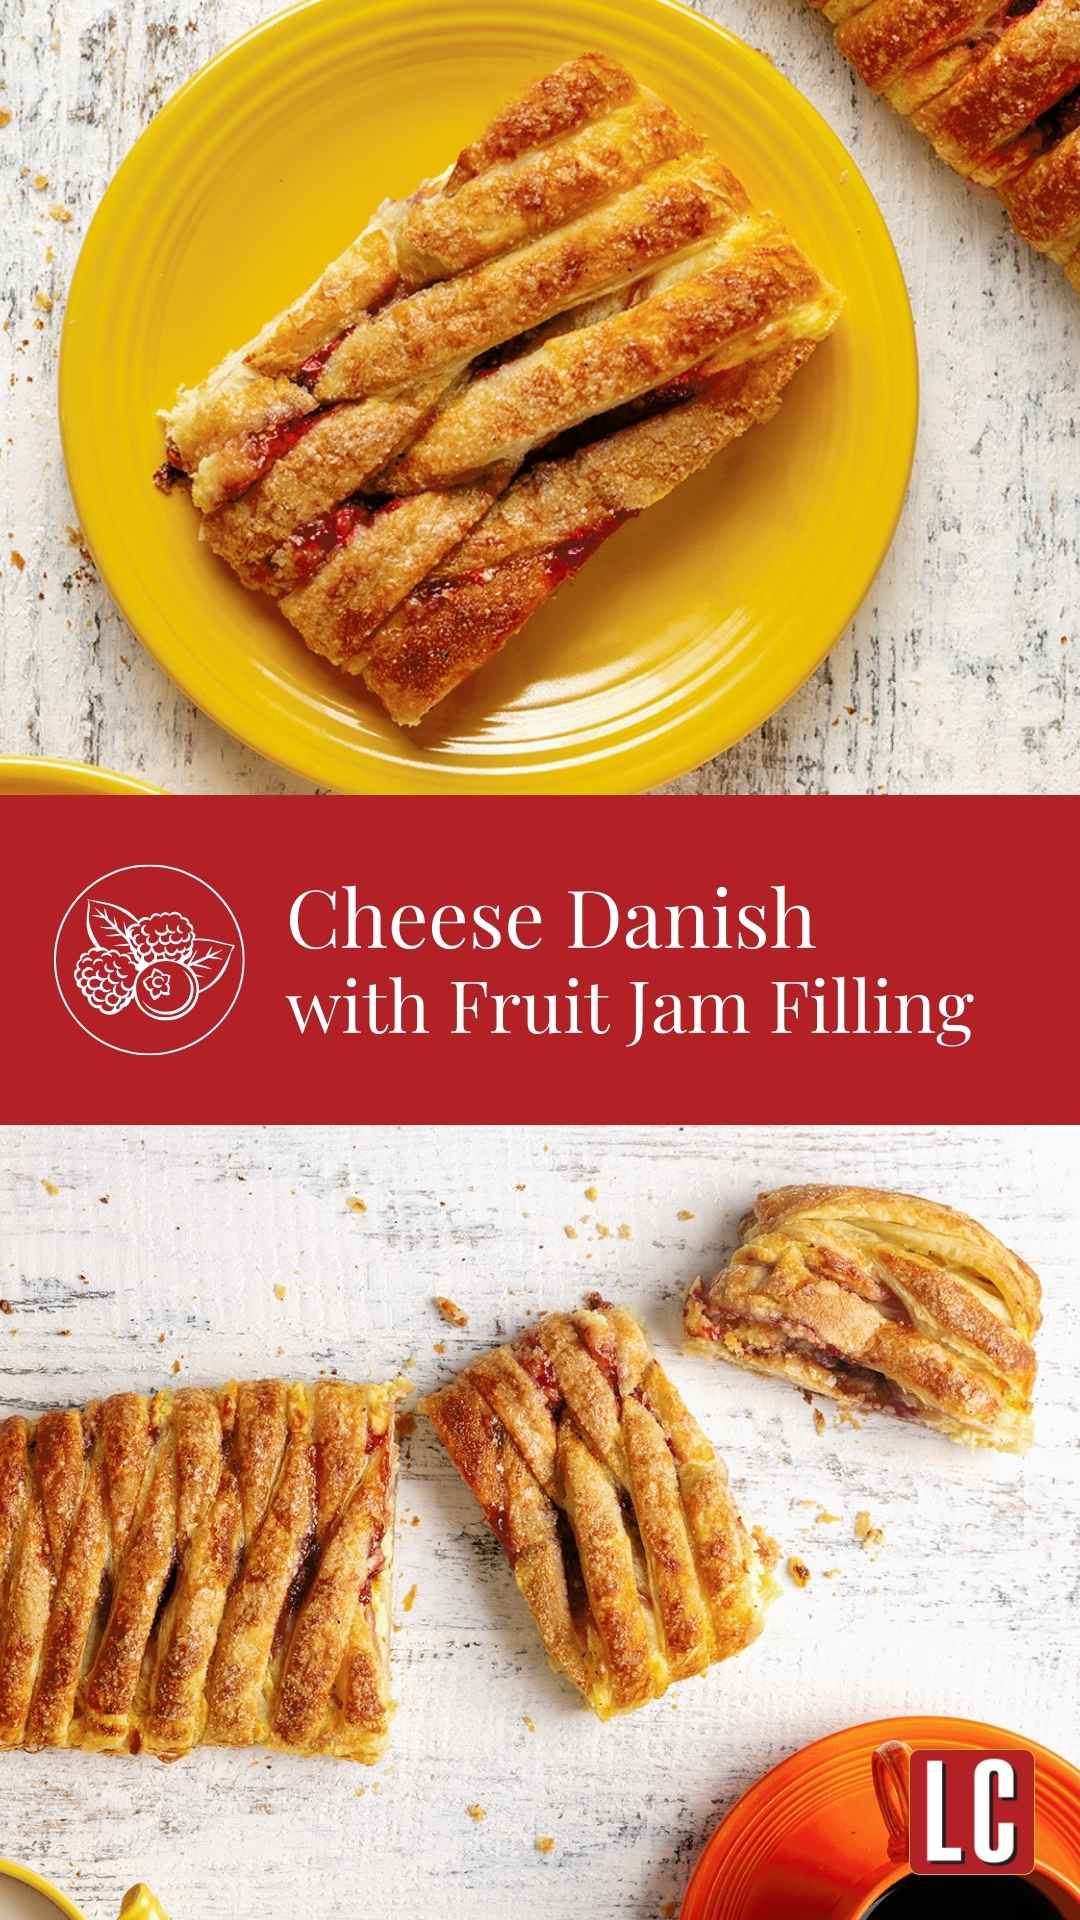
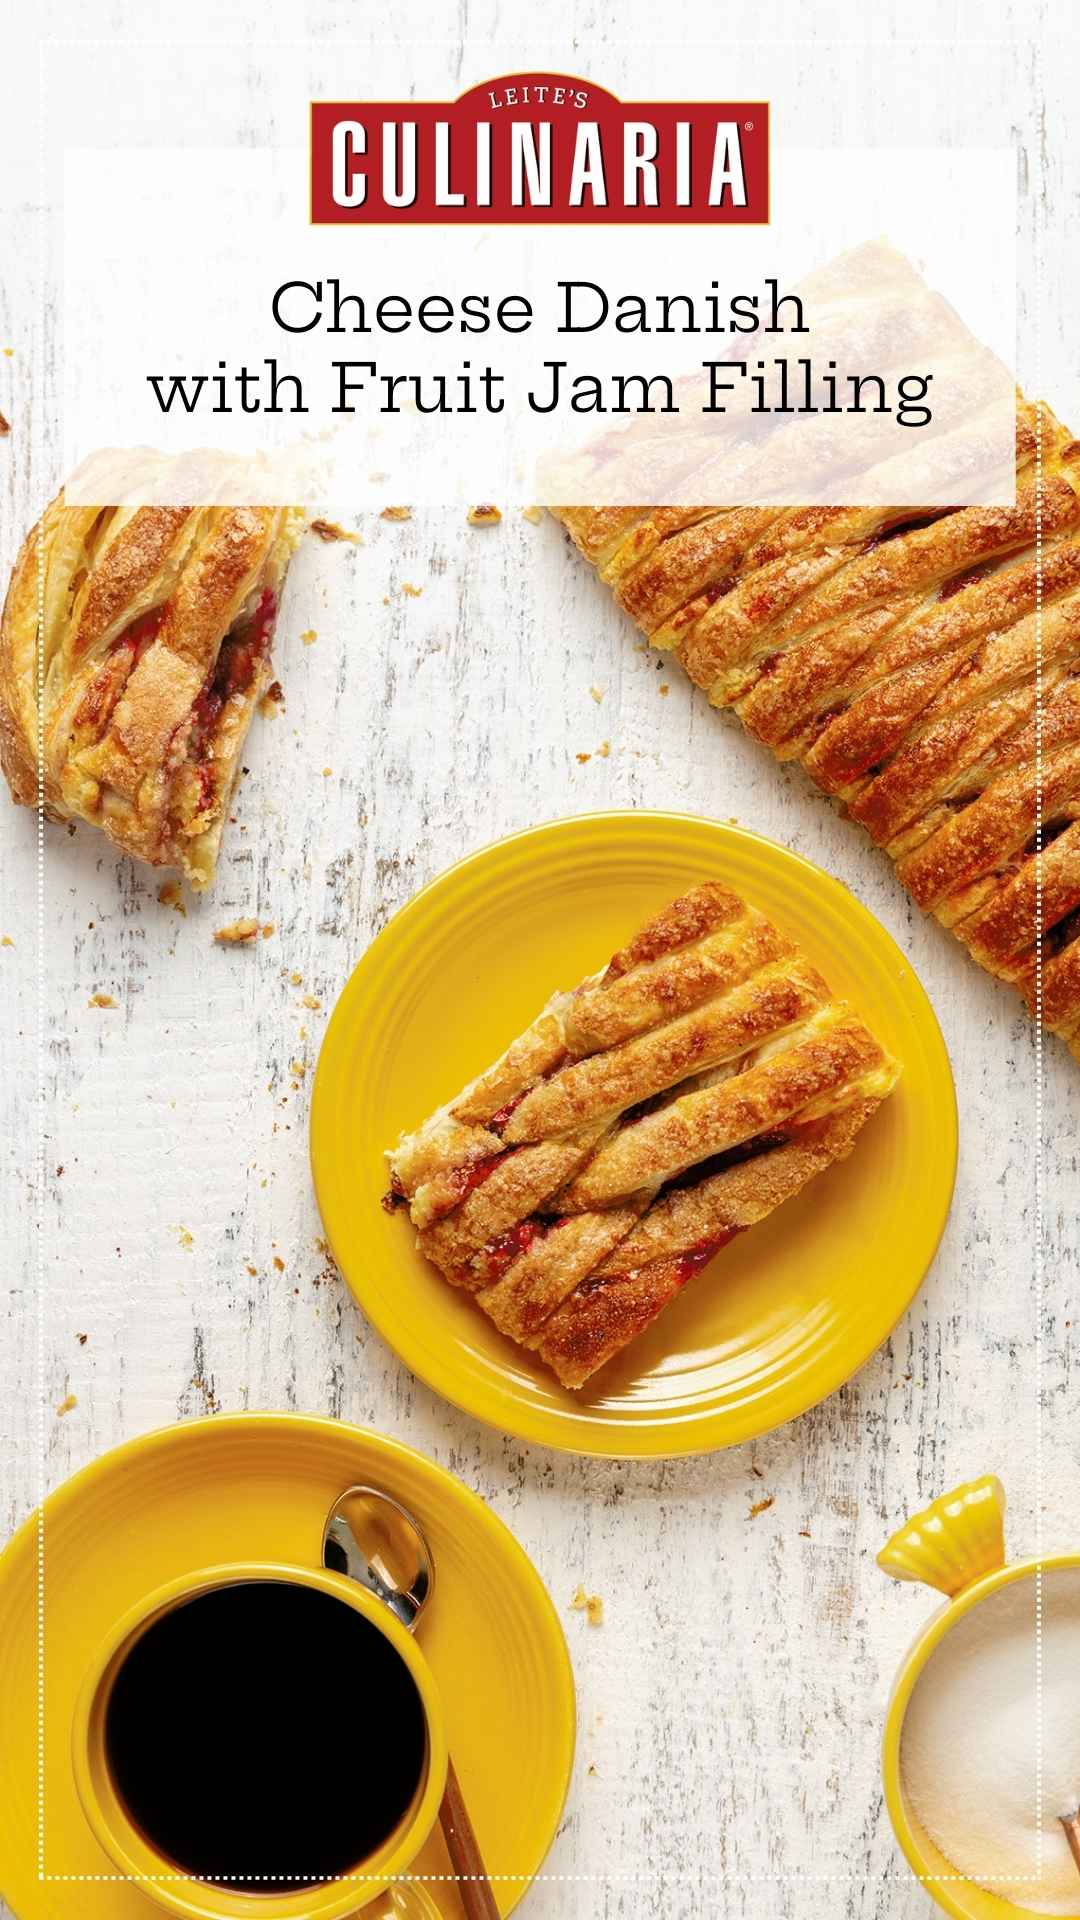
Cheese danish. Who doesn’t love cheese danish? Living in New York City for about 40 years, The One and I have had our pick of them. Within a stone’s throw of our apartment, we have no less than 10 bakeries, diners, and delis that offer all kinds of danish. The best of which, in The One’s not-so-humble opinion, is Zabar’s at Broadway and 80th Street.
But get this: He said this recipe is better than those at the venerated Upper West Side store. Hands down.
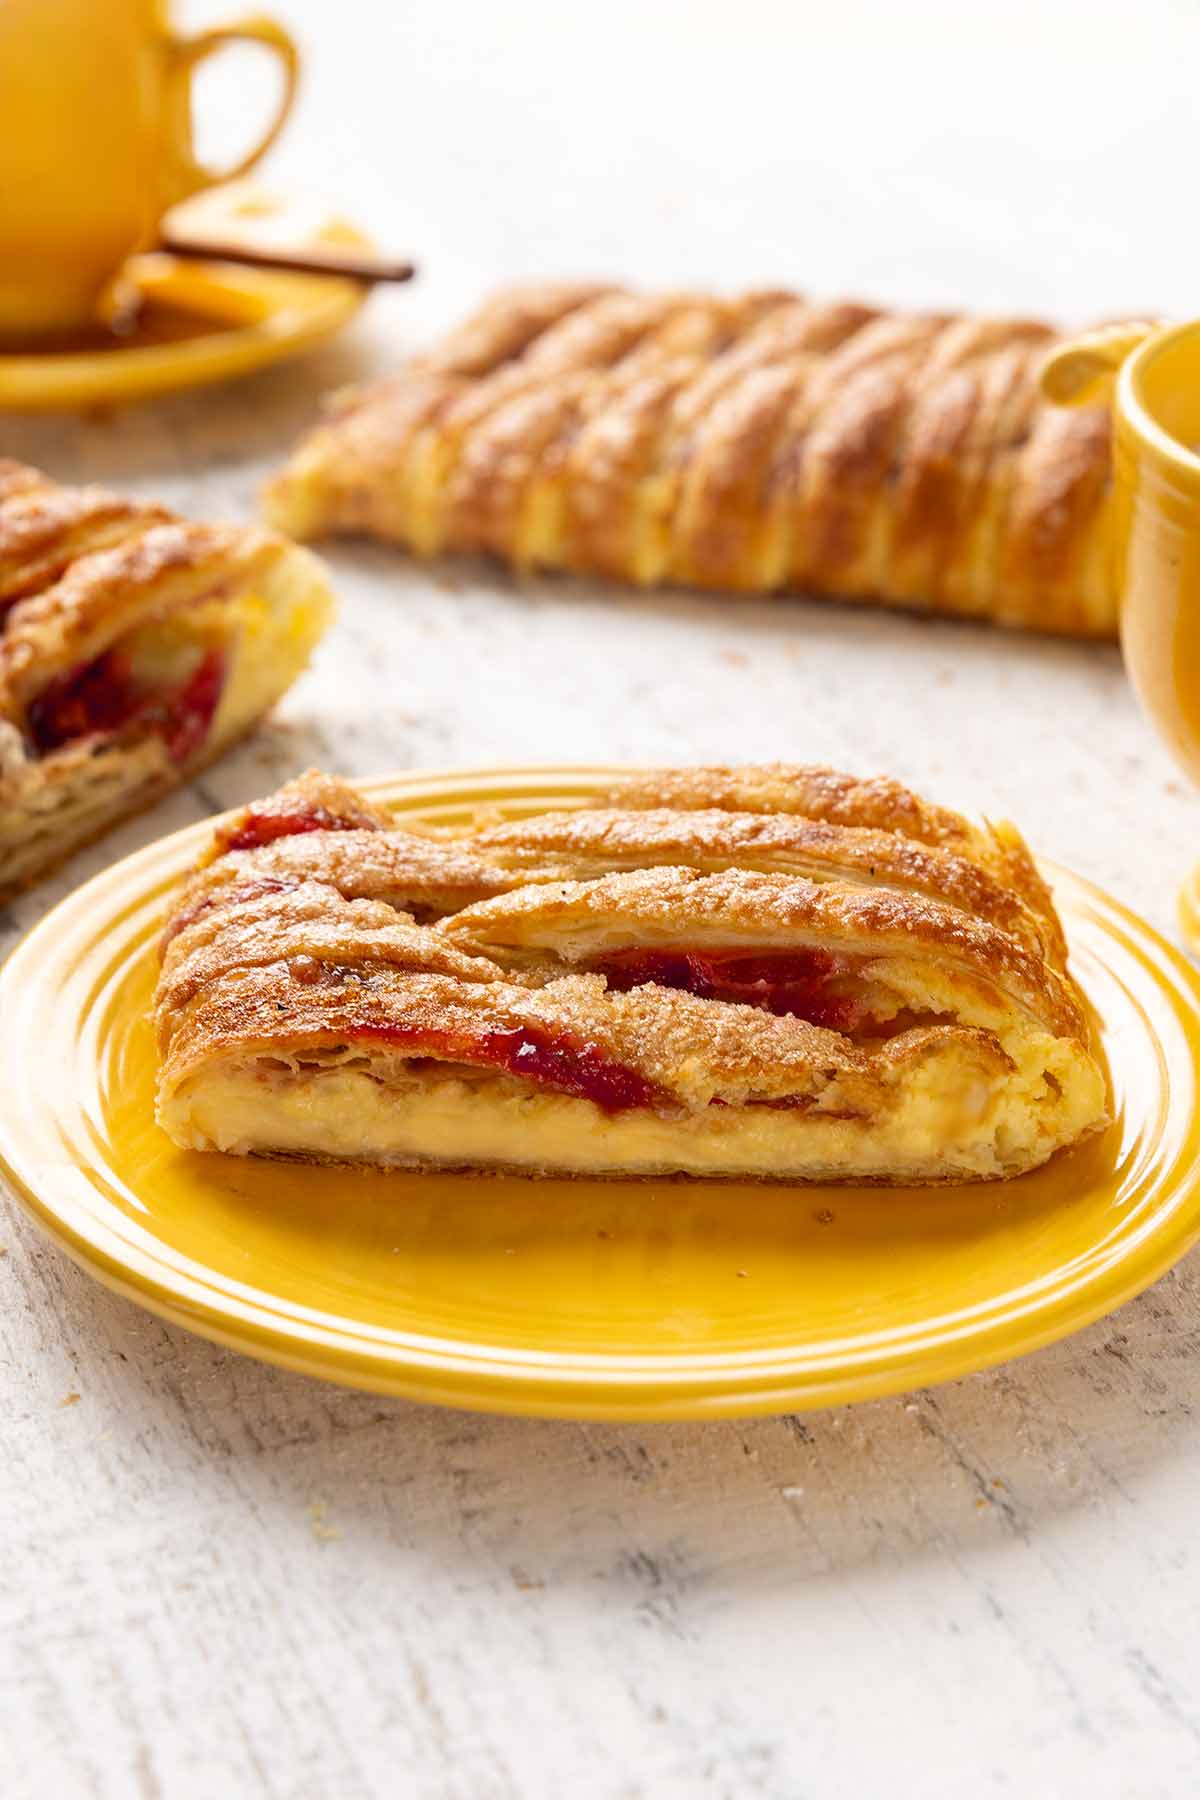
And he’s right. Eaten while still warm, the pastry is marvelous crisp, the filling is creamy and custard-like, and the fruit jam is oh-so-perfectly softened.
If I’d baked this 15 years ago, I would’ve hunched over the counter for hours making puff pastry from scratch. But these days, I’m more than happy to turn to frozen puff pastry. My pastry of choice is Dufour, discussed in the FAQs below. It’s an all-butter product that puts all other commercial puffs to shame. Truly.

Why Our Testers Loved This
My testers loved that this cheese Danish was easy to put together and had a rich, creamy filling. Linda P. said it best with her comment, “This cheese Danish is better than any I have ever had from a bakery.” Makes you want to try it, doesn’t it?
What Makes This Danish Different?
Dough
Danish dough starts with flour, yeast, milk, eggs, and ample butter for a rich, tender base. Repeated folding of the butter creates those crave-able flaky layers. My recipe calls for puff pastry, saving time and giving it a different, crisper texture.
Filling
This filling stands out for its simplicity, focusing on the classic cream-cheese flavor. It omits common additions like sour cream, lemon, or almond extract. Using room-temperature cream cheese and only the egg yolk creates a smooth, less sweet filling, letting the fruit preserve shine.
Notes on ingredients
- Puff pastry–The cheese Danish recipe was designed with readily available Pepperidge Farms puff pastry in mind. If you make your own pastry or use Dufour (my preference), you may need to trim or roll it slightly to get the correct dimensions.
- Cream cheese–Use full-fat cream cheese for the best flavor. Don’t use whipped cream cheese as it can become grainy when melted.
- Fruit jam–You can use your favorite fruit jam here. If you’re looking for inspiration, homemade raspberry jam is spectacular in this pastry. If your jam is very thick, give it a 20-second zap in the microwave to loosen it.
Recipe Variations
- Citrus cheese Danish–For a light citrus pastry, replace the jam with a teaspoon or two of finely grated lemon, lime, or orange zest.
- Goat cheese Danish–Replace the cream cheese with goat cheese to create a tangy cheese Danish.
- Jammy Danish–Use your favorite preserve in the filling: raspberry, blueberry, lemon curd, marmalade, you name it.
- Nut Danish–For a bit of crunch, fold sliced almonds, crushed pistachios, crushed and toasted pecans or hazelnuts into the filling.
- Fruit Danish–Consider adding raisins, currants, dried cranberries, chopped apricots, or prunes, too.
- Glazed Danish–Instead of sprinkling the top of the pastry with sugar, mix 1 cup (120 g) powdered sugar, 2 to 3 tablespoons milk, and 1/2 teaspoon vanilla extract until smooth. Drizzle over the warm Danish, then devour!
How to Make Cheese Danish
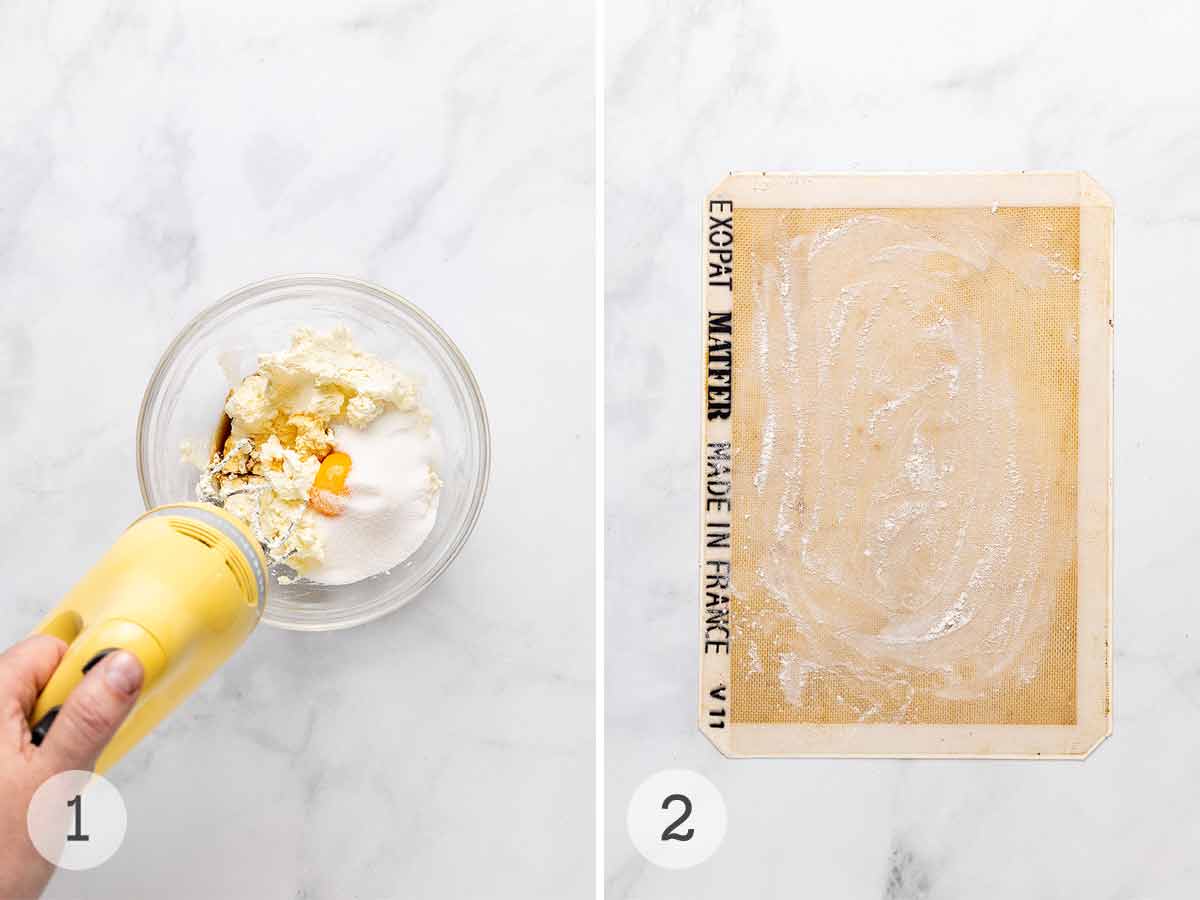
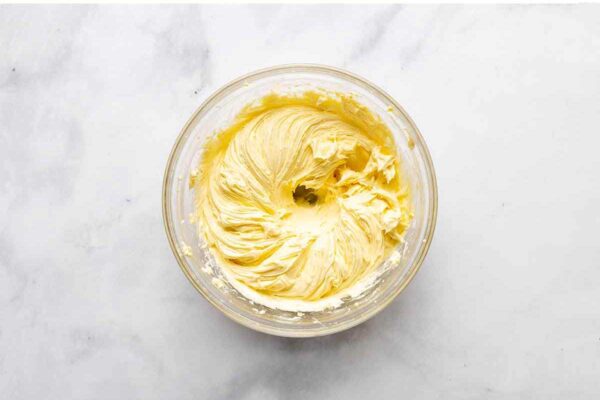
- Preheat the oven to 400°F. Beat the cream cheese, egg yolk, sugar, vanilla, and salt until smooth. Set aside.
- Flour a nonstick silicone mat or piece of parchment paper that’s roughly the size of a baking sheet.
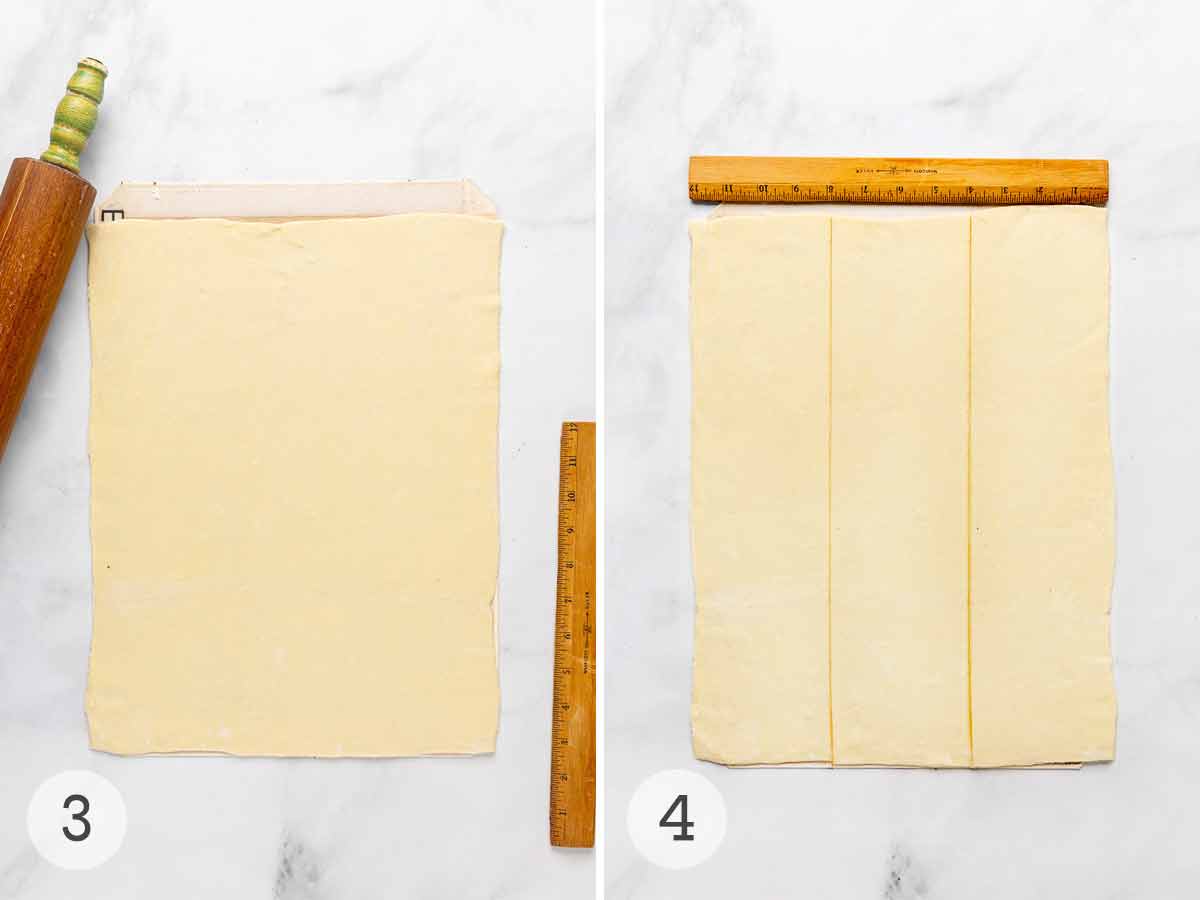
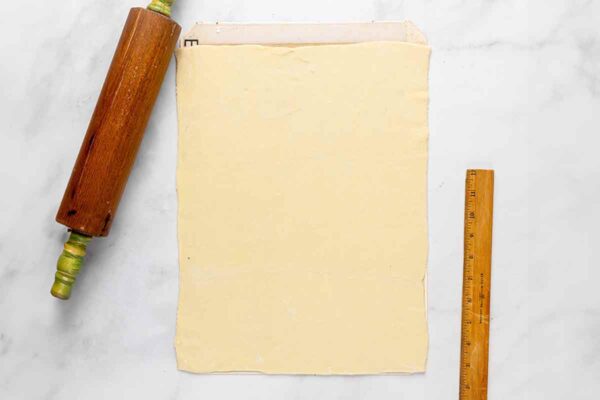
- Roll out the pastry, flouring as you go, until you have a 12-by-15-inch rectangle.
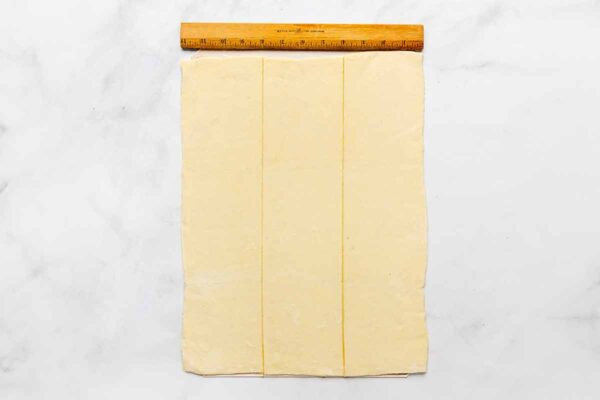
- Rotate the pastry so the short side is facing you and lightly score the pastry into 3 columns.
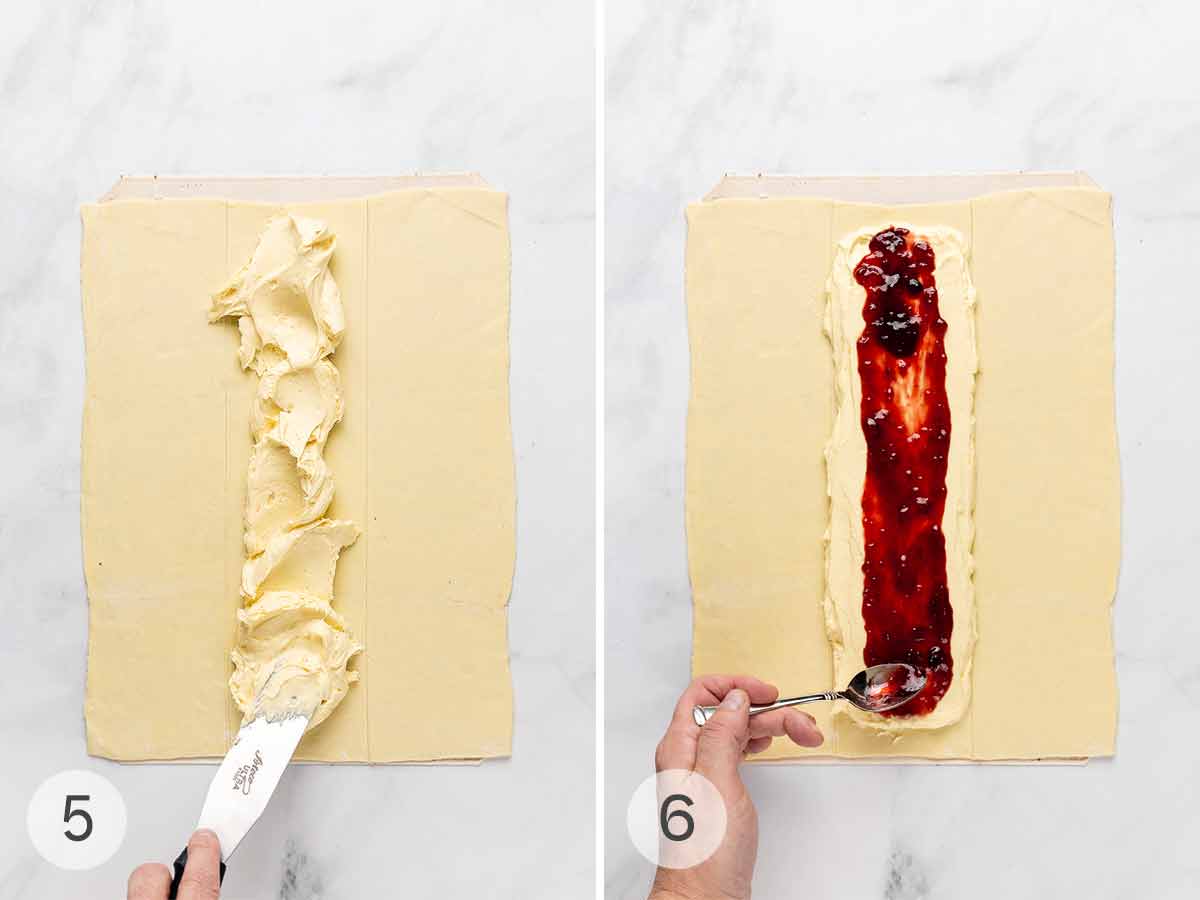
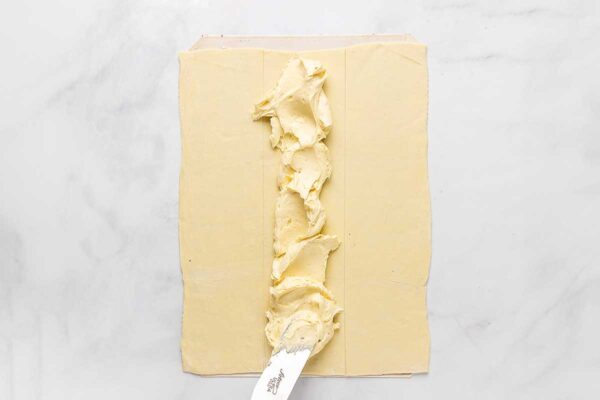
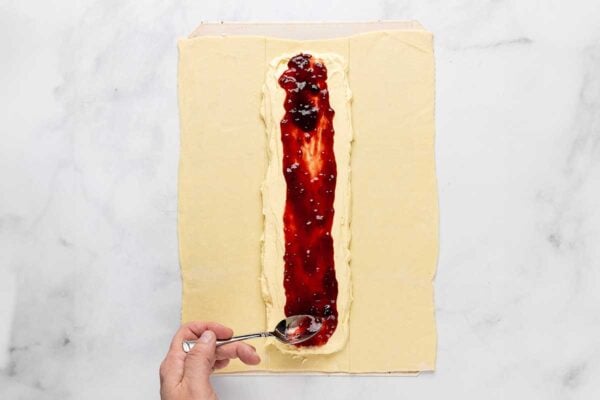
- Spread the cream cheese filling over the center section of the pastry.
- Spread the jam over the cheese filling.
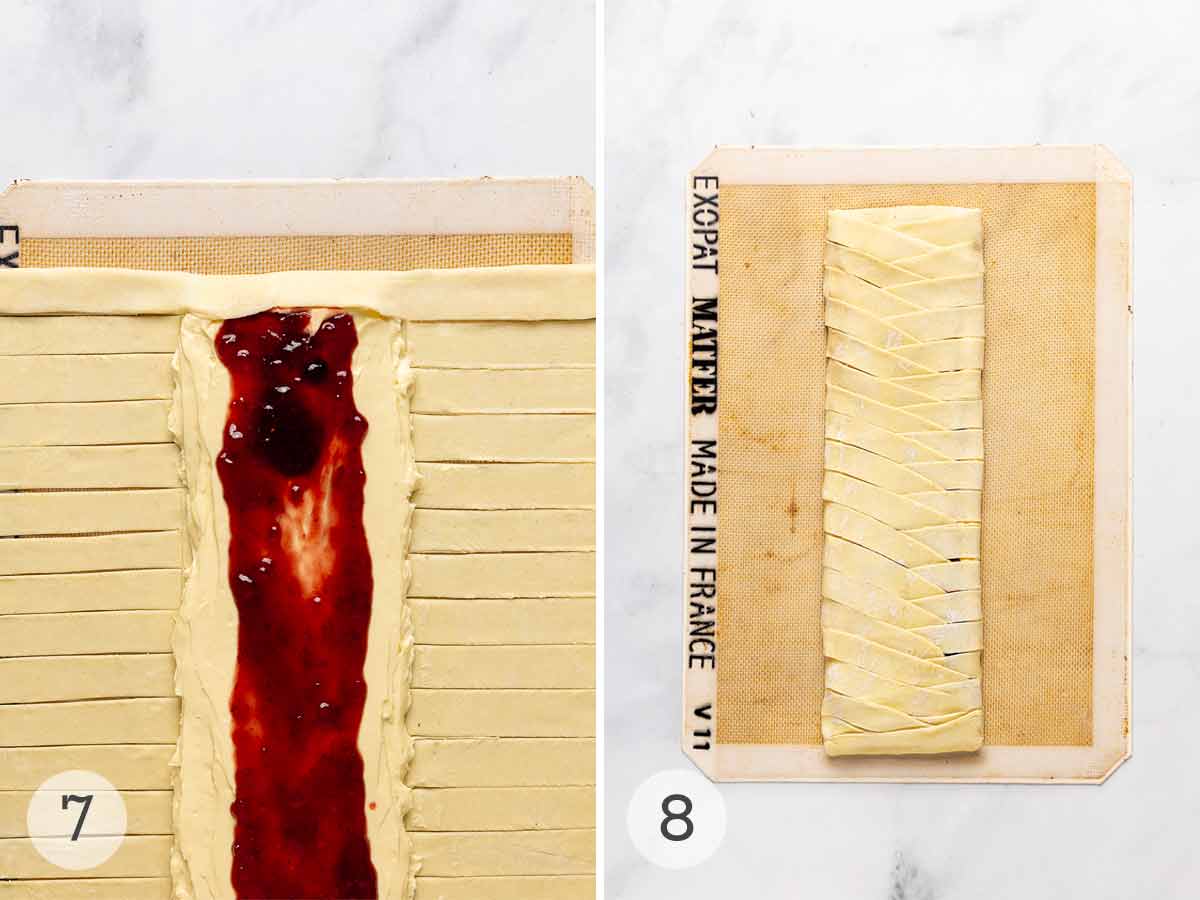
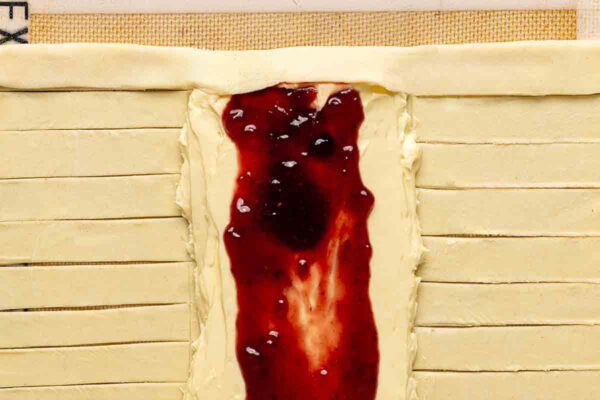
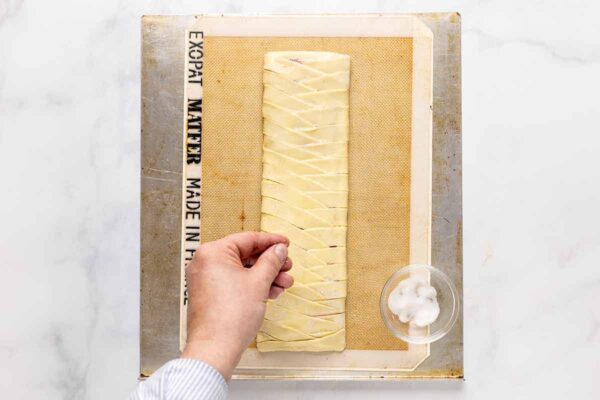
- Fold the top of the pastry over the filling to seal it, then cut strips on the left and right columns.
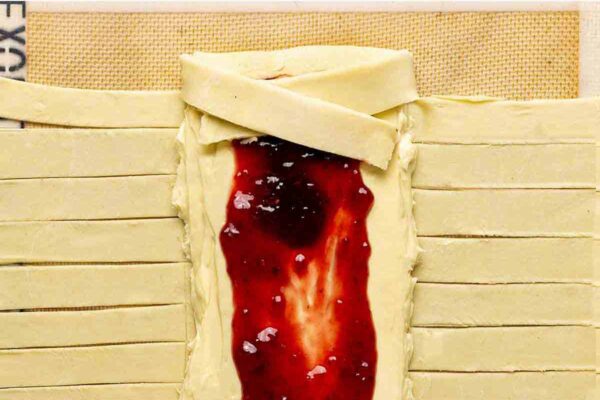
- Braid the strips in an alternating pattern to cover the filling.
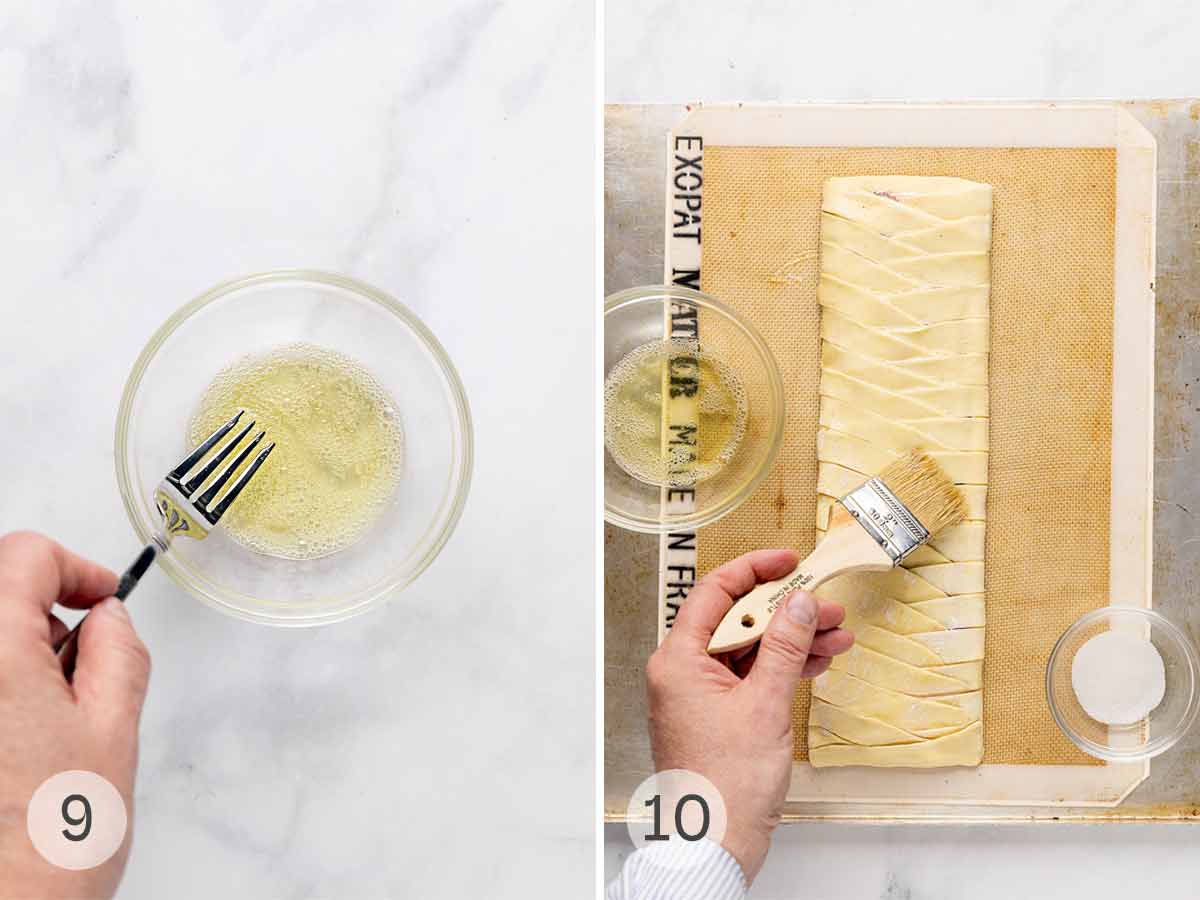
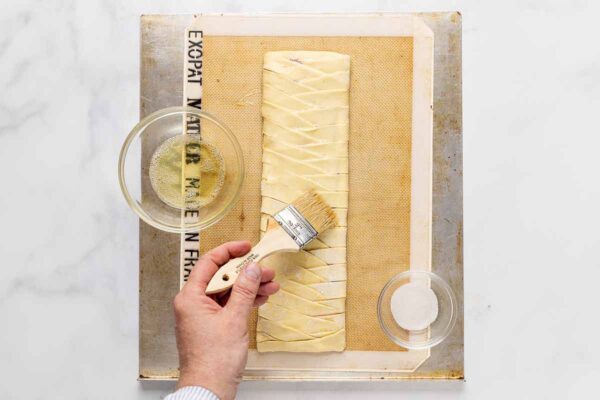
- Beat the egg white in a small bowl.
- Brush the pastry with egg wash and sprinkle with sugar. Bake until golden brown. Serve warm.
Your Danish Questions, Answered
Of course, you can! This recipe uses store-bought dough, which I fully support, but I know that my readers often like to do it themselves. And we have an excellent recipe for quick puff pastry. Give it a try and tell me what you think.
The hardest thing about store-bought puff pastry is waiting until it’s fully thawed. If you use it too soon, the dough will crack as you unfold it. Wait too long, and the dough will get too warm—making it limp, and you risk the butter starting to melt. Your best bet is to take the frozen dough out of the box and let it thaw overnight in the fridge.
In one word—carefully. Use a light touch with puff pastry, just enough to shape it and get rid of any bumps from the packaging. Otherwise, you risk losing those buttery, flaky layers. If your dough gets too warm, slide it on a baking sheet and pop it back into the fridge.
The most available and affordable brand is Pepperidge Farm, and I created this with Pepperidge’s dimensions in mind. Opt for this, and you’ll end up with a perfectly acceptable, The One-approved cheese Danish.
But if, like me, you want puff pastry made with real butter and just a handful of natural ingredients that puffs into über flaky and crisp layers, then you want the slightly pricier Dufour brand.
If you use a 1-pound package of Dufour, note that Dufour’s dimensions are different than Pepperidge Farm. So, you’ll need to trim a couple of inches from one side of the square dough to obtain a rectangle.
Pro tips & troubleshooting
- Leftover cheese Danish can be stored, wrapped in foil, in the refrigerator for up to 3 days or frozen for up to 3 months. Reheat in a 350°F oven until heated through.
- If you have extra filling, use it to fill puff pastry turnovers or hand pies.
More Tempting Pastry Recipes
Write a Review
If you make this recipe, or any dish on LC, consider leaving a review, a star rating, and your best photo in the comments below. I love hearing from you.–David
This cream cheese Danish recipe turned out to be very easy to make. And it’s delicious!
ginny
Cheese Danish
Video
Ingredients
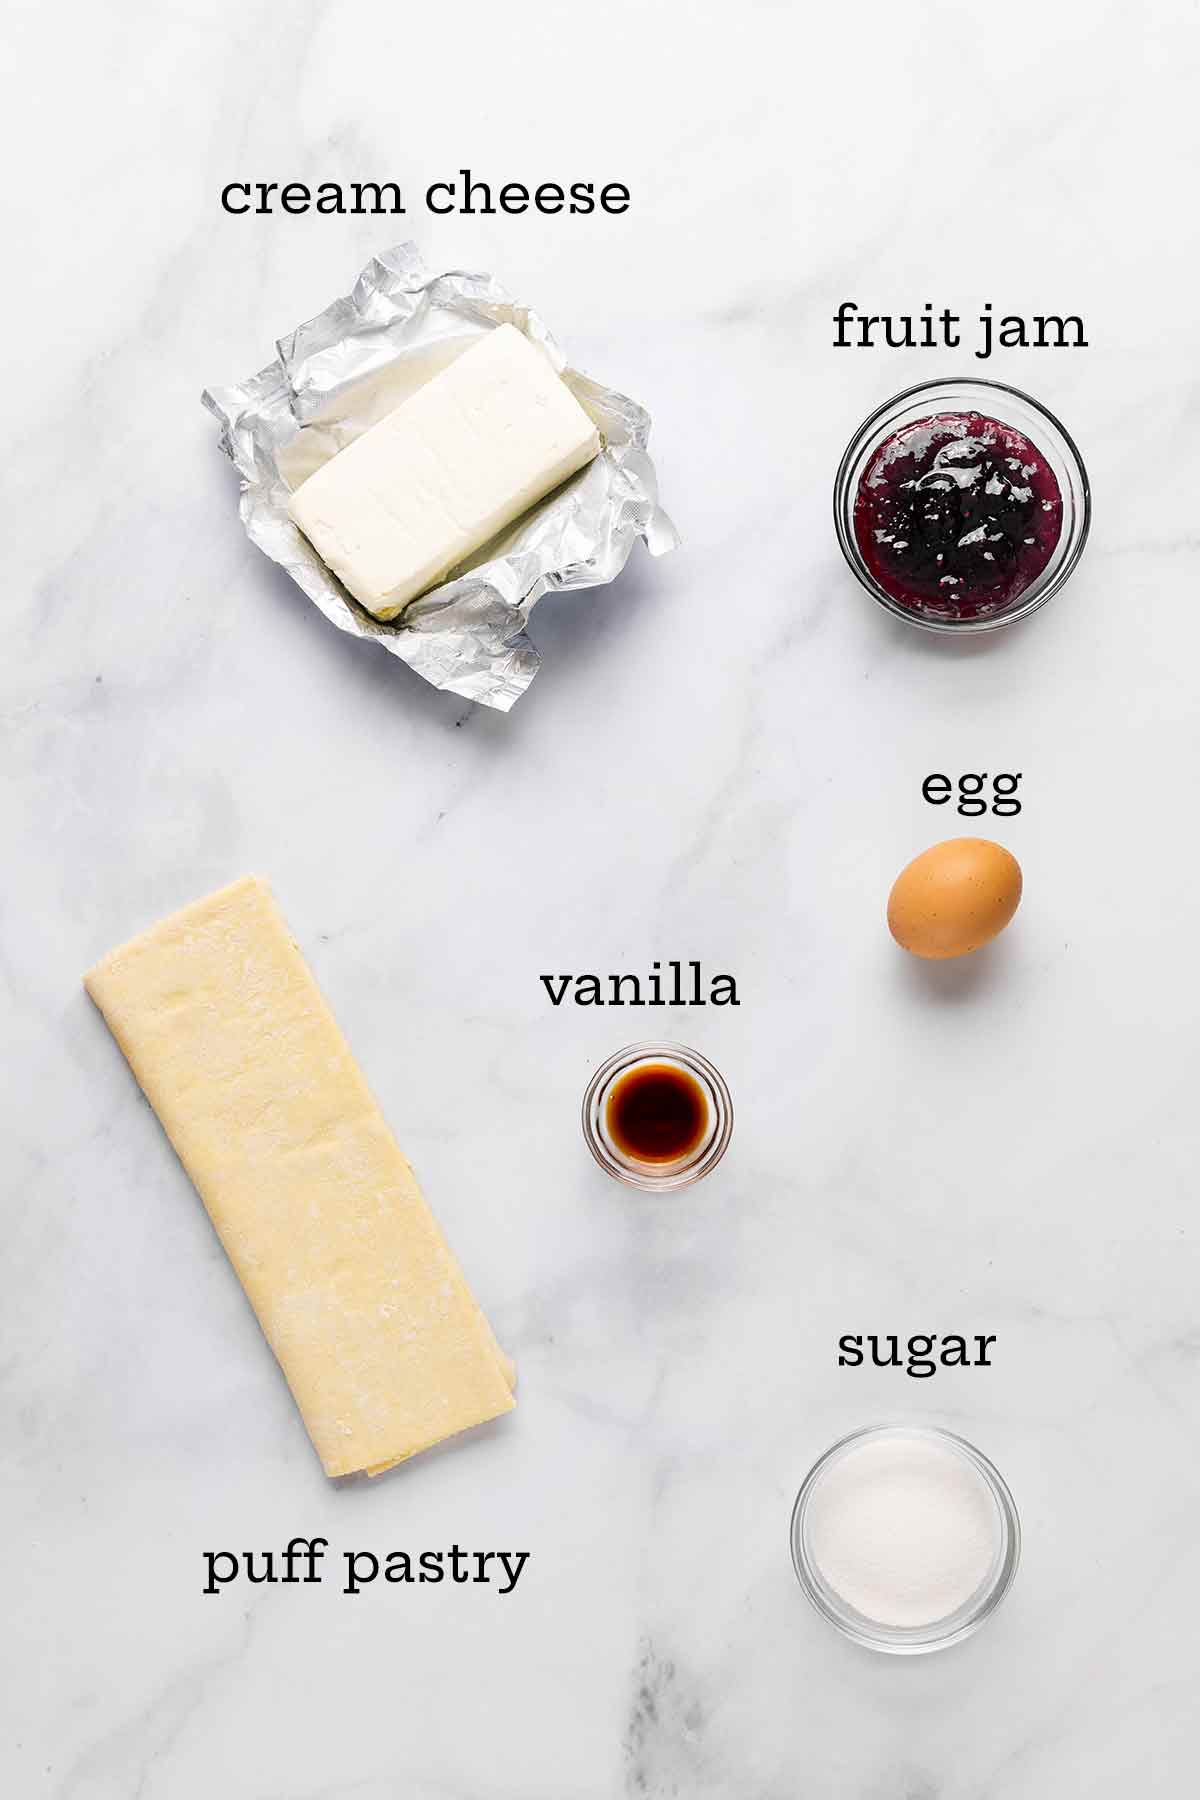
- 10 ounces (1 1/4 cups) full-fat cream cheese, room temperature
- 1 large egg, separated
- 1/4 cup granulated sugar, plus more for sprinkling
- 2 1/2 teaspoons vanilla extract
- 1/4 teaspoon salt
- 1/3 cup your favorite fruit jam
- 1 sheet frozen puff pastry, fully thawed (instructions below are for Pepperidge Farm puff pastry; if using Dufour, see the FAQs above)
- Flour, for dusting
Instructions
- Crank the oven to 400°F (200°C).
- Plop the cream cheese, egg yolk, sugar, vanilla, and salt in a medium bowl and beat with a handheld mixer until smooth. Set aside.

- Lightly sprinkle a nonstick baking mat or a piece of parchment with flour.
- Unfold the puff pastry on the parchment paper, and with a rolling pin, roll it out to a 12-by-15-inch (32-by-38-centimeter) rectangle. Check frequently so it doesn't stick.
- Make sure the 12-inch side of the pastry is nearest you. Lightly press a ruler into the dough, making three 4-inch-wide vertical columns, being careful not to press completely through the dough.
- Spread the cream cheese filling on the center column, leaving a 1-inch (2 1/2-centimeter) border on the top and bottom edges of the column.
- Spoon a column of jam down the middle of the filling.
- Fold the top edge of the pastry down to cover 1/2 inch (2 centimeters) of the filling.
- Cut 3/4-inch horizontal slits (or fringe, if you will) down the left and right columns.
- Now, it's just a matter of simply plaiting. Fold the top right strip diagonally across the filling. Do the same with the top left strip, overlapping the right strip.
- Repeat this right-left, right-left folding down the Danish until the last two strips.
- Fold the bottom lip of the pastry up 1/2 inch (2 centimeters) over the filling to seal it, then cross the last 2 strips over each other upward.
- Beat the reserved egg white and lightly brush it on the pastry.
- Sprinkle lightly with sugar. Slide cheese Danish and baking mat onto a baking sheet.
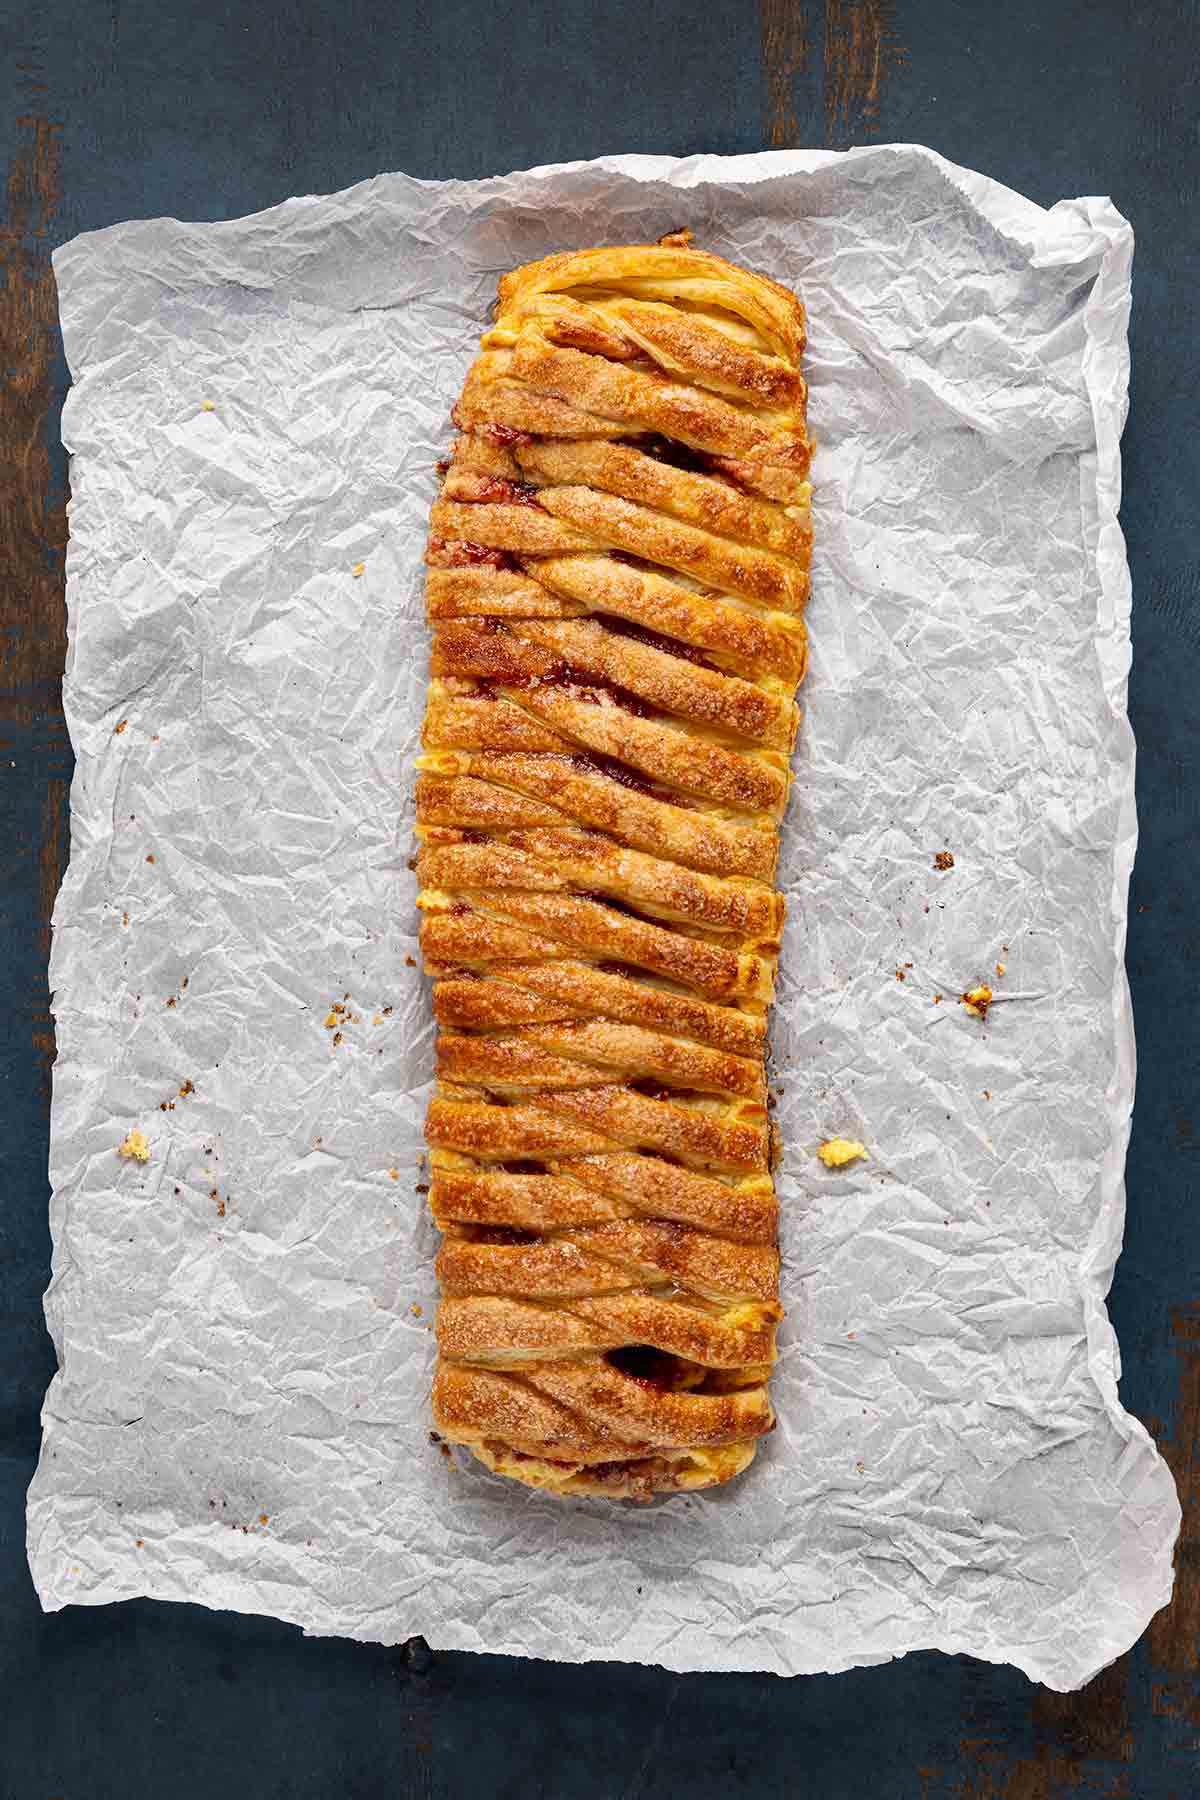
- Bake until golden brown, 30 to 35 minutes. Transfer the sheet to a rack to cool. Serve warm.


Notes
- Storage–Leftover cheese Danish can be stored, wrapped in foil, in the refrigerator for up to 3 days or frozen for up to 3 months. Reheat in a 350°F oven until heated through.
- Extra filling–If you’ve got extra filling, use it to fill turnovers or hand pies.
- Puff pastry brands–The above recipe was designed with the Pepperidge Farm brand in mind. If you use a different brand of pastry, note the weight and dimensions. You may need to trim it slightly to work with the recipe.

An LC Original
View More Original RecipesExplore More with AI
Nutrition
Nutrition information is automatically calculated, so should only be used as an approximation.
Recipe Testers’ Reviews
Did you know only 68% of the recipes we test make it onto the site? This recipe survived our rigorous blind testing process by multiple home cooks. It earned the Leite’s Culinaria stamp of approval—and the testers’ reviews below prove it.

This puff pastry cheese Danish is better than any I have ever had from a bakery. The store-bought puff pastry makes a light and airy crust with plenty of buttery flavor. The homemade filling is spot-on in terms of flavor and creaminess.
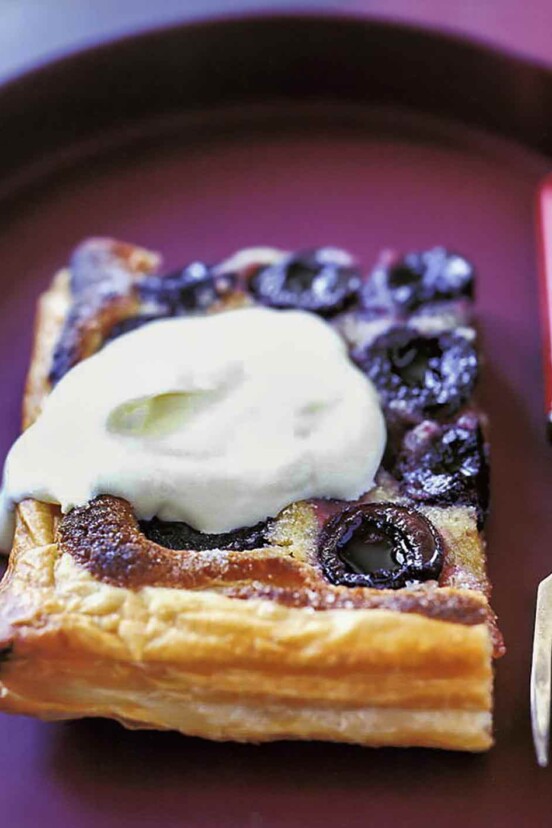
If you follow the instructions for preparing the dough and assembling the pastry, it will turn out looking as beautiful as the photo. You may have to read the directions more than once, but follow them precisely and you will have a perfect, professional-looking pastry.

If I had known how easy this would end up being, I’d have been making Danish forever ago. In the span of just about 1 hour, I had a lovely treat to take to a family celebration.
The filling was easy to put together, and since the day was warm, I didn’t bother to pull out the electric mixer but used a little elbow grease and mixed it by hand. The filling was lovely and slightly citrusy, and the puff pastry was easy to work with.
My only difficulty came when doing the final crossing of the pastry onto the cheese. Scoring the pastry and laying the cheese into the center was simple enough. Where I ran into trouble was making the pastry pattern. Should it be pulled to the other side across the cheese or only halfway? When it finished baking after 35 minutes, it wasn’t pretty, but it smelled divine.
I made a second one with goat cheese with the second sheet of puff pastry. It was equally tasty but the filling was a little more crumbly. One taster commented that it was like having little bits of cheesecake, and another couldn’t pick a favorite between the two of them. They were both good enough that none came home.
I can’t wait to make this again, maybe with a rum or almond flavoring with the cheese or apple bits added in. The possibilities seem endless.


I tried this recipe and had to lower my oven as the first one come out almost burnt on the bottom at 400 degrees, these are at 385. Look delicious, I made one almond.
Marianne, they look amazing! Sounds like your oven may run a little hot and adjusting the temperature is a great solution. Please let us know what you make next.
Perfection
Gorgeous, Jeannette!
Thank you for responding! I know now the culprit was the fact that my strips were probably not close enough together or sealed well enough. It did not affect the wonderfulness of the end product!
Fantastic, Ann! I am so happy that you were able to figure it out. Sometimes all it takes is a bit of conversation to assess where things went wrong. The next time you make it, I’m sure you will both a tasty and picture perfect Danish!
My danish turned out pretty good all things considered. The one thing that was kinda disappointing was that after baking there was a gap of about an 1” between the top of the cream cheese and the bottom of the dough….rather like what happens to some pies. What causes that and can it be fixed? Whole Foods was out of Dufour except for the plant-based version. Have you used that? I used Pepperidge Farms brand and it was ok but I kept thinking about how much better it might have been with DuFour.
Ann, we are so pleased that you enjoyed this even with the 1 inch gap. The recipe was developed using Pepperidge Farms brand of puff pastry and all the instructions are for those dimensions. You may have needed a bit more of the dough folded over to ensure the filling is completely covered or pinch the ends to seal the dough if you find it is separating. I also wondered if you added some fruit there may be moisture from your berries and if that may have resulted in some issues with your pastry? You want to make sure all your ingredients are at room temperature and the cream cheese filling is mixed just until blended. Any extra air in the filling may cause it to deflate. If you make it again, please let us know how it turns out.