
It’s not hard to make a rye sourdough starter from scratch. Some sourdough starters rely on wild yeasts that live in the air, others on acid-producing bacteria present in buttermilk, yogurt, pineapple juice, and the like, and still others start with commercial yeast or store-bought starters. Fact is, none of these additives is necessary. All it really takes to build a delicious and robust rye sour culture, or starter, is some whole-grain rye flour, water, a warm place, and patience. [Editor’s Note: And when your traditional rye sourdough starter is complete, the very first thing you’re going to want to do is use it to make this Galician rye bread.]–Stanley Ginsberg
☞ LEARN MORE, READ: HOW TO DRY SOURDOUGH STARTER
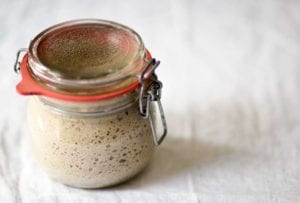
Rye Sourdough Starter
Ingredients
Day 1: Make the Rye Sourdough Starter
- 2.5 ounces whole grain rye flour, preferably organic
- 2.5 ounces warm water (105°F or 41°C)
Days 2 to 7: Refresh the Rye Sourdough Starter
- 2.5 ounces whole grain rye flour, preferably organic
- 2.5 ounces warm water (105°F or 41°C)
- 2.5 ounces Sour Starter from the preceding day
Days 8 and Beyond: Maintain the Rye Sourdough Starter
- 2.5 ounces medium or whole-grain rye flour, preferably organic
- 2.5 ounces warm water (105°F or 41°C)
- .25 ounces rye sourdough starter
Instructions
Day 1: Make the rye sourdough starter
- Start with equal amounts of organic rye flour and water by weight. Dump them in a nonreactive (glass, porcelain, stainless-steel, plastic) container, mix by hand into a stiff paste, cover, and let stand at room temperature (68 to 72°F or 20 to 22°C) for 24 hours.
☞ TESTER TIP: Occasionally the yeast normally present in whole grains fail to establish itself in a new culture; if, after 3 or 4 days, the culture darkens, develops a mold, or smells bad, dump the whole batch and start over. After a week, the culture, or sourdough starter, will be ready to use or to be stored refrigerated in an airtight container for a couple days. [Editor's Note: If storing the sourdough starter for more than a couple days, you'll need to maintain it, which we explain how to do just below.]
Days 2 to 7: Refresh the rye sourdough starter
- The next day, discard all but 2 1/2 ounces (70 grams) of the culture and mix the remainder with the refresh ingredients, cover, and let stand. Repeat each day, discarding all but 2 1/2 ounces (70 grams) of the preceding day’s culture.
☞ TESTER TIP: The most important point to remember at the early stages is to feed the sourdough starter daily. Even when it shows no apparent fermentation, the yeast is busy multiplying and consuming nutrients at a very high rate. By the second or third day, it will swell, show bubbles, and give off a clean sour smell. Over the next few days the activity will become more and more vigorous and the smell more intense.
Days 8 and Beyond: Maintain the rye sourdough starter
- In a perfect world—or in a working bakery—sourdough starters are refreshed daily. That said, daily feedings demand both a degree of dedication and abundant flour supplies that are impractical for all but the most committed home bakers. You can get by refreshing your starter every 36 hours or so.
- Mix the rye flour, water, and rye sourdough starter by hand until incorporated. Cover and ferment at room temperature (68 to 72°F or 20 to 22°C) overnight or for 10 to 12 hours. The sponge will be very bubbly, have a clean sour smell, and will have tripled in volume. Store refrigerated in an airtight container and it will last indefinitely.

Nutrition
Nutrition information is automatically calculated, so should only be used as an approximation.
Recipe Testers’ Reviews
The rye starter was easy to make and quick. It took about 5 minutes each of the 7 days. Mine smelled great and seemed consistent after the week of feedings. I switched to the refresh amounts after that and it stayed nice and healthy.
During the buildup, you end up tossing about 2/3 of it away. I definitely recommend a scale versus just using volume measurements.


Hi David, my starter is on day 5. Is it normal that during the 7-day feeding period the starter remains very stiff with no air bubbles? There is no unpleasant smell, but also not much of a sour smell. The room temperature seems to be what you recommend, 68-70 F. Is the starter supposed to become airy and bubbly after day 7? I can not see how, since it is stiff and pasty. Thank you in advance.
Elena, David is out today but I talked to him and he said there should be some bubbles by now. He suggested that if your flour isn’t fresh or if the water is fluoridated your may have problems….in addition, of course, to a million other small things.
I am on Day 10 of a similar starter using 50/50 rye and all-purpose flour, feeding twice daily since Day 4. I have seen no bubbles so far. Could it be that my improvised proofing chamber ranging from 90-100°F is too warm?
There is no mold and no off odors, can I salvage these by continuing to feed and ferment at lower temps?
Adriana, you writing to the right guy. I killed just about every single starter I made–for a long time! Yes, I think the chamber is too warm. Let the starter sit at room temp. At our house, that’s about 68 degrees. Feed it today and let it go for a day or two. Also, is your water hard where you live? Or have chlorine?
I am in the process of developing my first-ever rye starter. I am on day 6 and things seem to be going pretty well. The starter is active, though it is not doubling each day.
My question is about the “maintain” phase. Do we really only keep 7 grams of the starter? and then, do we store it in the fridge? If so, are we only keeping 7 grams of starter each time we refresh?
Nate–
I have been maintaining a rye starter for years. I would not worry a lot about the 7 gr once you have a healthy starter. What I do is always refresh with equal parts starter, flour, water. Usually for me that is about 50 gr each. Yes, I keep mine in the fridge in a small mason jar. When ready to refresh I dump out most of it leaving 30 – 50 gr starter, then add the water and flour. Hope this helps.
Great response! So, the maintenance phase is very similar to the first phase; we are just able to store it in the fridge and reduce the frequency of refreshing. Great!
Nate, you bet!