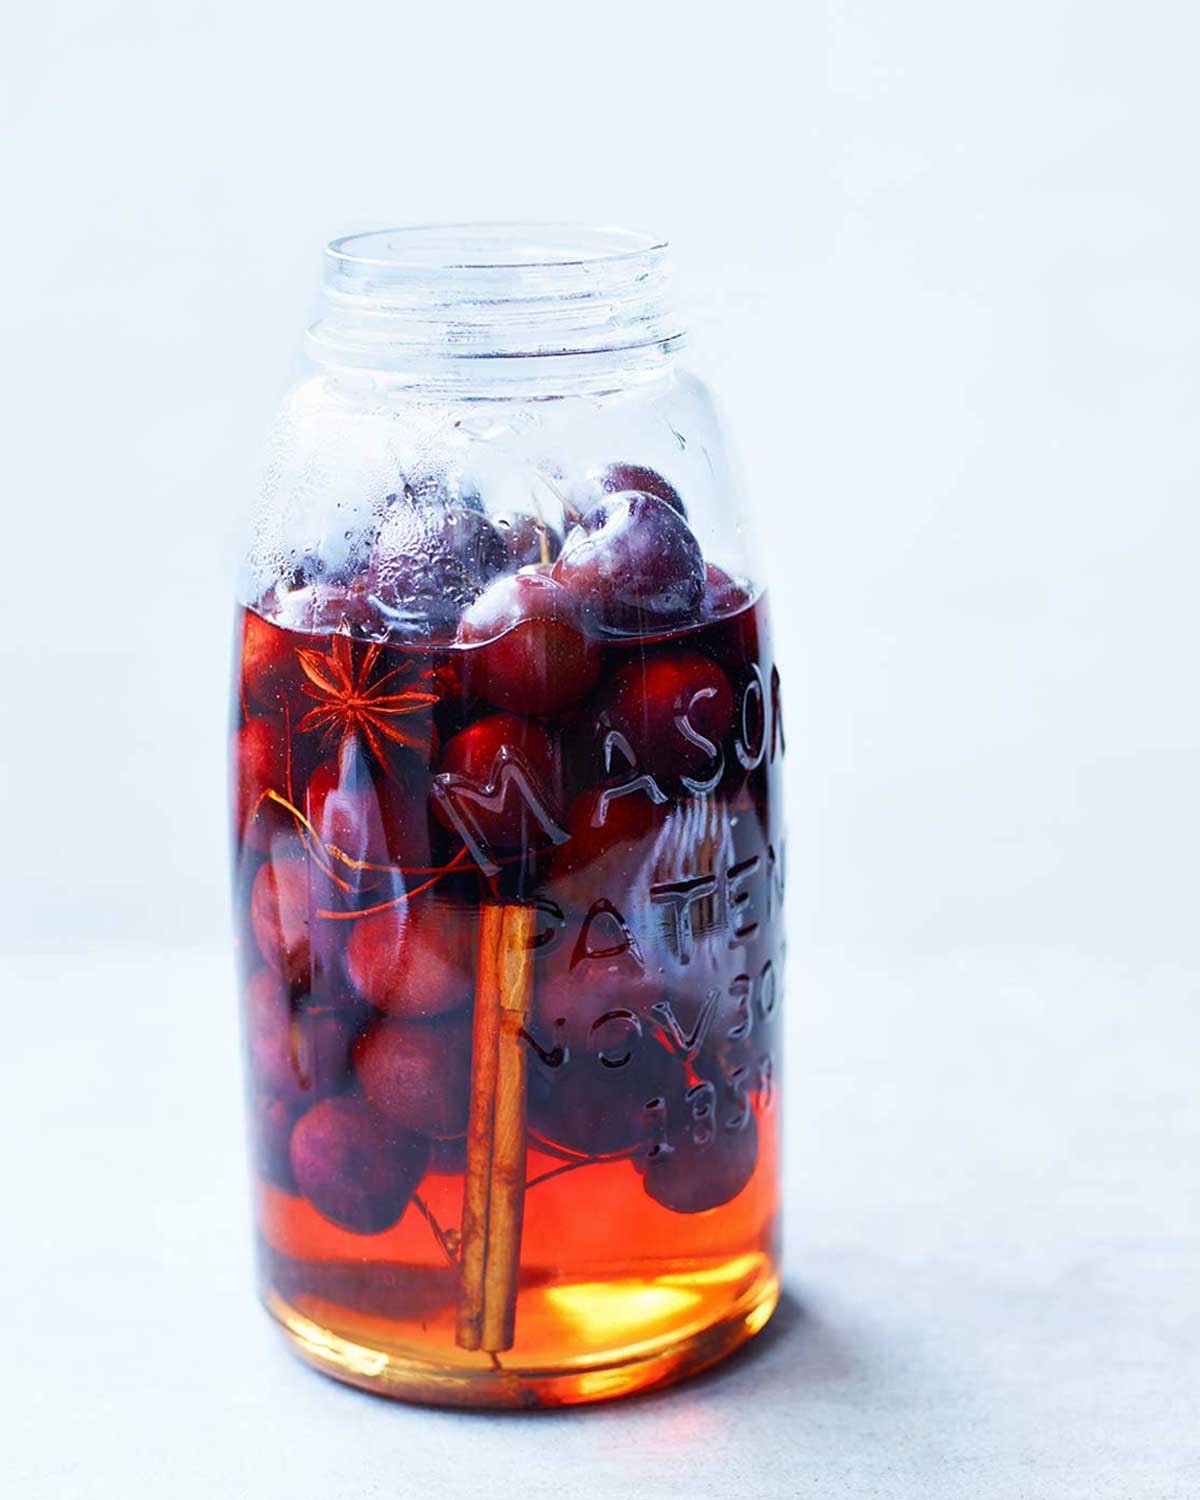
These pickled cherries are a little sweet, a little spicy, and altogether a stunning, simple, and conversation-starting way to take advantage of cherry season. The lightly spiced little lovelies are spectacular with cheese or charcuterie and, natch, both the cherries and their syrup take well to cocktails. Consider it a way to extend the ephemeral cherry season.–Renee Schettler Rossi
What are some uses for pickled cherries?
How to put pickled cherries to good use? Here are some of our preferred incarnations, but don’t let them stifle your imagination. Wanna share your intended use? We’d love to hear it. Let us know in a comment below.
Plop on a cheese board
Slip into cocktails
Toss into salad (and be certain to save the pickling liquid to dribble into the vinaigrette) Nibble alongside charcuterie
Stir into pan juices of roast chicken or pork or duck
Toss into sparkling water along with the pickling liquid as a sort of cheater’s shrub

Pickled Cherries
Equipment
- 1-quart glass jar with a lid and a rubber seal, sterilized and funnel
Ingredients
- 3 cups granulated sugar
- 1 2/3 cups white wine vinegar
- 1 cinnamon stick
- 2 whole cloves
- 1 star anise
- 4 cups whole fresh cherries, whether Bing, Rainier, or another sweet variety
Instructions
- If desired, remove the stems from the cherries. Do not remove the pits.
- Combine the sugar, vinegar, and spices in a large saucepan and stir over low heat until the sugar dissolves, 5 to 7 minutes. Increase the heat and boil rapidly until the liquid has reduced by about a third, 10 to 15 minutes.
☞ TESTER TIP: To easily gauge when your mixture has reduced by 1/3, use a wooden skewer or popsicle stick as a depth gauge. Simply stick it in the pan at the beginning and make a notch at the depth of the liquid. Then, as you boil the mixture to reduce it, take the pan off the heat every 5 minutes or so to let the bubbles calm down and check the depth, continuing on until sufficiently reduced by about a third according to your measuring stick.
- Remove the pan from the heat, add the cherries, and let cool to room temperature, 1/2 to 1 hour.
- Pour the contents of the pan into a 1-quart glass jar with a lid and a rubber seal using a funnel. Close the lid and set aside in a cool, dark place for at least 2 weeks before opening. The contents should remain dark or bright red, depending on the type of cherries used, and the cherries will become wrinkled, somewhat similar to raisins.
- Once opened, your jar of pickled cherries can be stashed in the fridge and will last for up to a month.

Nutrition
Nutrition information is automatically calculated, so should only be used as an approximation.
Recipe Testers’ Reviews
Quick! Run to your nearest farmer’s market and make these now! These little red gems are destined to become a summer staple in my fridge. These are delicious—and I think they will be very versatile. On their own, they’re a little tart, a little sweet, and a little spicy—nice on a ham and Cheddar sandwich or with a cold meat and cheese platter. I used them on crostini as an appetizer—crisp thin baguette slices, smear of soft goat cheese, sprinkle of baby arugula, and a little dice of the cherries. Delicious! I’ll be saving the syrup to use as a base for a gastrique or to pickle some shallots in or maybe use in a vinaigrette. I can see it pairing well with a roasted beet and goat cheese salad, for instance, or just stir a spoon into some soda water for a quick cherry shrub. This is a real keeper!
I used sweet Bing cherries—they’re the first to come to market in my area. The recipe came together in a snap—5 minutes to dissolve the sugar in the white wine vinegar and then another 5 minutes to reduce it by 1/3. I ended up with 3 cups liquid, which I poured over the cherries while it was still hot. After a couple of hours on the counter to cool, I hid the jar in the back of the fridge and tried to forget about them for 2 weeks. The cherries kept their color—still nice and plump after 2 weeks. They did float a little, I ended up with about 3/4 quart of cherries with some extra cherry vinegar syrup at the bottom of the jar.
Pure ambrosia or simply “umm umm good” is what I call this delicious treat! Even after growing up with grandparents who faithfully canned fruits and blanched vegetables, this was the first time I tried my hand at canning. With trepidation, I purchased my ingredients and quickly started prepping as soon as I arrived home, which took all of maybe 15 minutes, including washing the cherries.
Once all the ingredients were in the pot and the sugar started to dissolve, a lovely aroma wafted up from the pot after only 5 minutes. After another 5, the ingredients had boiled down nicely. I made a huge error then and submitted to curiosity by dipping one of my sweet Bing cherries into the mixture. Sweet, tangy flavor burst onto my tongue, the likes of which I can only liken to the childhood nostalgia of eating pickled peaches in South Georgia. I was not able to hold off for the requisite 2 weeks before tasting, but if the flavor improves any, I will be in cherry heaven.
The recipe makes a quart. I substituted a couple 1-pint Mason jars. I tried the recipe twice, once with pitted cherries and the other with the full cherries. No contest, I would keep the recipe as is with the full cherries. Usually I do not eat all of my cherries and allow them to spoil. Not anymore! Thank you for this lovely recipe!
These pickled cherries will be wonderful on charcuterie and cheese boards during the holidays. The aroma of the syrup filled the kitchen and reminded me of winter days. I’ve opened the cupboard and peered in at them every single day. They’ll be well worth the wait. I was initially concerned about the thickness of the syrup, but as I poured it into the jar, some thin juice also poured out of the pan. I realized then, that as these sit for two weeks, more juice will extract out of the cherries and most likely reduce the thickness of the syrup.
Before cooking, I measured 4 cups of cherries and put them in the jar to see if they would all fit. They did not but 3 1/2 cups cherries fit before cooking. However, after cooking, all 4 cups fit plus the syrup. So, even if it looks like too many, go ahead and use 4 cups.
This pickled cherries recipe has all sorts of promise, so I’m optimistic that I’ve captured a little of the fleeting cherry season in a new way. This is a pretty easy recipe and seems like it should work with whatever variety of cherries you have available. I made mine with Rainier since that’s what’s showing up locally, though of course I would love to try these with Bings.
Be aware that when you boil the vinegar, the vapor might really be strong, so plan on using your exhaust fan. You want to pay close attention so that you don’t burn the sugar past syrup into caramel, and maybe use your spatula or a skewer or a popsicle stick as a depth gauge. I notched a skewer and every 5 minutes or so, would turn off the heat so the bubbles calmed down and check the depth, continuing on until sufficiently reduced by about a third. I was glad I used a good size saucepan (8-inch diameter, 3.2qt volume) as the rapid boil looks a little exciting initially bubbling up. I did measure the rather thick syrupy liquid at the end of 15 minutes (2 1/2 cups), returning it to the pan and adding the cherries which fit into a single layer filling the saucepan.
After cooling for 40 minutes, I used a canning funnel, which I really recommend for trouble-free pouring, and fit all the cherries in with about 3 fl. oz. leftover liquid. The cherries floated up about an inch off the bottom, and to ensure that they stayed submerged, I placed a food-safe canning lid insert under the ring and lid to press down the fruit under the liquid since they wanted to float.
The spiced syrup smelled lovely, the jar was sealed up and sent to the cellar to sit for 2 weeks, and I patiently (hah!) look forward to tasting these in 2 weeks. I can already see them as part of an appetizer board or even used in drinks! The syrup will be a bonus ingredient to save for a shrub or spritzer. I spooned some into an infusion of ginger and cinnamon water, and it set pretty solid on the spoon and ice cubes, which reminded me of Greek cherry spoon sweets.
Preserving the season’s best produce is a wonderful way to reap the benefits of ripe produce year round. Preserving and canning have been very popular in the past few years and this recipe for cherries in vinegar is one of the most unique recipes for preserving that I have come across. Unique in its flavor components, fresh cherries are mixed with a combination of sugar, white wine vinegar (I used a nice Prosecco vinegar), and the warmth of a cinnamon stick, 2 cloves, and 1 star anise. The mixture of sugar and the vinegar give the cherries a tart “pop” of flavor while the spices give it them a real depth of flavor. The pickled cherries sit for 2 weeks in a cool spot…and it’s well worth the wait.
After 2 weeks, their color was still bright red, but the cherries themselves did wrinkle a tiny bit. They were perfectly pickled and have a wonderful flavor! Looking forward to testing them out in many, many recipes. I’m happy to have these beautiful red gems in the fridge for both sweet and savory applications over the next month or so. In fact, here are a few ways I plan to use them this coming week: First off tonight, I am going to toss them together in a salad of curly, bitter endive with pistachios and crumbled goat cheese. Later this week I am going to pair the cherries with fennel-crusted pork chops. And to try them in a sweeter application, I am going to try serving them with a sprig of fresh mint as a dessert over a serving of rich, creamy fromage blanc.
In terms of the recipe itself, it took about 10 minutes over low heat for the sugar to dissolve into the vinegar mixture. I ended up finding some lovely Bing cherries at the market for this recipe–and wanted to mention that I removed their stems before adding them into the jar with the preserving liquid. I did not pit them, but I think it’s worth mentioning taking the stems off. It took about 20 minutes for the cherries in the liquid to cool to room temp.
This pickled cherries recipe was super easy to put together, even for someone who isn’t a seasoned pickle-maker. I found some lovely local Massachusetts Rainer cherries and was thrilled to find a new way to preserve the local fruit of the season. I can’t wait to add these cherries to my next cheese board! The liquid turned a beautiful pink colored when poured in the jar.
With cherry season in full swing still and cherries selling at a very low price, this a great new way to take advantage. The recipe is simple to prepare and made some lovely preserved cherries with an interesting texture. They turn a bit wrinkled like a raisin but they do not fully cook or turn mushy. So they have a nice texture and since they are left whole, they don’t get overpowered by the vinegar.
I loved them with thin slices of sourdough rye bread and a strong Cheddar. Open those windows for ventilation with those vinegar fumes! The cherries do turn a bit wrinkled and the vinegar mixture soaks up a lot of the color. I did get a quart, but I do think this is more liquid than the cherries need. It might be ok to cut it down by 1/4 or 1/3. Another possibility is to add some more cherries, another cup or two. The leftover vinegar syrup is delicious though, kind of like a “shrub,” and I will be using it in drinks and cocktails.


We are not into sweets much are they very sweet, every ting ready for the pot just wondering about the sugar? Thanks Dan
Dan, unless your cherries are exceptionally sweet, I don’t think you’ll find these to be overly sweet. Our testers all described them as a great balance of sweet and tart. Do let us know how they turn out.
Hi, I got bags of free cherries. I decided to try this recipe. The flavor was terrific, but O DEAR what a disaster. I know that I did something wrong. After I poured the mixture over the cherries, a thick 1/4 inch toffee like base settled at the bottom of the jar. Where did I go wrong? I hope you can tell me, as I have access to lots more cherries and would like to try again. Thanks.
Lorna, we are thrilled you liked the flavor and want to to make them again. We checked with our canning expert and the temperature change might have caused the liquid to thicken more than intended. The cherries should be added to the mixture in the pan and then left to cool to room temperature. Once they have cooled, proceed with pouring the entire mixture into a jar. I hope this helps and please do let us know how they turn out.
I made this, but out of habit I poured the hot mixture over the cherries without waiting for it to cool…. I wonder if I ruined it 🙁 … I guess we will see.
Jo, I think they’ll be fine. The cherries are supposed to be added to the liquid as soon as it comes off the heat.