

This buttermilk sandwich bread has an ever so slight tang and an almost cake-like in texture and toasts amazingly. It’s also ideal for, natch, sandwiches of any sort.–Renee Schettler Rossi
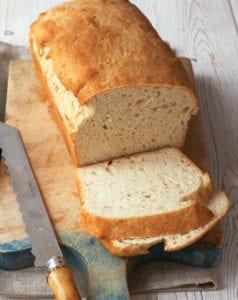
Buttermilk Sandwich Bread
Ingredients
- 1 1/4 cups buttermilk , (either low-fat or full-fat)
- 2 tablespoons unsalted butter, cold or room temperature, plus more for slicking the pan
- 3 1/4 cups unbleached all-purpose flour
- 1 tablespoon granulated sugar
- 1 tablespoon wheat bran, (optional)
- 1 teaspoon kosher salt
- 2 1/4 teaspoons (a 1/4-ounce or 7-g packet) instant yeast
- 1 large egg
- 2 teaspoons melted butter, for brushing the loaf
Instructions
- Butter a 9-by-5-by-3-inch loaf pan.
- In a small saucepan, heat the buttermilk and butter over medium heat until it registers about 130ºF(54°C) on an instant-read thermometer. Remove from the heat.
- In a stand mixer fit with the flat beater, mix together 1 1/2 cups of the flour, the sugar, wheat bran (if using), salt, and yeast on low speed just until combined. Add the warm buttermilk mixture and mix until all the ingredients are smooth and combined. Add the egg and continue beating for 1 minute.
- Add the remaining 1 3/4 cups flour and continue mixing for 5 minutes. The dough will be sticky and will not come away from the sides of the bowl. Scrape the dough into the prepared pan and brush the top with the melted butter.
- Cover the pan loosely with waxed paper and let the dough rise to within 1 inch of the top of the pan, about 25 minutes. Position a rack in the middle of the oven and preheat it to 375ºF (190°C).
- Bake the loaf until the top feels firm and is lightly browned, about 40 minutes.
- Let cool in the pan on a wire rack for 10 minutes, then turn out onto the rack and let cool completely before slicing into roughly hewn hunks or slender sandwich slices.

Explore More with AI
Nutrition
Nutrition information is automatically calculated, so should only be used as an approximation.
Recipe Testers’ Reviews
Did you know only 68% of the recipes we test make it onto the site? This recipe survived our rigorous blind testing process by multiple home cooks. It earned the Leite’s Culinaria stamp of approval—and the testers’ reviews below prove it.
Wow. This may become my new basic bread recipe. I’m terrible with yeast breads, so I tend to stay away from them. I’ve made no-knead breads, but sometimes you want a soft, tender sandwich loaf. This is that loaf! It’s like the love child of a traditional sandwich bread and a no-knead bread—no kneading but also no waiting all day for the rising and proofing stages.
Mixing the dough for 5 minutes is crucial to its success. I could visibly see the difference in the dough from when I started compared to after the 5-minute period. The recipe says you’ll have a batter but mine was more like a very soft dough. I think with some practice, you could shape it or form little buns.
Also, watch your dough during the first rise! I left my first loaf alone for 40 minutes and came back to find the dough billowing out of the pan (I poked it back to deflate it a little and then baked it and it was no worse for wear). I also started checking the loaf after 30 minutes of baking and found 35 minutes to be my sweet spot.
It made great toast. I love this bread—the crust is soft, the crumb is tender, and the flavor has a hint of tanginess from the buttermilk.
I love the idea of making homemade sandwich bread but it always seem to involve too much time and then the bread disappears so quickly. Luckily this recipe comes together easily and in the blink of an eye. The results are delicious.
The buttermilk adds a nice tang that give it much more flavor than store-bought white bread. I can see myself making this all the time.
This buttermilk sandwich bread is very easy to prepare and can be made even by people who consider themselves “yeast phobic.” It’s a nice white bread prepared in no time and looks like the real thing.
I prepared it for the weekend, but it was finished by 6 pm on Friday. The bread is very light and easy to cut it into nice slices a few hours after baking. I’ll try to make another batch during the week for morning toasts.
This is a very nice everyday bread. You can mix up the dough in the morning and have fresh bread for lunch. It’s a little richer than most breads because of the addition of the egg. It makes very nice toast.

The flavor is good. The texture on the inside is perfectly soft and the crust allows for a good crunch without being too hard. I didn’t use the bran. I followed the directions but if I made it again, I might try to deal with smoothing the top a little or something. It wasn’t perfectly rounded.
It was almost cake-like when sliced. Very quick and easy. Will do this one again—can do it on a weeknight. Makes great toast!
I used low-fat buttermilk for this recipe as it was all I had. I did add the wheat bran for a little extra fiber—it wasn’t very noticeable in the finished product, so I will probably use more next time. Ended up baking it for an extra five minutes to get a nice brown color on top.


I made a few changes because I didn’t have all the right ingredients and it still turned out pretty good! The best part was that I had a loaf of delicious homemade bread in just under 2 hours!
Exceptions:
1. I only had 2 cups of bread flour (I had no all purpose) so I used that along with 1 1/4 cups of
whole wheat.
2. There was no sugar in the bin, so I used a tablespoon of honey.
3. I heated the honey in the pan along with the butter and the buttermilk to exactly 130.
4. I beat the batter with a dough hook for 7 minutes, then took it out with wet hands and formed
it into the pan
The loaf turned out with a pretty hard crust (which is my preference) but a tender bread and delicious flavor! Next time I will try to make it with the proper ingredients and see if it is better than my impromptu ingredients.
Dan, I love that you took the recipe and made it work with what you had on hand! That’s the beauty of baking—it’s both science and art, and sometimes, a little improvisation leads to something wonderful.
Using a mix of bread flour and whole wheat sounds like it added a nice depth to the loaf, and honey as a sweetener? Inspired! Heating it with the butter and buttermilk was a clever touch, too. And a hard crust with tender bread inside? That sounds like a win to me.
I’m so glad you enjoyed the results, and I can’t wait to hear how it turns out when you make it with the “proper” ingredients. Knowing you, I bet it’ll be another masterpiece. Thanks so much for sharing your tweaks and for giving the recipe a go!