
TL;DR (Quick-Answer Box)
- What it is: A sophisticated, decadent dessert featuring a dark, rich, cooked salted caramel filling set inside a delicate, all-butter sweet pastry crust.
- Why you’ll love it: The essential balance of deep caramel sweetness + the sharp counterpoint of salt creates an intensely satisfying, irresistible flavor profile.
- How to make it: Blind bake the pastry crust. Cook sugar and salted butter until very dark, then slowly pour in hot cream. Return to low heat and simmer for 5 minutes, stirring to dissolve the caramel. Let cool for 10 minutes, pour into the shell + chill for at least 2 hours.

Featured Review
Your recipe saved my Thanksgiving dessert table. I always make two traditional pies (pumpkin, apple) and one “something different.” This year I wanted a salted caramel pecan tart. I followed a recipe that was highly recommended, but it turned out to be a glorified pecan pie in the shape of a tart. I was utterly disappointed. The eggs in the caramel should’ve been a dead give away. Anyway, I stuck it in the freezer to donate to the next church dinner.
Not to be deterred, I found your recipe, said a quick prayer & just a little while later I have a glorious salted-caramel tart with toasted pecans to serve my guests on Thanksgiving. Thank you!
Angie
People often ask me how I get the ideas for my recipes. Some magically happen from ingredients in my fridge, others are inspired by restaurant meals or ingredient combinations that I like. And then there are those that come from the oddest of sources.
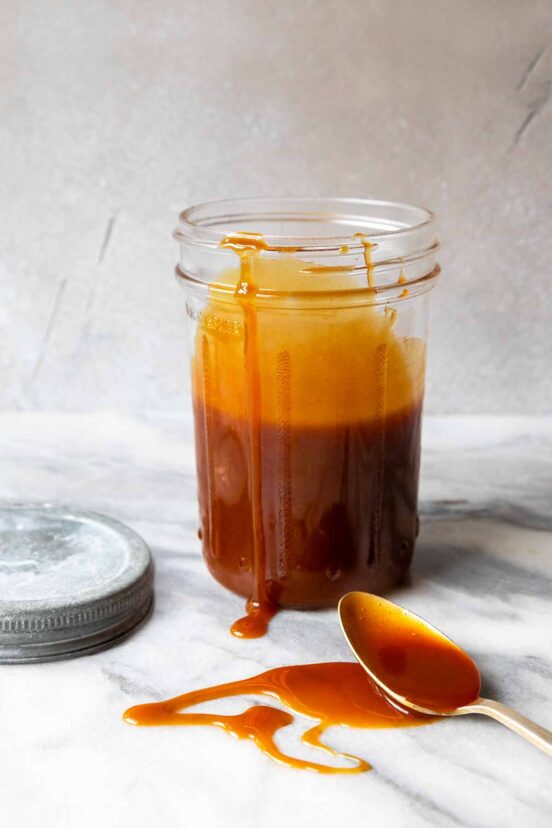
Several years ago I’d been perfecting my recipe for salted caramel sauce. When it comes to desserts, caramel is my weakness, and the combination of salted butter and caramel is close to perfection, with the salt accentuating the caramel and balancing its sweetness. During this time, one of the bakeries in my Paris neighborhood, which had been run by an accountant who had exchanged crunching numbers for kneading dough, was bought by the well-known Paris baker Eric Kayser.
Just after Kayser moved into my part of town, my friend Laura dropped by with a copy of his new tart book. It was full of mouthwatering photographs with short, seemingly simple recipes, each of which fit neatly on a single page. I flipped through it, thinking that perhaps his tarts were better than his bread. (Believe it or not, the accountant had actually made better bread.) When I saw a recipe for tarte au beurre salé, or salted butter tart (aka salted caramel tart), I knew I had to try it.–Jennifer McLagan
Your Salted Caramel Tart Questions, Answered
Some caramel recipes use water to help dissolve the sugar but the problem with adding water is that it takes much longer for it to caramelize. Not only that, your filling likely won’t be thick enough. Making caramel without water is a little thicker but follow McLagan’s suggestions and you’ll do just fine.
It’s all the pockets of butter inside the dough that melt in the oven, leaving flaky layers. Keeping the dough cold helps that butter to stay solid. Another tip is to employ the French method of fraisage to make streaks of butter, rather than blobs. Just a couple of quick swipes is all it takes.
More Deeply Flavored Caramel Recipes

Write a Review
If you make this recipe, or any dish on LC, consider leaving a review, a star rating, and your best photo in the comments below. I love hearing from you.–David
Featured Review
I’ve made this twice, and so thought I’d add my two cents (besides just agreeing that it’s a caramel addict’s dream). One thing you can do with this recipe with great success is make individual, bite-sized tarts using mini muffin pans (about 18 to 24 from the quantity of caramel in the recipe); add toasted pignoli pine nuts for added visual interest and some crunch; freeze for later; impress everyone who tastes it, and I mean everyone.
Allison Parker

Salted Caramel Tart
Ingredients
For the pastry (make enough for two tarts)
- 2 cups all-purpose flour, plus more for the work surface
- pinch of fine sea salt
- 2/3 cup cold unsalted butter, diced
- 1 large egg
- 1/3 cup superfine sugar, (or just blitz granulated sugar in a blender until finely ground but not powdery)
For the salted caramel filling
- 1/2 recipe Sweet Butter Pastry
- 1 1/4 cups superfine sugar
- 1/2 cup salted butter, diced
- 1 cup heavy cream
- lightly whipped cream, for serving (optional)
Instructions
Make the sweet butter pastry
- Combine the 2 cups all-purpose flour and a pinch of fine sea salt in a food processor and pulse to mix. Add the 2/3 cup cold unsalted butter and pulse until the mixture resembles very coarse bread crumbs. Dump the mixture into a large bowl.
- In another bowl, whisk together the 1 large egg and 1/3 cup superfine sugar. Pour the egg mixture over the flour mixture and mix with a fork. Squeeze a bit of the mixture between your fingertips. If it holds together, transfer the dough to a lightly floured surface; if not, add a couple of teaspoons of ice water and test again.
- Knead gently and form into a ball, divide the pastry in half, and flatten into 2 disks. Wrap each disk in plastic and refrigerate for at least 30 minutes before using.
- Roll out one of the pastry discs (see NOTE) on a floured surface and line a 9-inch or 9 1/2-inch (23-cm or 24-cm) tart pan. Prick the base of the tart with a fork and refrigerate for at least 30 minutes.
- Preheat the oven to 375°F (190°C).
- Place the sweet butter pastry-lined tart pan on a baking sheet. Line the pastry with parchment paper and fill it with dried beans. Bake until the pastry is just set, about 15 minutes. Remove the paper and beans and continue to cook until the pastry is a dark golden color, 10 to 15 minutes. Move the tart to a wire rack and leave to cool completely.
Make the salted caramel filling
- Meanwhile, combine the 1 1/4 cups superfine sugar and 1/2 cup salted butter in a deep, heavy saucepan over medium heat. Stir to mix and cook, stirring occasionally, until the butter and sugar caramelize, 10 to 15 minutes. The sugar and butter will go through several stages: First, the mixture will look like a flour-butter roux, then it will appear curdled, and then the butter will leak out of the sugar mixture. Don't worry: It will all come together in the end.
- While the caramel is cooking, pour the 1 cup heavy cream into a saucepan over medium heat. Bring it to a boil, then immediately remove it from the heat and set it aside.
- Keep stirring the butter-sugar mixture, watching carefully as it begins to caramelize, and remembering that the heat in the pan will continue to cook the caramel once it is removed from the burner. You want to end up with a rich, dark caramel color, but you don't want to burn the mixture, which will impart a bitter taste. When the caramel reaches a color that's just a shade lighter than what you want, remove the pan from the heat and slowly and carefully pour in the cream; the mixture will bubble and spit. When the caramel stops bubbling, return it to low heat and cook for 5 minutes, stirring to dissolve the caramel in the cream. Remove the pan from the heat and let the caramel cool for 10 minutes.
- Slowly pour the cooled caramel into the cooled, baked pastry in the tart pan. Refrigerate the tart for at least 2 hours.
- Remove the tart from the pan and, using a wet knife, cut it into wedges. (The tart is easier to cut when it's chilled.) Serve the tart at room temperature. For maximum flavor, bestow a dollop of lightly whipped cream upon each slice.
Notes
Explore More with AI
Nutrition
Nutrition information is automatically calculated, so should only be used as an approximation.
Recipe Testers’ Reviews
Did you know only 68% of the recipes we test make it onto the site? This recipe survived our rigorous blind testing process by multiple home cooks. It earned the Leite’s Culinaria stamp of approval—and the testers’ reviews below prove it.

This is a simple caramel tart and a good starting recipe for those cooks who fear making pastry dough and caramelizing sugar. Having caramelized several of my pans (not a fun job to clean up), I was fearful of yet another adventure into burned sugar. This was such an easy and foolproof method that yielded a beautiful thick caramel. The end result was luscious.
The dough came together beautifully with the addition of several tablespoons of ice water. One helpful hint that I learned from Nathalie Dupree is to set aside the smaller portions of dough as they begin to come together. Then, combine all the parts together and knead. This prevents the dough from becoming overworked.
This salted caramel tart is a FABULOUS dessert…but VERY RICH!!! A small piece is all you need…along with the unsweetened whipped cream to help cut the sugar of the tart.
This is a simple recipe that works quite well as is or as a starting point for any number of variations. It makes caramel approachable by omitting the use of a thermometer, and you can make your own superfine sugar by pulsing regular sugar in a food processor. Plus, it can be made ahead and/or in brief installments of time for those with, say, infants.
The pastry dough came together easily without any water (or humidity in the air) and baked into a flaky, golden-brown tart shell. It was neither too sandy, as are some pie crusts with minimal water, nor too tough, as some tart doughs can be.
The salted caramel also worked as written, with the caramel passing through the various stages the author describes. I cooked my caramel for 15 minutes and wound up with the color pictured here and a flavor that was just short of bitter (much like the taste of a Cadbury’s Crunchie bar). One caution: the cream not only bubbles and spits when added to the caramel, but it also gives off a lot of steam.
My only complaint is that the saltiness was not strongly perceptible, so I might add a bit of salt next time. After filling my 9-inch tart shell to the brim, I had about 1/3 cup of caramel leftover. The tart was excellent in very small slices paired just with whipped cream, but I can imagine it with a drizzle or a layer of dark chocolate ganache, or spiked with liqueur.


Your recipe saved my Thanksgiving dessert table. I always make two traditional pies (pumpkin, apple) and one “something different. This year I wanted a salted caramel pecan tart. I followed a recipe that was highly recommended, but it turned out to be a glorified pecan pie in the shape of a tart. I was utterly disappointed. The eggs in the caramel should’ve been a dead give away. Anyway, I stuck it in the freezer to donate to the next church dinner.
Not to be deterred, I found your recipe, said a quick prayer & just a little while later I have a glorious salted caramel tart with toasted pecans to serve my guests on Thanksgiving.
Thank you!
Angie, I don’t think there’s any higher praise than saving someone’s Thanksgiving dessert table. Thank you! I’m thrilled you like the tart. (And I really have to try your variation with the toasted pecans on top. Sounds amazing!)
Hello. Do you use all of the pastry? Not sure why it’s states divide in half. Please clarify, thanks.
Hi, Georgina. You’re absolutely right—that part was a bit confusing, and I appreciate you pointing it out! The pastry recipe makes enough for two tart shells, but for this salted caramel tart, you only need one of the two discs. I’ve since added a note to the recipe to clarify that and included a tip to freeze the second disk for later (because let’s be honest—another tart moment is always just around the corner). Thanks again for writing in and helping make the recipe better for everyone!
Whipped this up today but when I brought the cream to a boil I threw in some coffee to infuse the cream. Came out a rich caramel with nice notes of coffee. We’ll see how it goes over tomorrow.
That sounds divine, Chris. I hope everyone loves it.