Want to save this?
TL;DR (Quick-Answer Box)
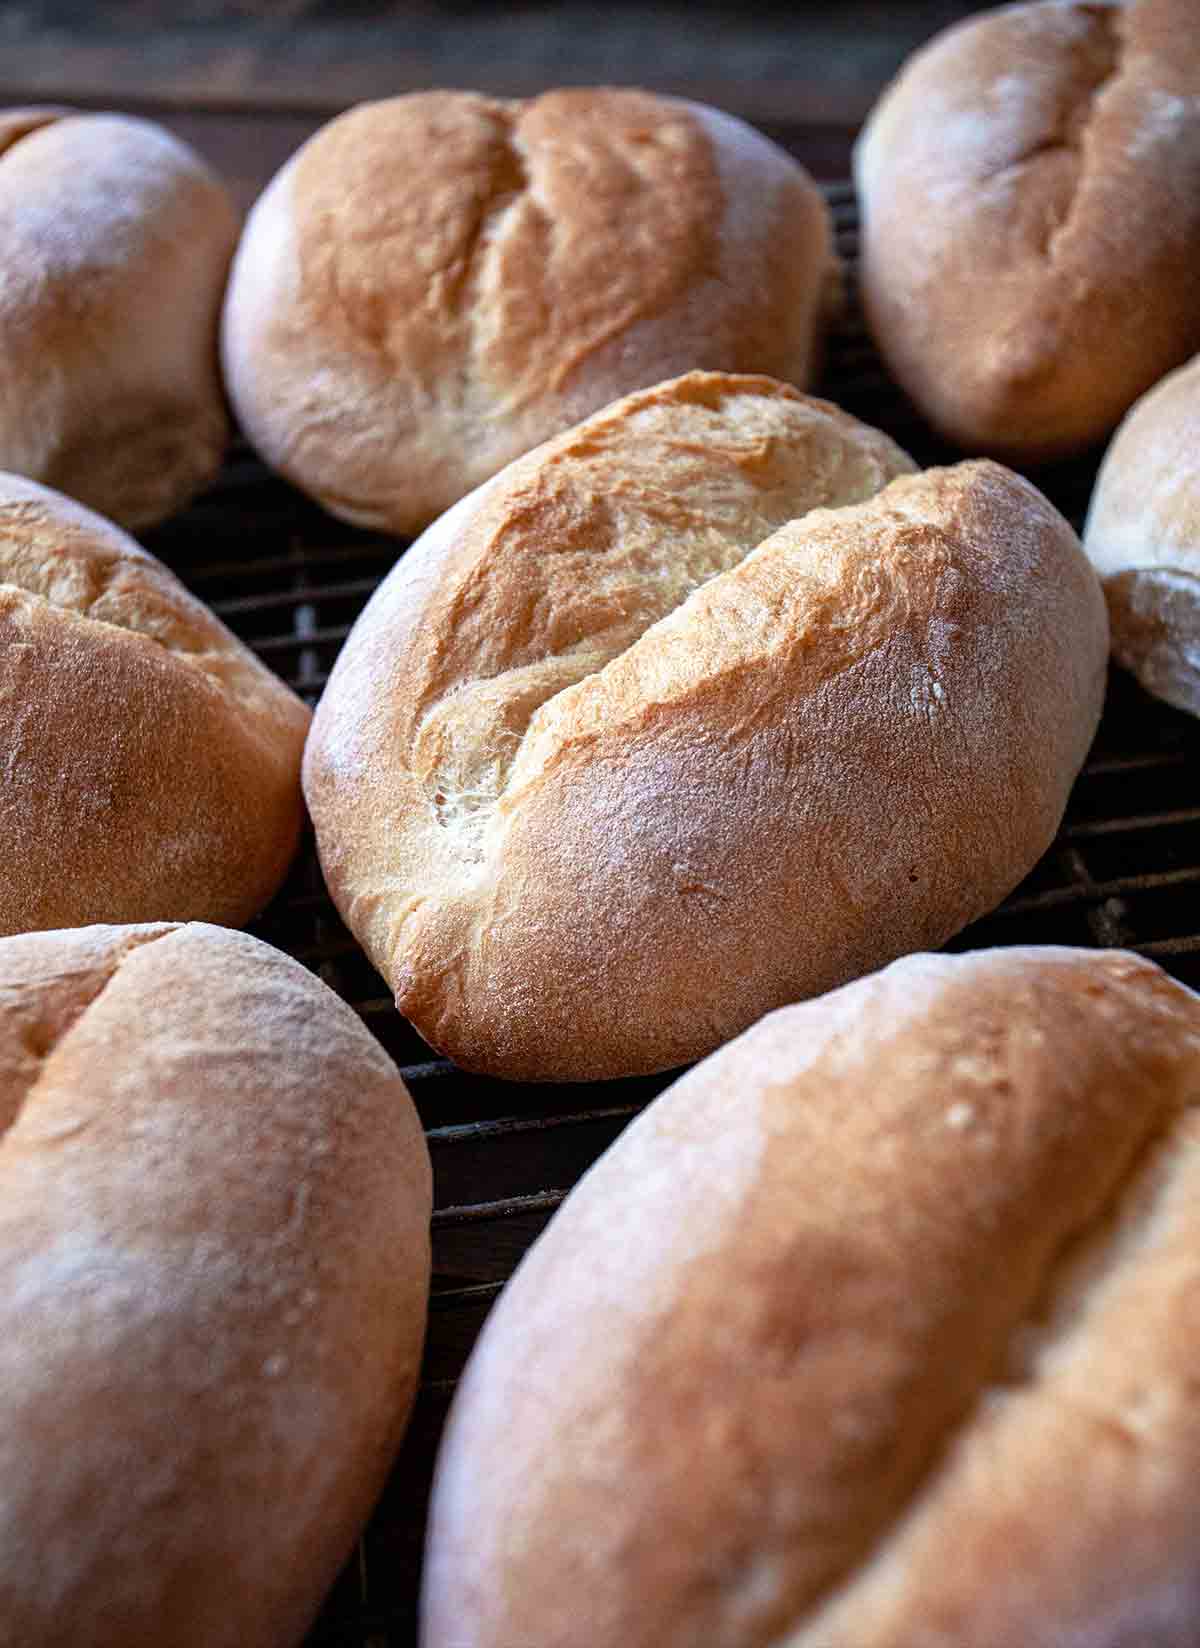
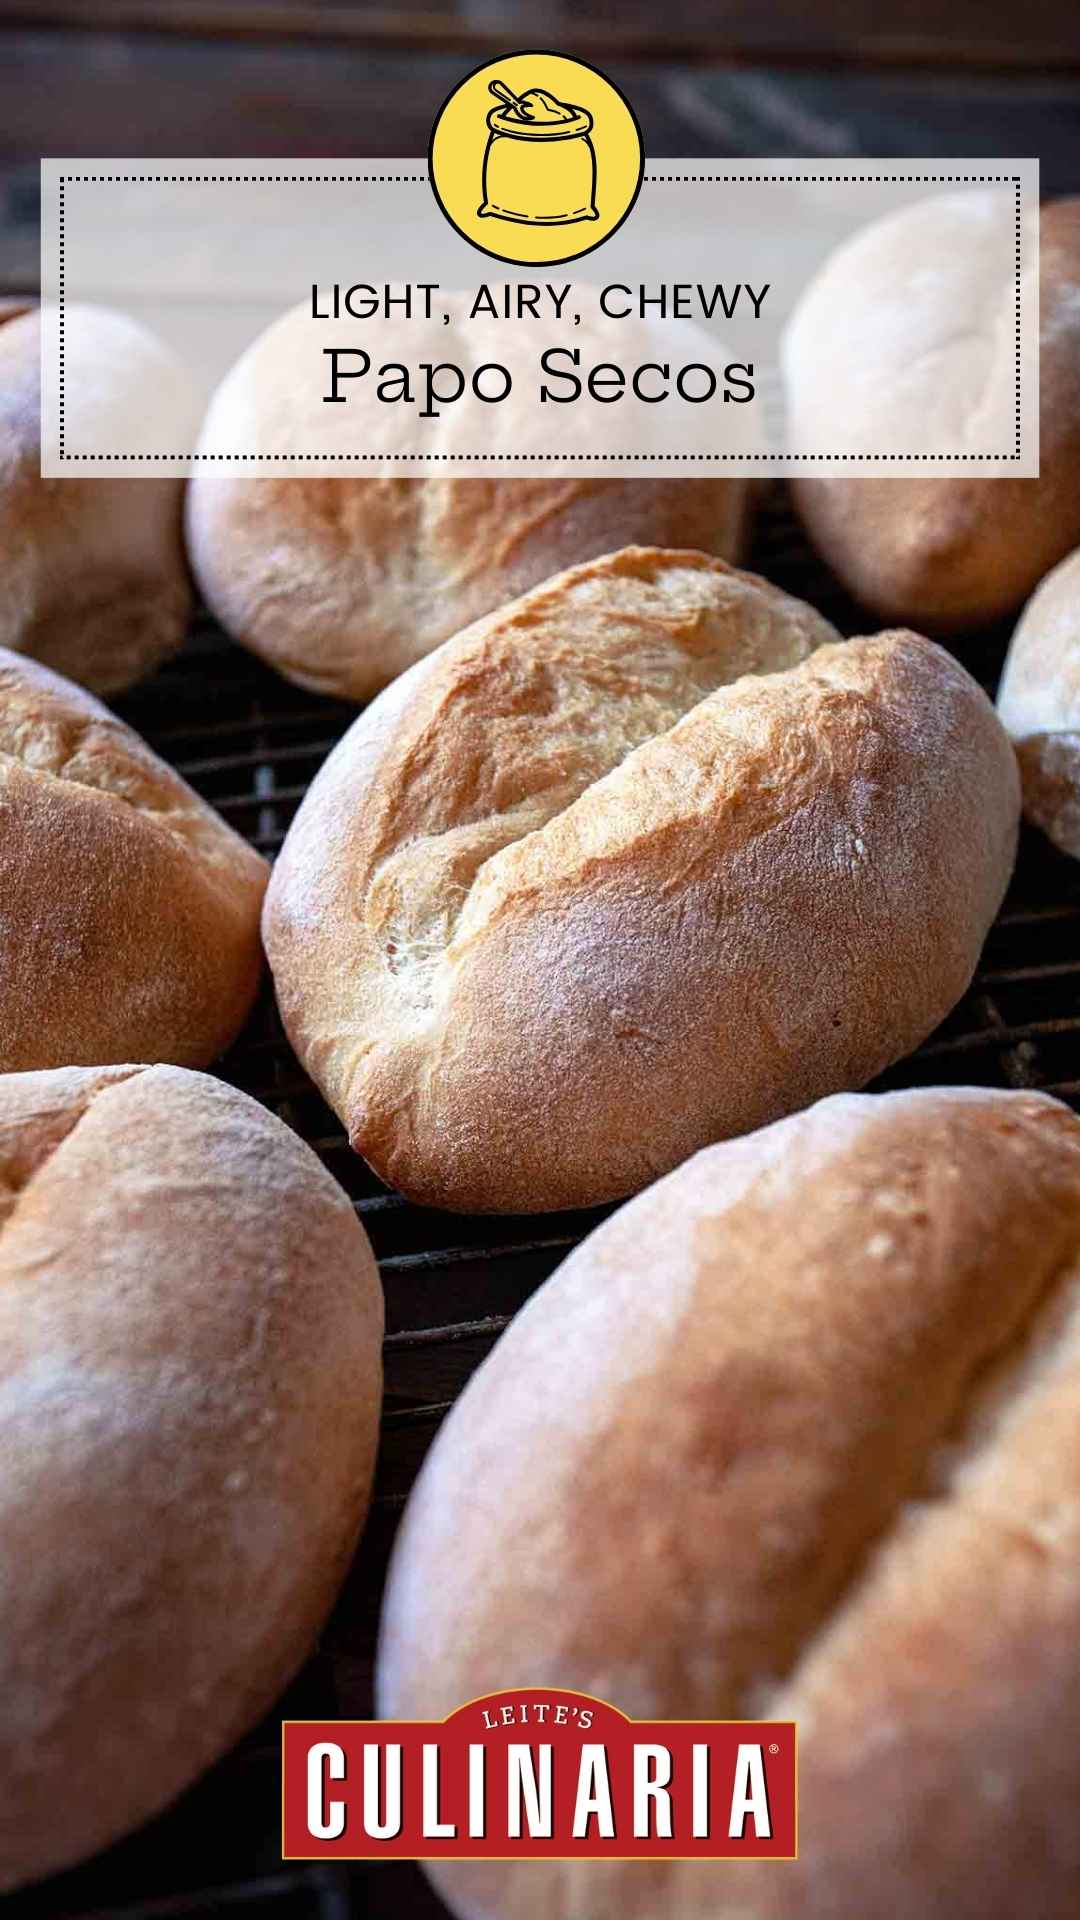
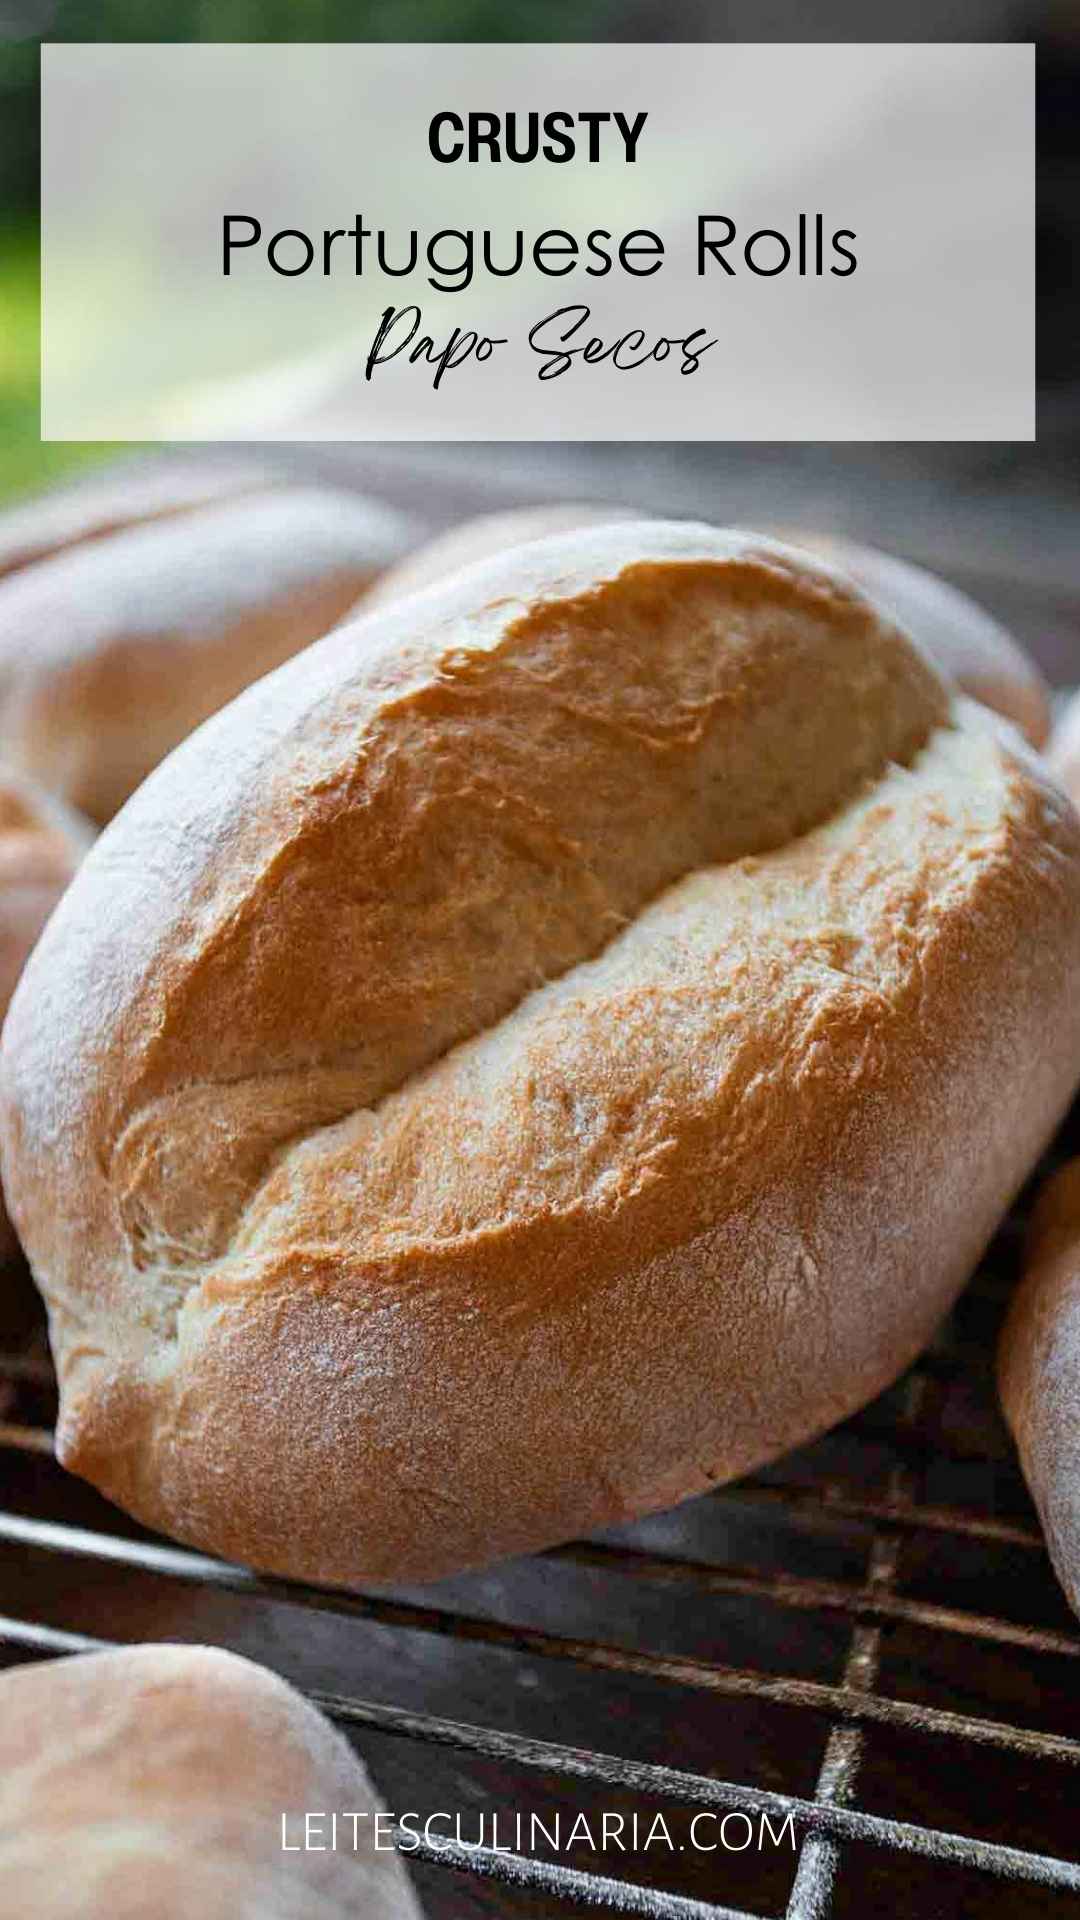
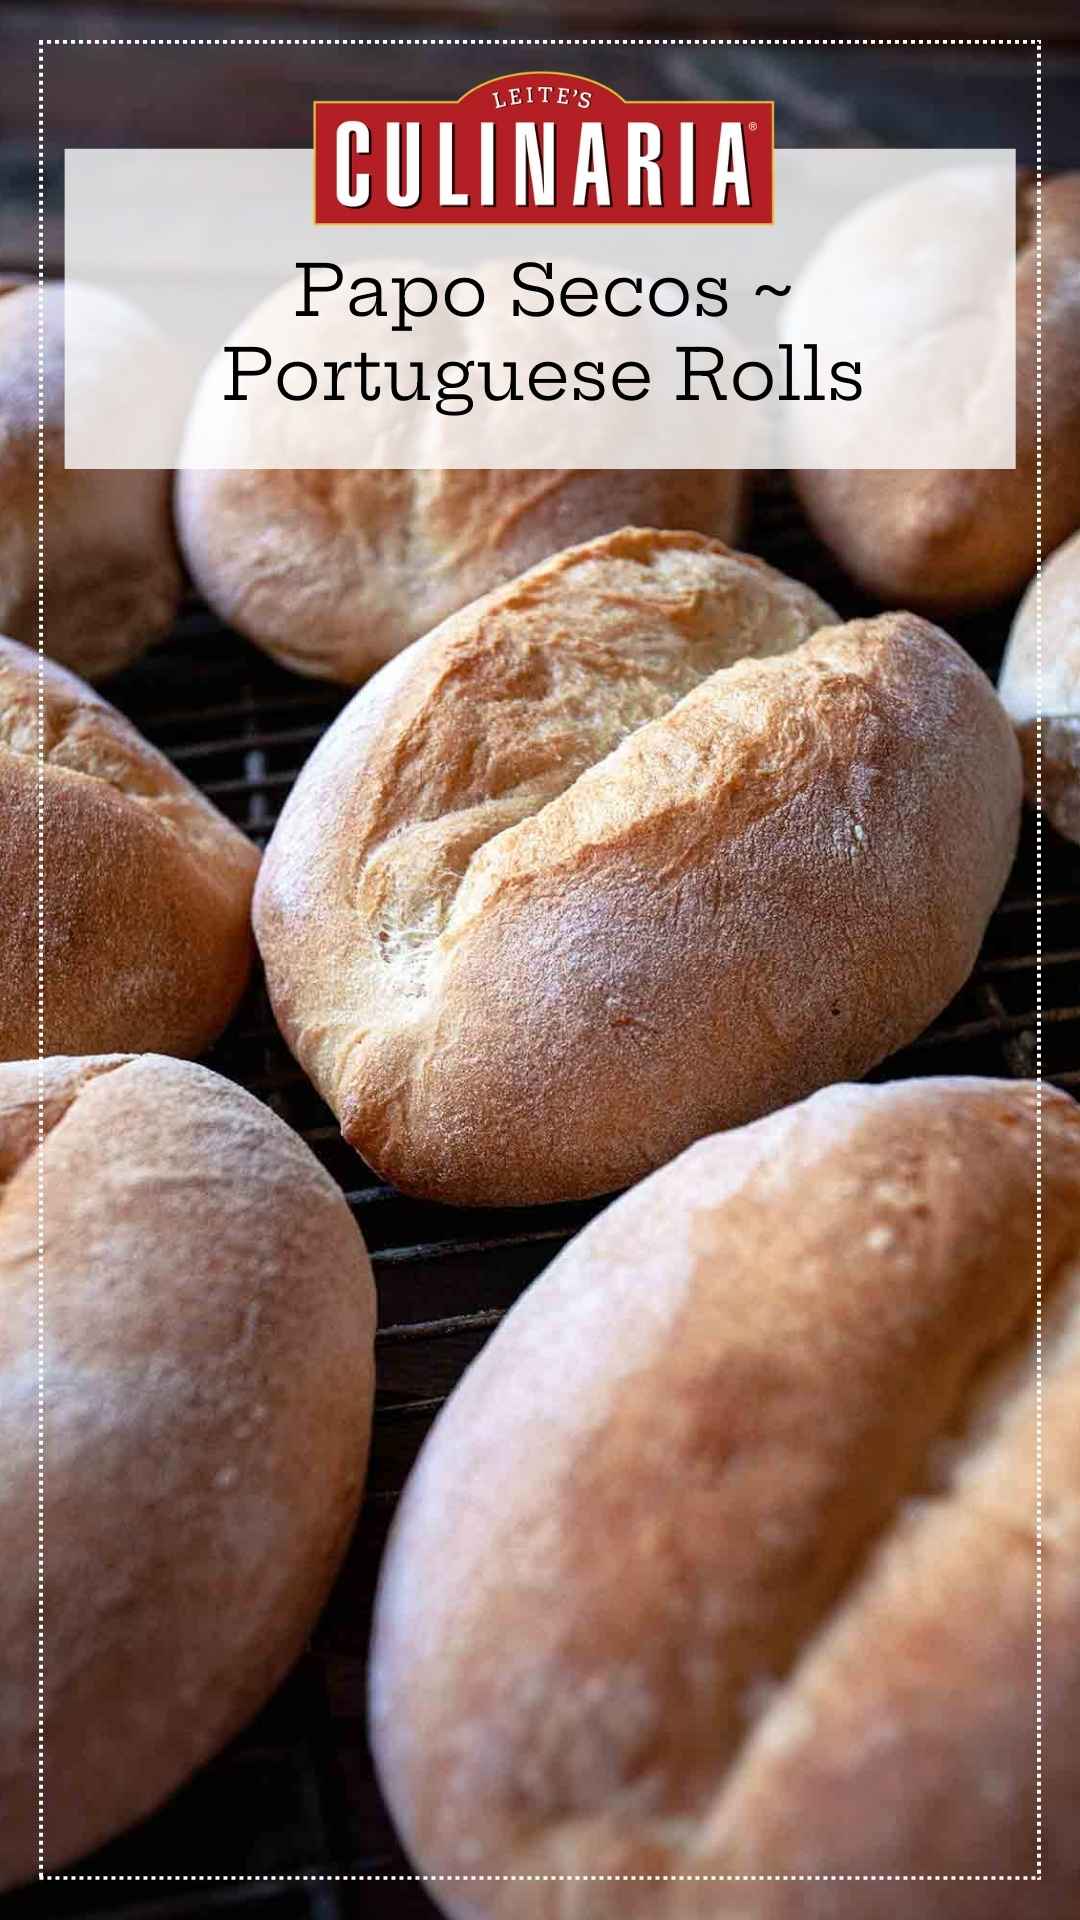
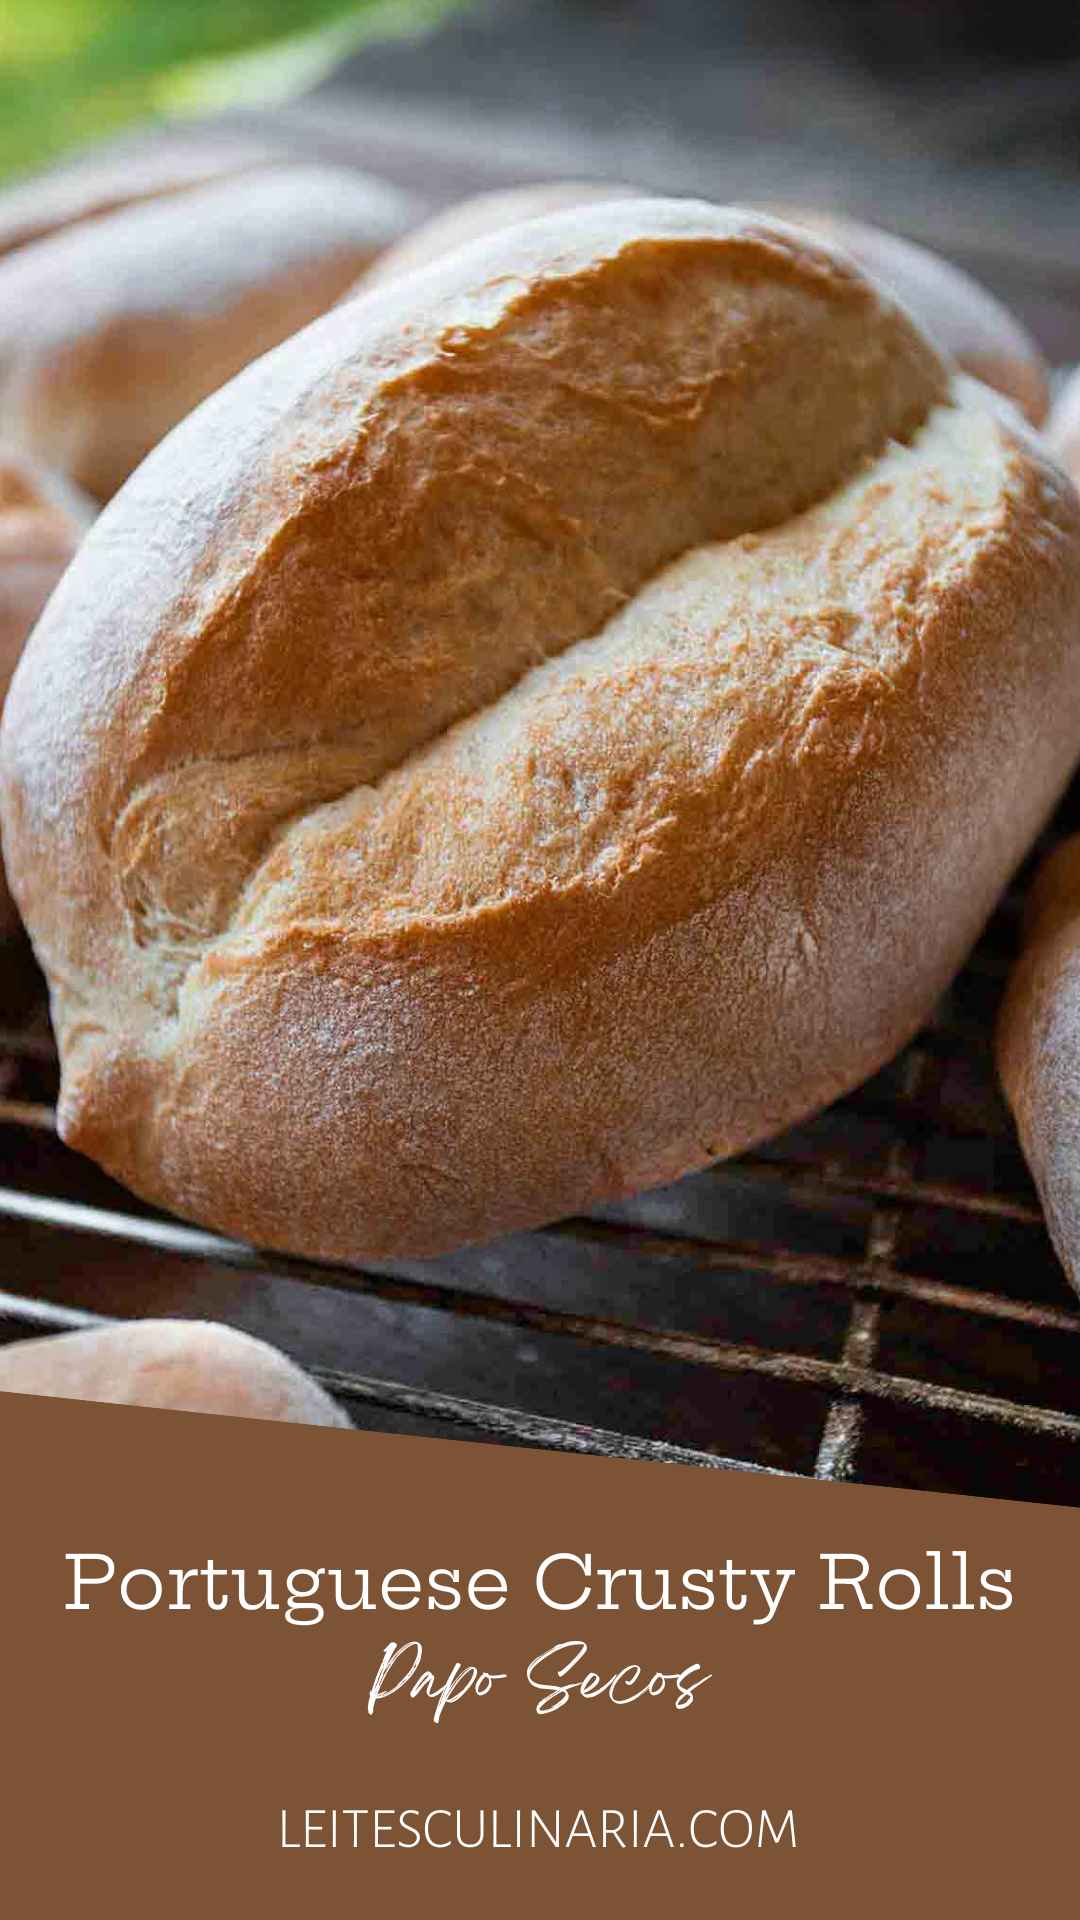
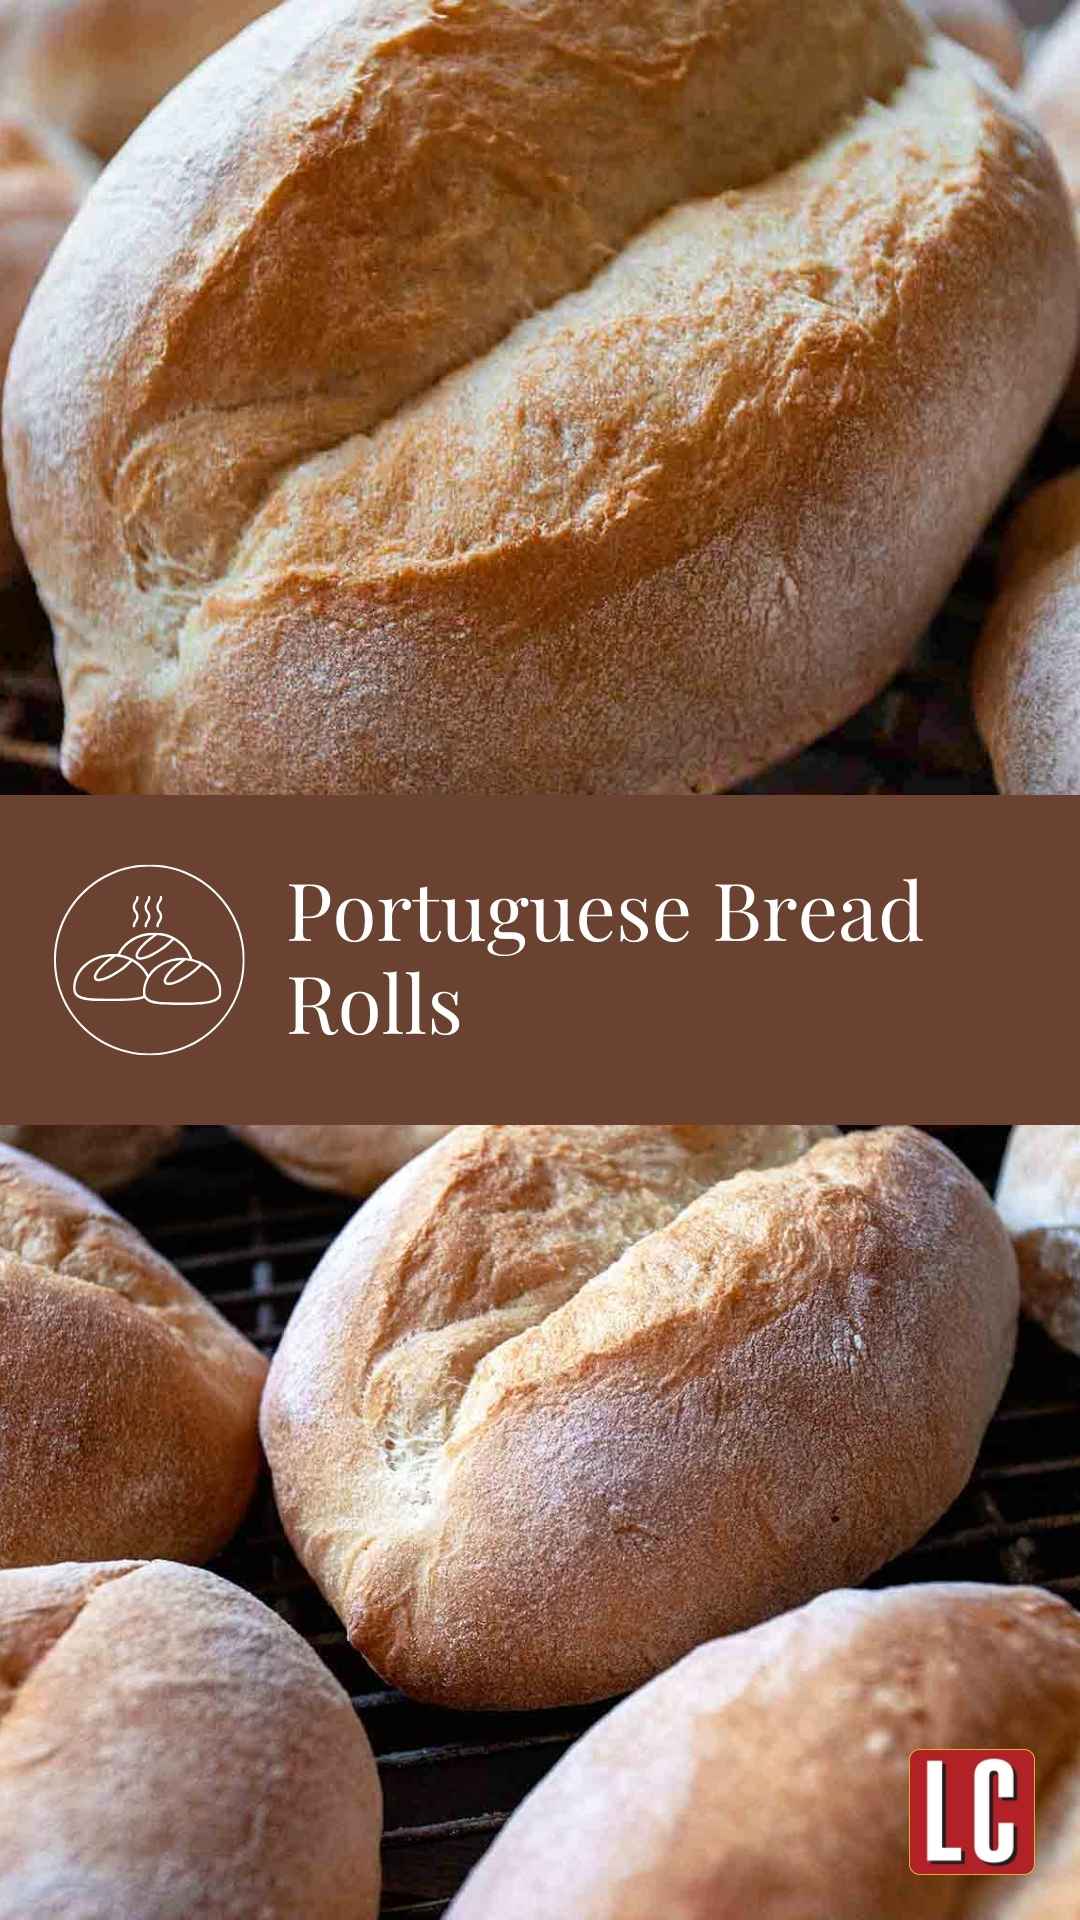
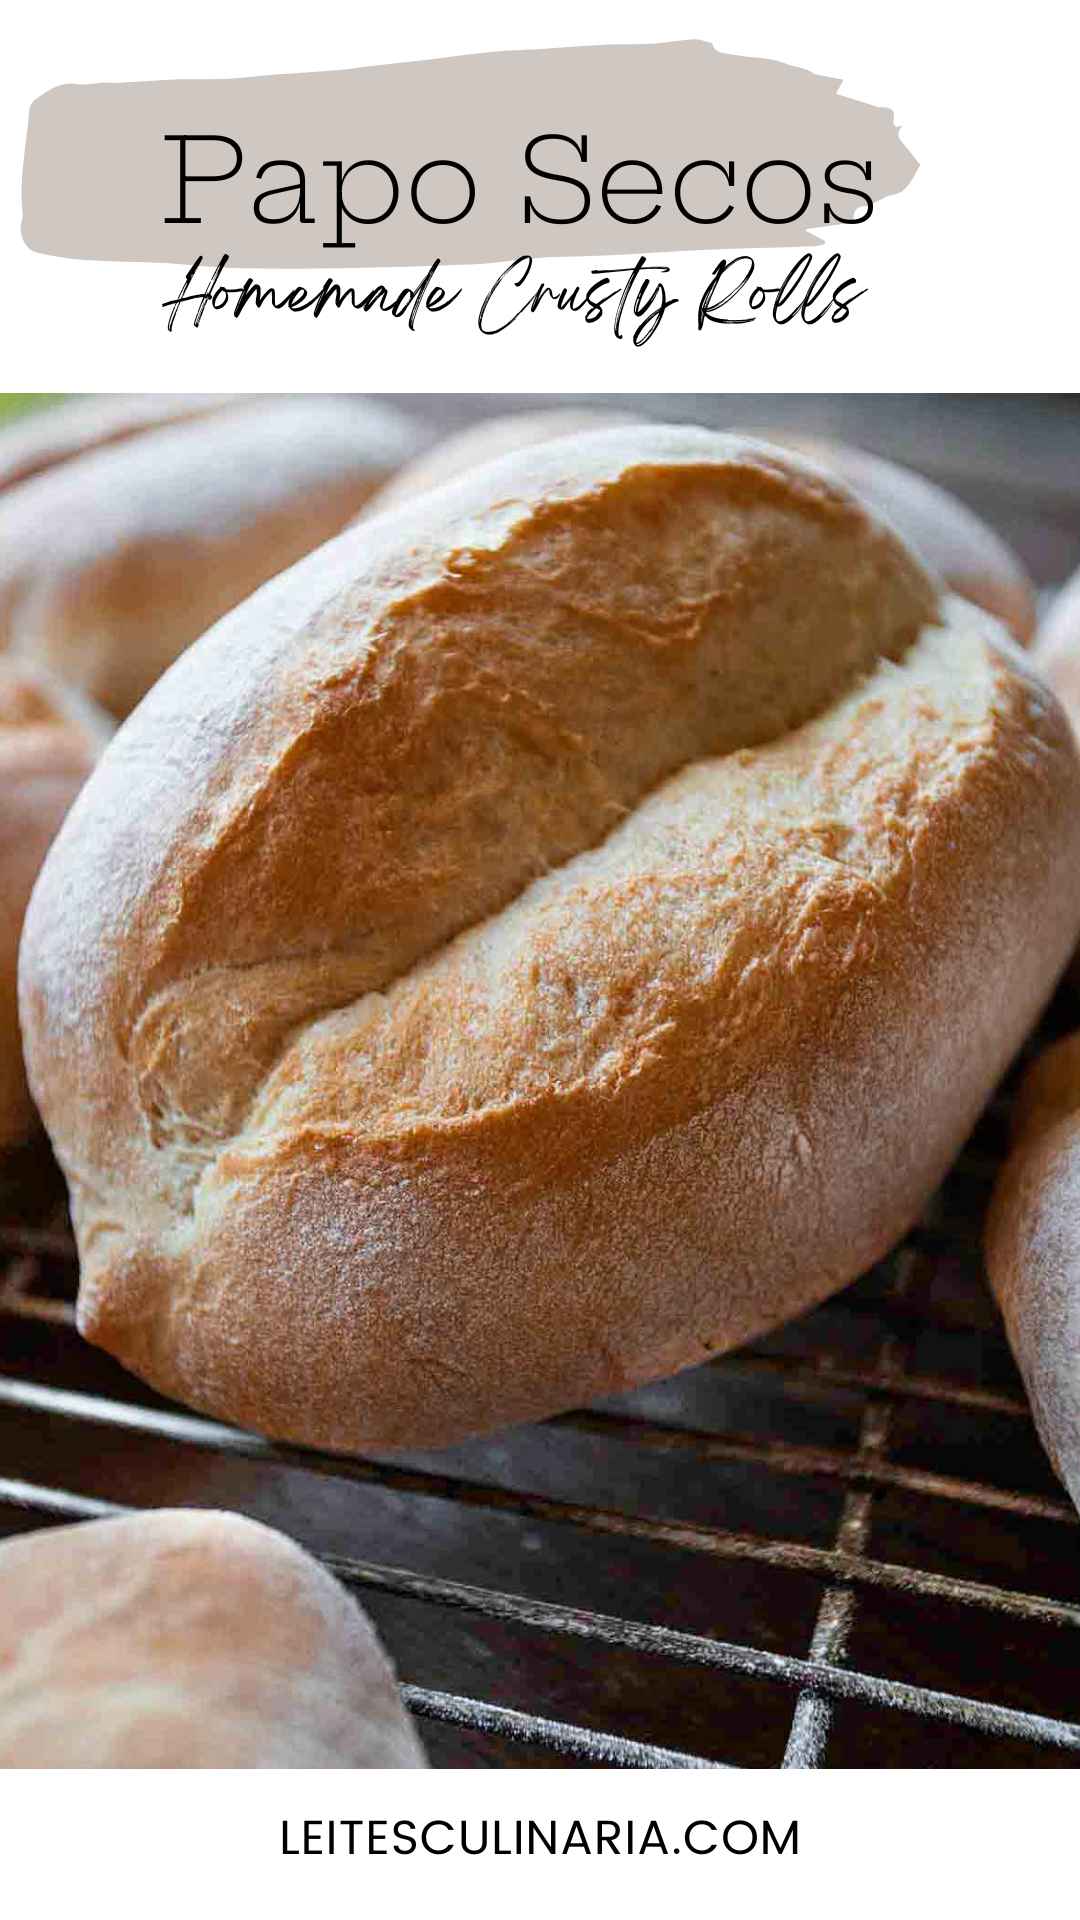
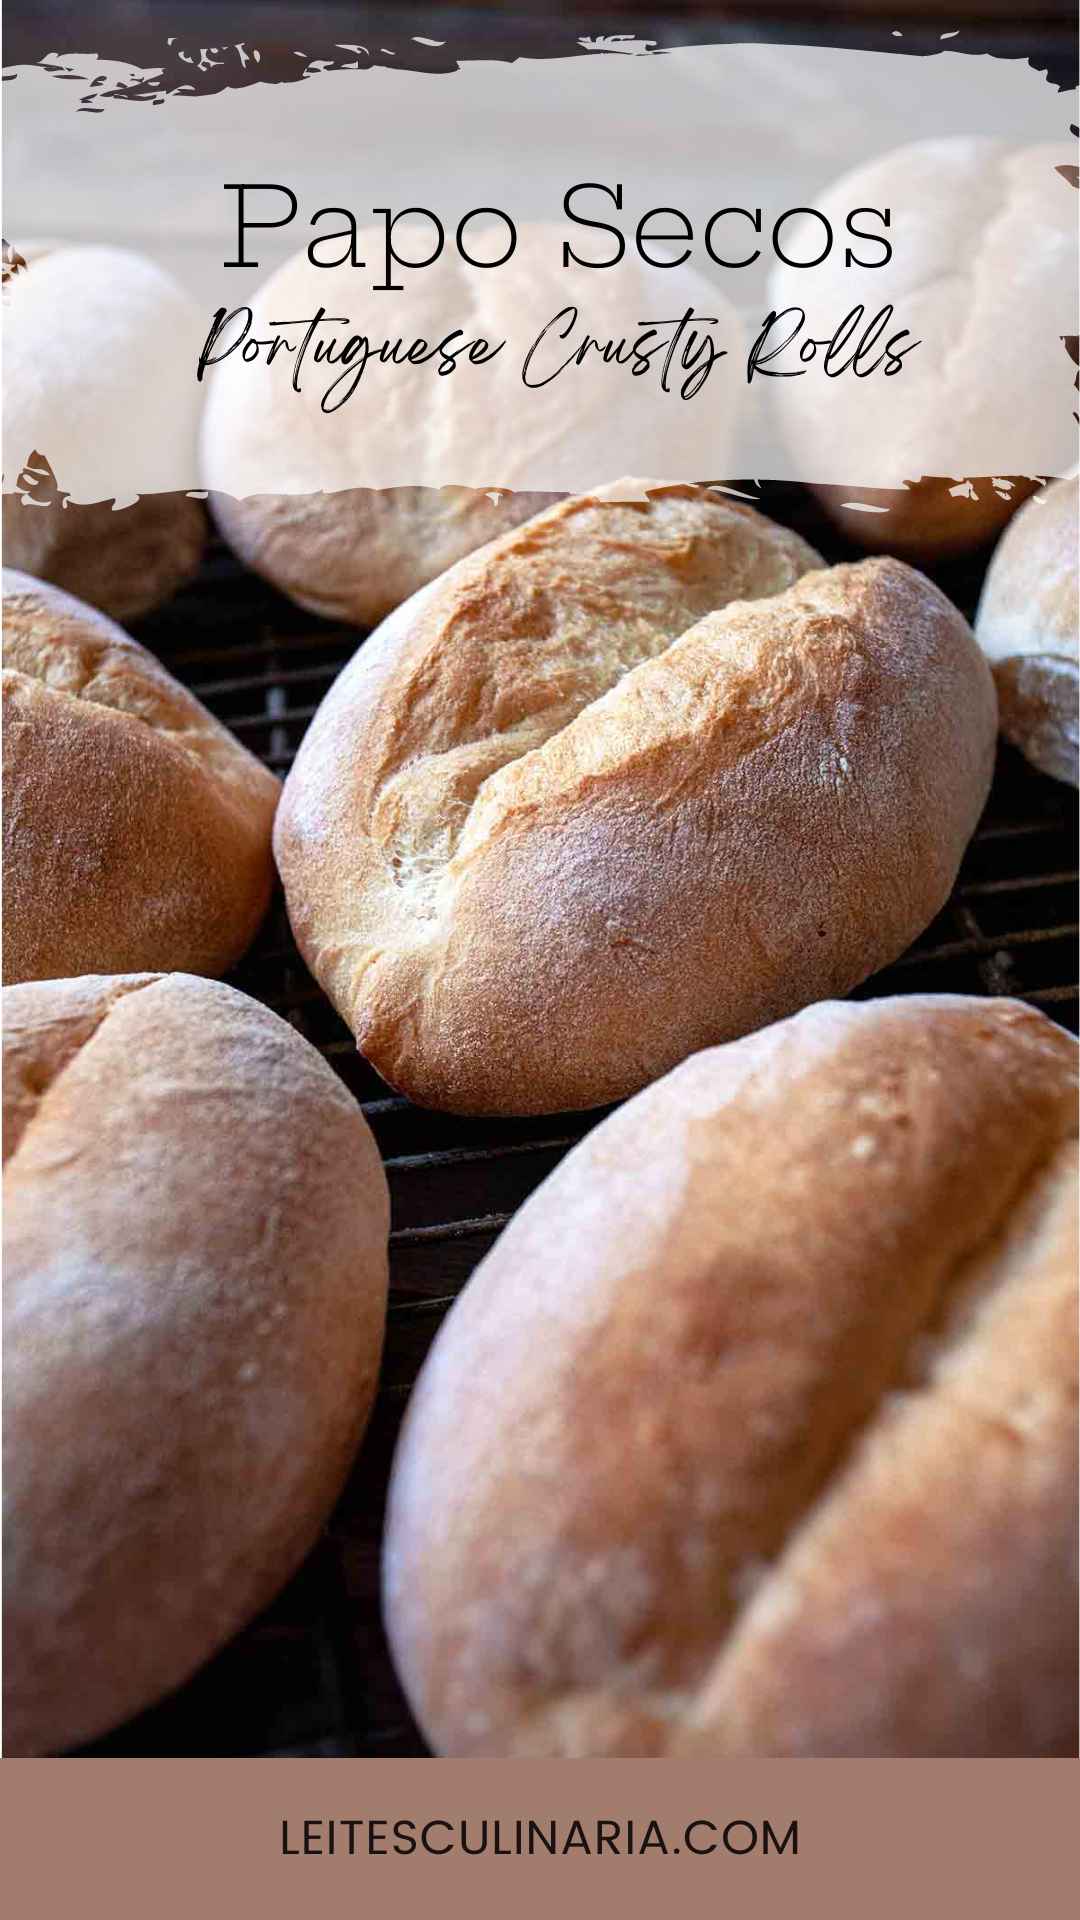
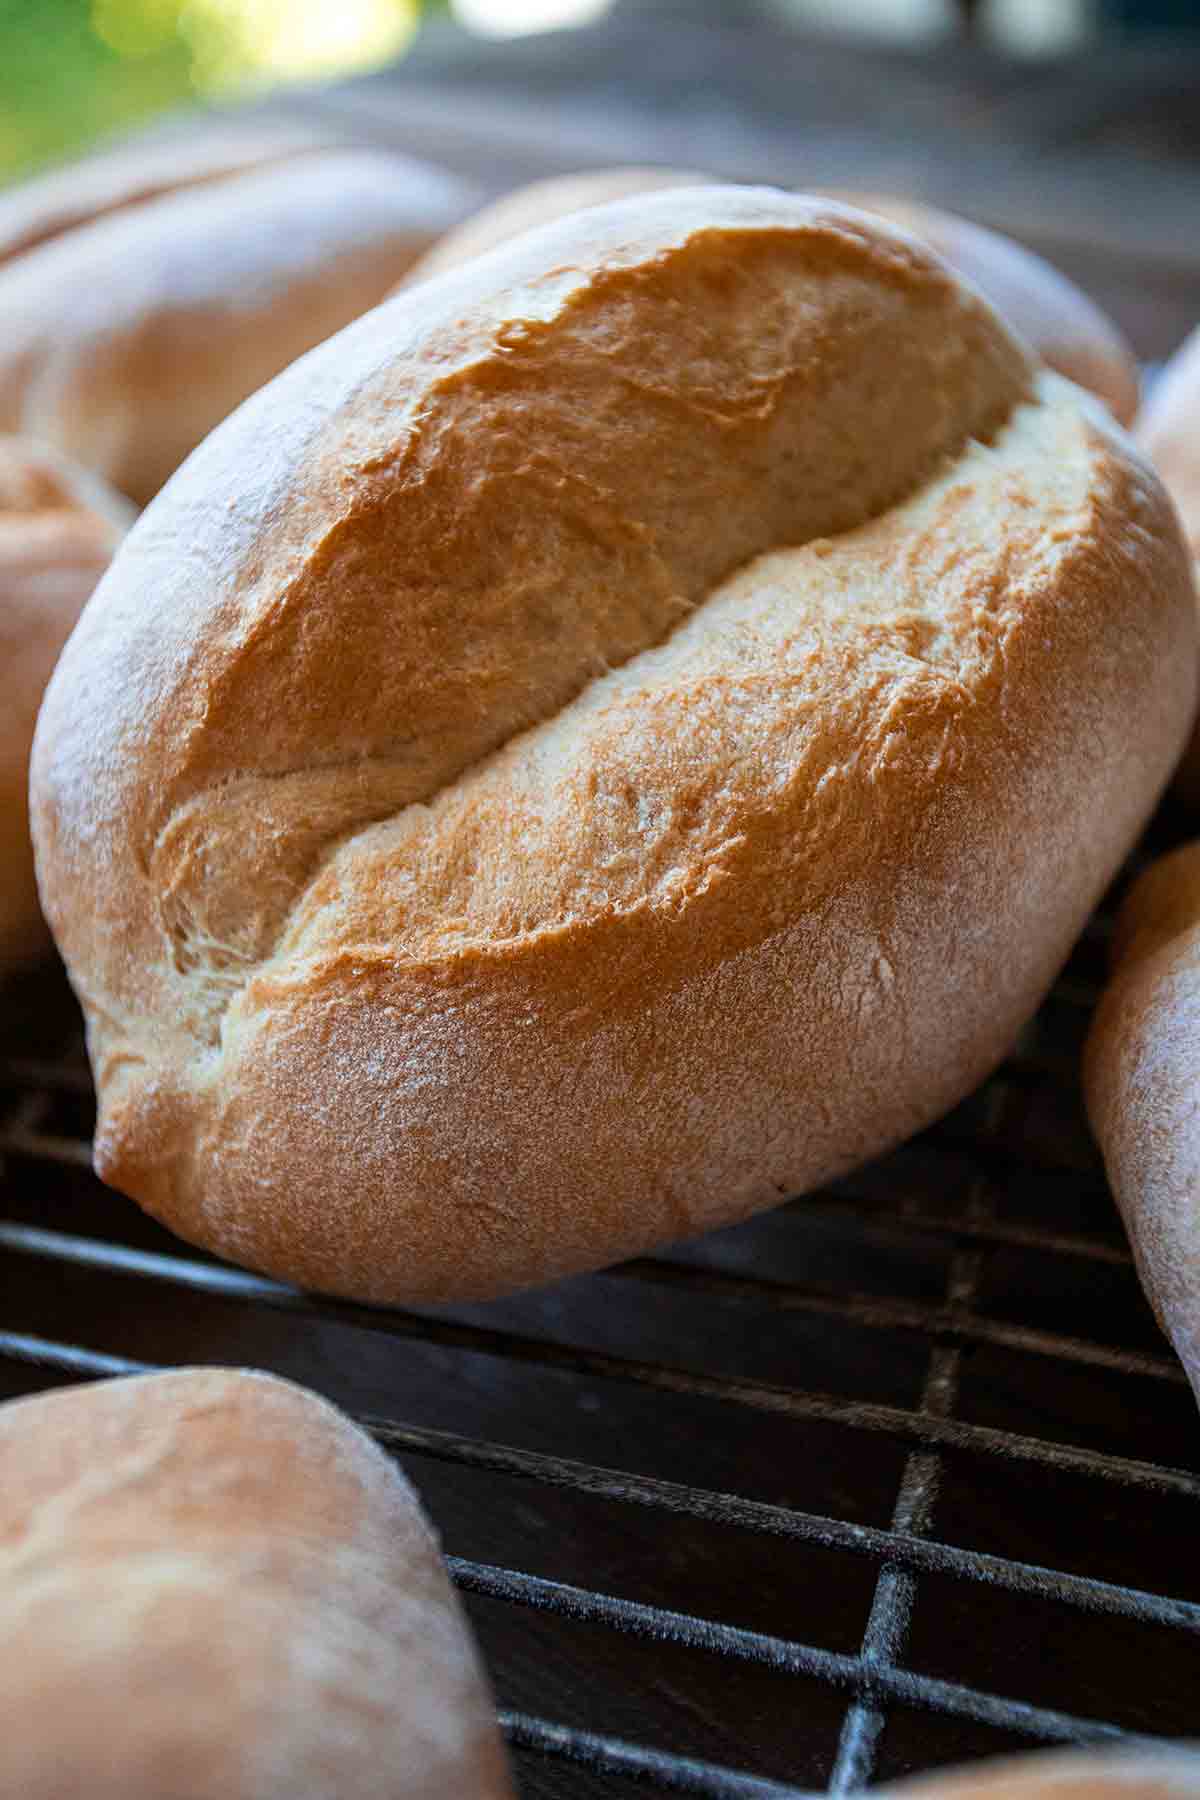
- What it is: Classic Portuguese rolls (papo secos) with a light, airy interior and a signature crispy crust.
- Why you’ll love it: Authentic flavor perfect for bifanas, sandwiches, or simply slathered with butter. A rewarding bake that brings a Portuguese bakery right to your kitchen.
- How to make it: Activate the yeast, then mix, add salt, and knead the dough. Let it rise, performing two sets of gentle turning and folding. Divide the dough and roll into balls, shape the rolls by making a deep “karate chop” crease, then fold. Proof, bake, enjoy!

Featured Review
I have been searching for a good bun recipe to use for hamburgers. Every one has disappointed, until now. These buns turned out great on my first attempt. I can’t wait to use them for the hamburgers tonight. I was so surprised how those narrow dough logs puffed right out into a burger worthy receptacle. I want to try to stretch them out next time to use them for vertical split hot dog buns.
Reid Chamberlain
I grew up eating papo secos. (Every Portuguese kid within 1,000 miles of me grew up eating papo secos.) I called them “butt buns” because, to my 10-year-old eyes, they looked like the plump little ass cheeks of a putto, or newborn.
I made a few changes from tradition in this recipe, which I think makes for a better texture. Instead of kneading the hell out of the dough, I borrowed the technique of folding the dough over itself rather than punching it down, which I first learned from Chad Robertson of Tartine Bakery. This results in a lighter interior and bigger butts, er, buns. Yet these still have the crusty exterior anyone who’s Portuguese knows to expect.
They’re not hard to make. Honest. The only part that takes a bit of time to get the hang of is the shaping. It took me several tries to get it right. (Ok, maybe more than a few, but at least all my blunders tasted great! The video below will help.) The good thing is, even if you don’t get that perfect crack right down the middle with the first batch, the rolls are still awesome.
Chow,

How to Store Papo Secos
Because these rolls are homemade, they won’t last indefinitely in the bread box the way some store-bought buns can. They’ll keep for 2 days in a resealable plastic bag at room temperature. To perk them up, warm them in a 425°F (218°C) oven for 6 to 8 minutes. If you prefer to freeze the rolls, wrap each in foil and then slip them in a plastic bag.
More Soft + Chewy Roll Recipes
Write a Review
If you make this recipe, or any dish on LC, consider leaving a review, a star rating, and your best photo in the comments below. I love hearing from you.–David
Featured Review
This is another authentic 5-star Portuguese recipe from one of my favorite chefs! While it is time-consuming, the recipe itself is quite simple. My 4-year-old daughter even helped! Get yourself some bread flour, and run—don’t walk—to the kitchen. These crusty rolls are too good not to try (and share)! For an added bonus, make David’s excellent caçoila recipe and make yourself a sandwich when the rolls are ready. You can thank me later. 😉
Kristy Daube
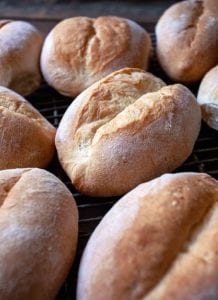
Papo Secos | Portuguese Rolls
Video
Ingredients
For activating the yeast
- 1/2 cup lukewarm water (105°F to 110°F | 41°C to 43°C)
- 2 1/4 teaspoons active dry yeast
- 1 tablespoon granulated sugar
For the bread
- 5 cups bread flour, plus up to 3 tablespoons more, if needed
- 1 1/2 cups lukewarm water (105°F to 110°F | 41°C to 43°C)
- 1 tablespoon table salt
- 2 tablespoons salted or unsalted butter
- Cornmeal
Instructions
Activate the yeast
- In the bowl of a stand mixer fitted with the dough hook, mix the water, yeast, and sugar on low speed until combined. Let sit for 10 minutes until foamy.
Make the bread
- Add the flour, water, and butter and stir on low until the ingredients are combined and a cohesive dough forms, 3 minutes. Cover with plastic and let sit for 30 minutes.
- Sprinkle the salt over the top of the dough and mix on low (speed 2) for 5 minutes. If the dough rides up the hook, use a spatula to scrape it down.
- Bump the mixer to medium-high (speed 7) and knead for 2 minutes more. The dough should pull away from the sides of the bowl and be slightly sticky. If the dough hasn’t released from the bottom of the bowl, add some more flour—a tablespoon at a time—until it does.
- Remove the bowl from the mixer, cover it with plastic wrap, and place in a warm (68°F to 72°F | 20°C to 22°C), draft-free spot. The inside of your oven with the light turned on is ideal. Let the dough double in size, about 1 hour.
☞ TESTER TIP: If you’ve always found it tricky to assess when exactly dough has doubled in size, lightly butter a plastic bread proofing bucket or clear glass bowl. Use a grease pencil or piece of tape to mark the level of the dough when you start. Makes it a lot more obvious when the dough has doubled.
- Reach down 1 side of the bowl and gently but firmly pull the dough up and fold it over itself. Don’t punch it down. Rotate the bowl a quarter turn and repeat. Continue turning and folding 2 more times. Cover and let rest until doubled in size, about 30 minutes.
- Repeat the turning and folding process, cover with plastic, and let the dough rest until doubled in size, about 30 minutes more.
Shape the dough
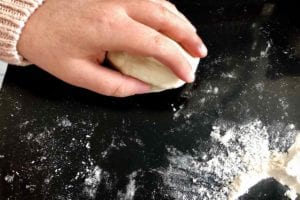
- Divide the dough into ten equal pieces, about 4 1/4 ounces (120 grams) each. Lightly flour your hands. Cup one hand over a chunk of dough and roll it on your work surface in a circle to tighten the ball. Being somewhat neurotic, I count the turns—no fewer and no more than 40 revolutions. Repeat with the remaining dough.
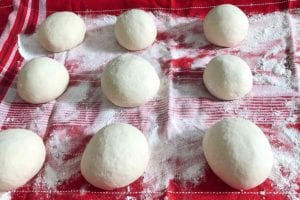
- Place the balls on a baking sheet lined with a floured non-terrycloth kitchen towel or a baker’s couche. Cover them with a kitchen towel. Let rest for 20 minutes.
- Transfer the balls to your work surface. Heavily dust the towel again.
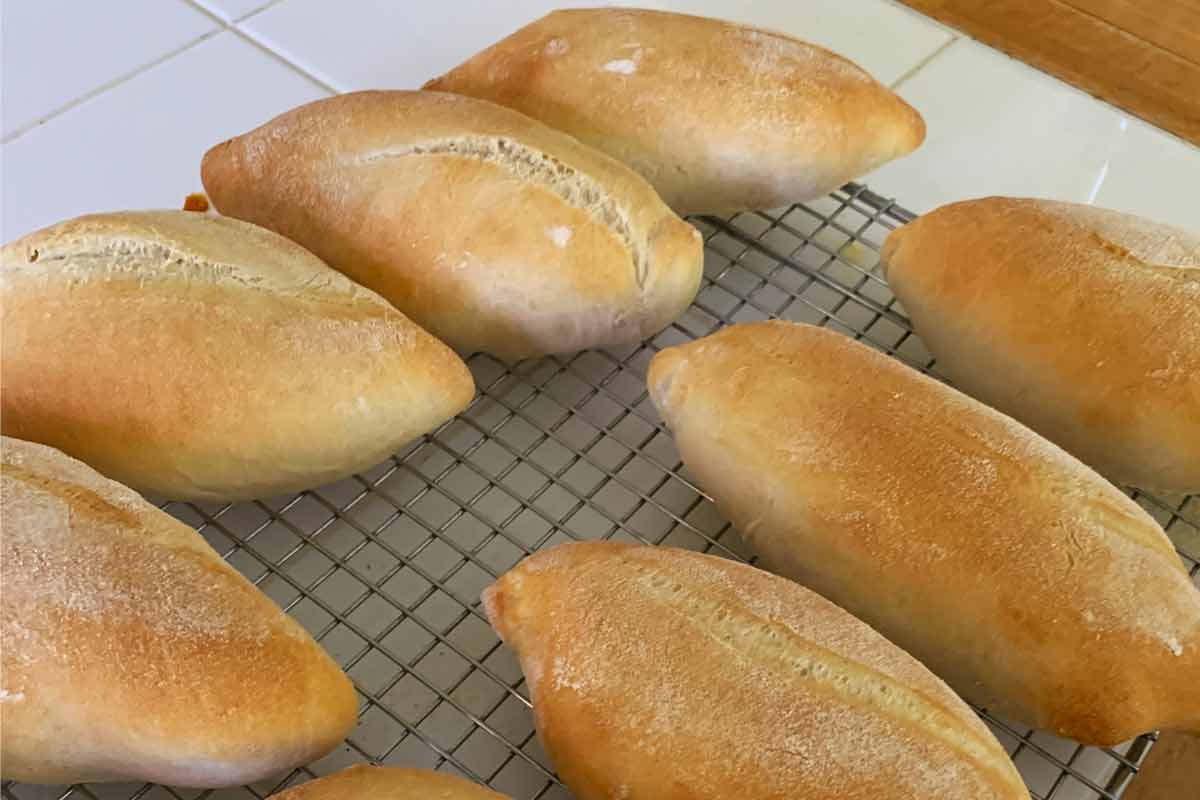
- Flour your hands. Flatten a dough ball into a 6-inch (15-cm) disc. Using the side of your hand, make a deep crease (think karate chop) across the middle of the disc.
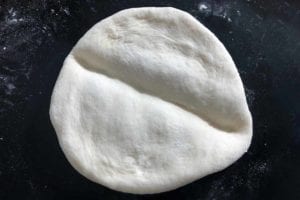
- Grab both ends of the crease and gently tug them to elongate the dough into a slight oval.
- Fold one half of the dough over the other along the crease. The dough will have a half-moon shape.
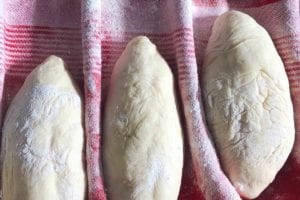
- Twist the ends of the half-moon into fat points and, using your thumbs, flatten them a bit to seal.
- Gently transfer the papo seco to the towel, seam-side down. As you shape more rolls, arrange them in a row, few inches apart. Pull the towel up between each row to create a ridge that will hold the shape of the rolls during proofing. Repeat the shaping and lining up the papo-secos, folding up the towel between rows.
- Cover the rolls with a towel and let rise in a warm place until almost doubled in size, about 30 minutes.
Bake the papo secos
- Meanwhile, position a rack in the middle of the oven and slip in a baking stone or tiles. Place an empty metal tray on any rack that won’t interfere with the rising papo secos. (Do not use a glass pan as it could shatter.) Crank the heat to 500°F (260°C). The oven and stone will need time to properly heat.
- Have a cup of very hot tap water at the ready.
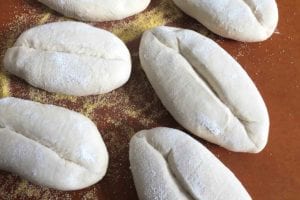
- Coat a baking peel or rimless baking sheet with cornmeal. Carefully turn a few of the papo secos seam-side up and arrange them on the peel.
- Place the front edge of the peel at the back of the baking stone and quickly yank it toward you to shift the dough onto the baking stone. Repeat with the remaining papo secos. Quickly but carefully pour the hot water into the metal tray and immediately shut the oven door to trap the steam. Immediately reduce the heat to 425°F (218°C).
☞ TESTER TIP: If your baking stone can’t fit all of the rolls, bake them in batches. As the Portuguese say, Não faz mal. No problem!
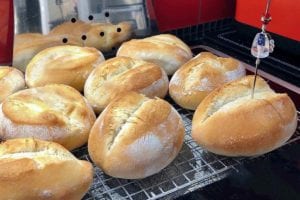
- Bake the papo secos until they’re puffed and golden brown, 15 to 20 minutes. Remove them from the oven and let them cool on a rack. To get that characteristic crusty outside, let the roll sit out several more hours prior to devouring.

An LC Original
View More Original RecipesExplore More with AI
Nutrition
Nutrition information is automatically calculated, so should only be used as an approximation.
Recipe Testers’ Reviews
Did you know only 68% of the recipes we test make it onto the site? This recipe survived our rigorous blind testing process by multiple home cooks. It earned the Leite’s Culinaria stamp of approval—and the testers’ reviews below prove it.

I grew up with these crusty rolls. They were delivered daily before breakfast along with one giant version, our daily bread. Warm. Crusty. This was our bakery white bread. My mom baked everything else but these.
When my daughter started eating table food (pre-teeth and before words), she’d point to the papo secos and say “uhm…uhm…” Then, when she could talk, she’d call them pãozinho, the Portuguese word for “little bread,” and shake all over with excitement.
She still calls them pãozinho and up until last month, we only had them for very special treats from a Portuguese bakery so that we could look forward to the ones baked in the Azores during our yearly visits. Those were so special. They don’t home deliver anymore but you can get them from the bakery still warm almost any time of day.
With the physical isolation craze of baking and numerous social network posts sporting papo secos, plus the ugly chance we may not be able to visit the Azores this year, I also jumped on the homemade papo secos bandwagon. My first attempt was quite successful, but I found the shaping to be somewhat challenging and the crust to be short-lived. When I read this recipe, I just knew that I could get the shaping right.
Although I want to believe it was the wording in the recipe that provided the “click” in my understanding, it’s possible that I had already been somewhat “primed” from previous recipes. This recipe also only had a crusty exterior for about 60 minutes then softened. Although not crispy, the crust was chewy crusty when compared to the interior which was light yet dense with very even crumb. This might have been from using all purpose flour since I neither had access to bread flour or vital wheat gluten to convert my AP flour to bread flour. However, I must say that the combination of this bun with the bifana did take me back to my years when I lived in the Azores and the light yet slightly dense interior was perfect for sopping up the bifana juices! Yum! Nevertheless, this recipe creates a roll that I’m pleased to call pãozinho! 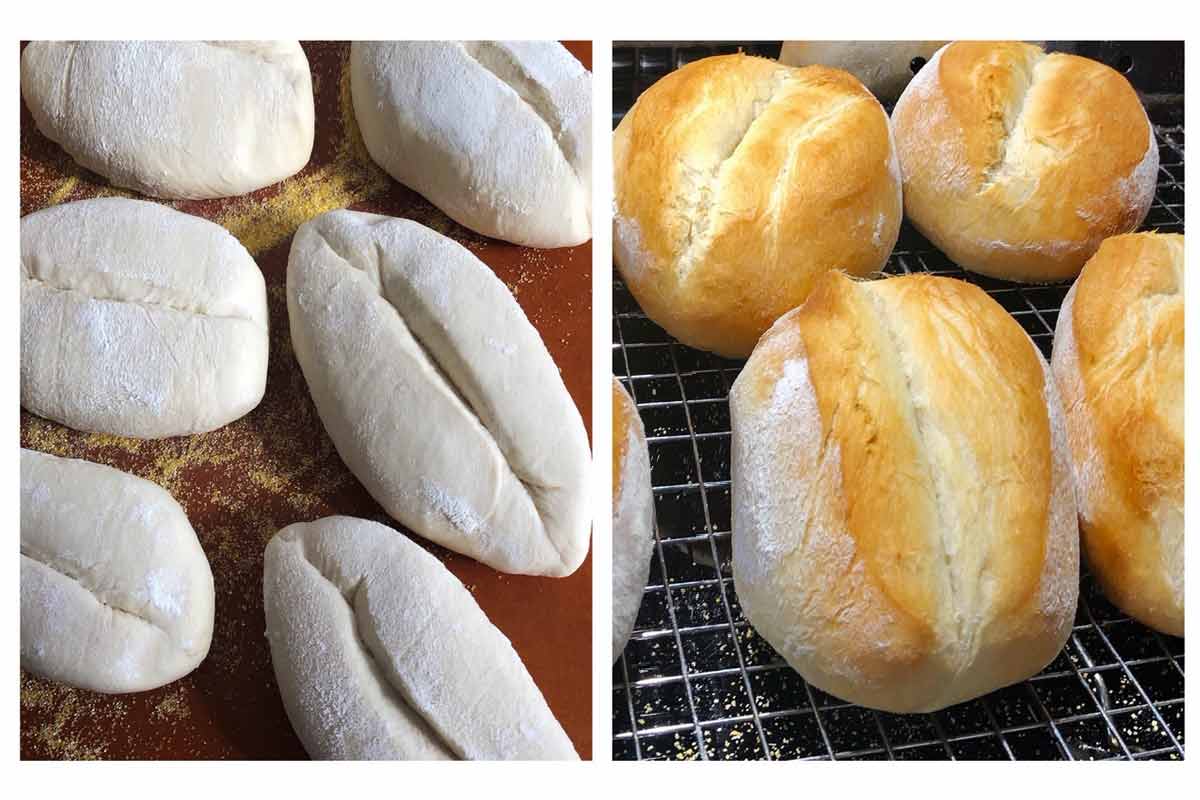

This is a time-consuming recipe but it isn’t difficult at all and the results are worth every minute.
Bread recipes can be daunting and working with dough can be challenging, but this dough was a joy. It came together and kneaded nicely in the mixer. By the time the kneading was done (I did 15 minutes), the mixing bowl was clean. It rose right on schedule (popping the bowl in the oven with the light on is the way to go) and was easy to work with when forming the balls and then the rolls. Instead of just rolling the dough to form balls, which didn’t seem to “tighten the ball,” as the recipe says, I used my thumb to press it in as I rolled it and that led to nicely shaped and tight dough balls. The forming instructions looked complicated at first glance but made sense when I was working with an actual dough ball.
The dough was quite airy and while I wouldn’t call the rolls dense, they weren’t as light on the inside as I expected. But they had a really nice crumb and, yes, a crusty exterior. As the recipe said, the crust got crisper after letting the rolls sit out for a few hours. But I started these in the morning and had one for lunch so I didn’t wait for that! They really did taste just like the Portuguese rolls we get from the grocery store.

Who doesn’t love a good homemade roll? The dough was so quick and easy to bring together. My Kitchenaid literally did all the work.
The dough was slightly sticky, smooth, and elastic and yes, it thwacks the sides of the bowl clean! Rising times were spot on. When it came time to shape the rolls, I reread the directions a few times and it made sense while I was doing it. Shaping took no time at all. The rolls were done and had nice color in 18 minutes—crusty outside and light and fluffy inside. However, once they cooled, the outer crust was no longer crunchy. I am sure popping them in a hot oven will re-crisp them perfectly.
Just remember to turn the oven down once you add the water for steam. I forgot on my second batch until they were mostly done, but honestly, they were a touch darker, but still moist and tender inside.

I was really surprised at how well these turned out for me. Either this is the ultimate bread recipe or I’m just finally getting good at yeasted breads. No matter which, these are delicious and pretty quick to make. And mine even looked (mostly) like the photograph! These baked up with a beautiful golden crust and an incredibly fluffy interior.
My measurements yielded 12 rolls, meaning that there were 2 “free agents” for me to slather with butter and eat immediately. They do develop a much nicer crusty finish after sitting out for a while, but I dare you to wait that long before eating just one. Or, in my greedy case, two. The biggest problem I’ve found with bread rolls is that they aren’t sturdy enough for filling with anything substantial. These, however, hold up so well because of the outside crust that I filled them with pork bifanas and they didn’t fall apart or get soggy at all.
I found all the measurements and timing accurate. My dough was definitely doubled after 1 1/2 hours, both times. As the author suggests, I often put my dough in the oven with the light on and it works like a charm. Instead of using a towel to hold the formed rolls, I used my metal baguette tray and it held all 12 perfectly. I cooked 6 at a time, using my cast iron sheet pan.

Absolutely lovely! These buns are soft and tasty. We made pulled pork sandwiches and these were able to hold all the wonderful juices and not fall apart. I’m convinced that taking the time to make your own bread is worth the effort! These are far better than any bread I’ve ever purchased at a Portuguese bakery. I may have to double the recipe next time!
I found 35 revolutions to be a bit much. I gave it about 10. I placed my dough on a baking sheet lined with parchment and dusted with flour. I hate washing kitchen towels covered in flour! I covered them with plastic wrap. Later, when I returned my buns back to the dusted parchment-lined baking sheet and didn’t bother to “prop them up,” they held their shape just fine.
I don’t have a baking stone. I used the same baking sheet lined with parchment that my buns had been proofing on to bake with. I poured water into the metal tray, popped the baking sheet in the oven, and quickly closed the door. Yes, the buns were on a “cold” baking sheet, but they didn’t seem to suffer! Plus, I didn’t have to wrestle with a baking peel and try to get the buns onto a stone without losing them to the back of my oven. Mine took 30 to 35mins to bake to golden brown, so they took a bit longer because they weren’t on a hot stone, but I would bake them this way again and recommend my method which was far easier than what was written.
The exterior was soft (crusty isn’t really an appropriate name for these buns) with some nice big air bubbles. The inside was light and airy but the crumb was dense (it didn’t have big holes).
The flavor of these were outstanding and I will absolutely make them again.
These rolls were definitely soft and delicious. They had a chew to them. They came out delicious. The directions for shaping were easy to follow. I saw David’s rolls on his Instagram and his look like mine (which was a relief for me!) I toasted them up the next day for dinner and man oh man were they scrumptious!!! They also freeze well too.


Hi David, I am in Portugal at the moment, and enjoying the papo secos here, they’re so light and airy, they almost float, I live in England and have tried many times to make them, but they always come out heavy. Your recipe looks different, which I will try. There’s a high of water-to-flour ratio, which I calculate yours be 80 percent hydration, is that the key? Is it possible to put the weights down for each thing instead of cups, so as to provide a more accurate measurement for the water and flour?
Thank you so much for sharing this recipe.
John, I’m so jealous. You’re in Portugal! I think the flour might be a factor, too. When I lived in Lisbon, I had a hard time making my tried-and-true American cakes using Portuguese flour. So you might have to experiment a bit. And the recipe includes metrics. All you have to do is click the “Metric” button that’s above and to the right of the ingredients list.
Thanks David, I didn’t see a conversion button, will use it then, thanks for the feedback!
Of course, John!
Although the recipe is interesting, I think the amount of flour is wrong. In the first stage of making the dough it never got past a sloppy mess until I started adding more flour. Instead of 5 c I think I wound up using more like 7 c. Going on to first rise now..much easier buying from Portuguese bakery. lol
Cathy, flour is one of the trickiest things in baking. I suggest using a scale. It gives absolutely accurate results. I’ve made this recipe many times, and it’s never been a sloppy mess!
This is another authentic 5-star Portuguese recipe by one of my favorite chefs! While it is time-consuming, the recipe itself is quite simple. My 4-year-old daughter even helped! Get yourself some bread flour, and run—don’t walk—to the kitchen. These crusty rolls are too good not to try (and share)! For an added bonus, make David’s excellent caçoila recipe and make yourself a sandwich when the rolls are ready. You can thank me later. 😉
Kristy, muito obrigado! Those rolls look fantastic! And don’t forget to use them for bifanas, too!