
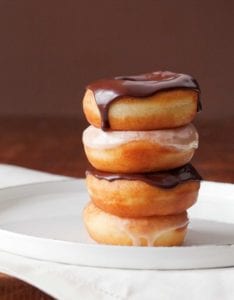
Glazed doughnuts. Everybody loves ’em. Even when seemingly everyone is paleo this and gluten-free that, you rarely see someone refuse a glazed doughnut. Especially when they’re homemade, hot from the oil, and taste just like the old-fashioned kind you remember from childhood. This particular recipe turns out doughnuts that aren’t quite as airy as Krispy Kreme doughnuts, but we don’t think that’s a bad thing. The doughnuts are less sweet than most, which means you can drown them in glaze and they still won’t seem cloying. Talk about our kinda doughnut. [Editor’s Note: Seriously. I can’t stop eating these doughnuts. This note may have been typed impatiently and one-handedly while attempting to lick drippy doughnut glaze from fingers and wrist before it plummets to certain disaster onto my laptop.]–Renee Schettler
How To Make Yeasted Glazed Doughnuts
To make her doughnuts so wildly fluffy, author Lara Ferroni relies on a higher proportion of yeast than one would expect. A neat 3 tablespoons of active dry yeast, to be exact. You could substitute instant yeast—not to be confused with rapid rise yeast—but you’ll need to carefully reduce the amount, explains recipe tester and baking guru Cindi Kruth. Instant yeast is what’s now most readily available in larger packages, AF and Red Star being the most common brands you’ll find at big box stores and supermarkets. At only $3 or $4 a pound, this is by far the cheapest way for home bakers to buy yeast. Kruth made these using 2 1/4 teaspoons instant yeast in place of the 3 tablespoons active dry and she was quite, quite pleased.
Glazed Doughnuts
Ingredients
For the doughnuts
- 3 tablespoons active dry yeast or 2 1/4 teaspoons instant yeast
- 1 cup whole milk, heated to 110˚F (43°C)
- 2 to 2 1/2 cups bread flour, plus more for the work surface
- 2 tablespoons superfine sugar, (or just blitz granulated sugar in a blender until finely ground but not powdery)
- 1/2 teaspoon salt
- 1 teaspoon vanilla extract
- 3 large egg yolks
- 4 tablespoons unsalted butter, at room temperature
- Vegetable oil, for frying
For the basic glaze
- 1 1/2 cups confectioners’ sugar, sifted to remove any lumps
- 3 to 4 tablespoons milk or water
- 2 teaspoons vanilla extract, (optional)
For the chocolate glaze
- 1 1/2 cups confectioners’ sugar
- 4 tablespoons cocoa powder
- 2 tablespoons milk or water
- 2 teaspoons vanilla extract, (optional)
Instructions
Make the doughnuts
- In a medium bowl, dissolve 2 tablespoons yeast in 3/4 cup warm milk. Stir in 3/4 cup of the flour to create a smooth paste. Cover and let rest in a warm spot for 30 minutes.
- Combine the remaining warm milk and yeast in the bowl of a stand mixer fitted with the paddle attachment. Add the flour mixture along with the sugar, salt, vanilla, and egg yolks. Mix until smooth. Turn off the mixer and add 1/2 cup of the remaining flour. Mix on low for about 30 seconds. Add the butter and mix until it becomes incorporated, about 30 seconds. Switch to a dough hook and, with the mixer turned off, add more flour, about 1/4 cup at a time. Knead the dough on medium speed between additions until the dough pulls completely away from the sides of the bowl and is smooth and not too sticky. It will be very soft and moist, but not so sticky that you can’t roll it out. (You may have flour left over.) Cover the bowl with plastic wrap and refrigerate for at least 1 hour and up to 12 hours.
- Line a baking sheet with a lightly floured dish towel. Roll out the dough on a lightly floured surface to 1/2 inch thick. With a doughnut or cookie cutter, cut out 3-inch-diameter rounds with 1-inch-diameter holes. (Note: If making filled doughnuts, clearly, don’t cut out the holes.) You can re-roll the scraps and cut out additional holes.
- Place the doughnuts at least 1 inch apart on the baking sheet and cover loosely with plastic wrap. Let rest in a warm spot to proof until they almost double in size, 5 to 20 minutes, peeking every five minutes. To test whether the dough is ready, touch it lightly with a fingertip. If it springs back immediately, it needs more time. If it springs back slowly, it is ready. If it doesn’t spring back at all, it has over-proofed, in which case you can punch it down and re-roll it once.
- While the doughnuts are proofing, heat a heavy-bottomed pot with at least 2 inches of oil until a deep-fat thermometer registers 360˚F (182°C). With a metal spatula, carefully place a couple of doughnut holes or doughnuts in the oil, being careful not to crowd the pot. Fry for 1 to 2 minutes per side, until light golden brown. Remove with a slotted spoon, drain on a wire rack over a paper towel, and let cool slightly before glazing. Repeat with the remaining doughnuts and holes, keeping the temperature consistent.
Make the glaze
- Whichever glaze you’re making, place the sugar (and cocoa powder, if relevant) in a bowl and slowly stir in the milk and vanilla, if using, a little at a time, to make a smooth, pourable glaze.
Glaze the doughnuts
- Pour the glaze into a shallow bowl. Dunk the doughnuts, let any excess glaze drip off, and then transfer them to a wire rack placed on a baking sheet or over a sheet of parchment paper to rest until glaze sets. (Who are we kidding? We know these glazed doughnuts are going straight from bowl to gaping mouth.)
Nutrition
Nutrition information is automatically calculated, so should only be used as an approximation.
Recipe Testers’ Reviews

These glazed doughnuts were delicious. Not only that but the recipe was easy and quick—very quick, considering they’re yeast-raised doughnuts. With no initial rise before shaping, except for what would occur in the fridge during the one-hour rest, I expected the doughnuts to be somewhat dense. But the doughnuts rose to double their initial size in the 20 minutes that the recipe noted. I used instant yeast, so I adjusted the amount to 2 1/4 teaspoons—the standard 75 percent conversion—which was just right. Once fried, the doughnuts were delightfully light and perfectly risen. You won’t want to waste any of the dough, so fry the odd-shaped leftover pieces as well. My class devoured them in a matter of minutes. Everyone loved them. The glaze comes together in a flash, but use it right away as it dries quickly when sitting. I found that simply dipping the tops of the doughnuts into the glaze was quicker and less messy than pouring. Also, keep the frying oil between 360 to 365°F (182 to 185°C). If the oil is too hot, the doughnuts will appear done on the outside, but they won’t have fully cooked on the inside. If the oil is too cool, they can end up greasy.
It’s hard to find an argument against glazed doughnuts. It’s certainly easy enough to find store-bought ones, but you’d be missing out. Don’t be intimidated by the use of yeast in this recipe—the dough is easy to make, especially if you have a stand mixer. The dough looks flat when you cut out the shapes, but it puffs up nicely in the hot oil. I glazed mine with the chocolate glaze and next time will make a pastry cream filling to really make this an over-the-top treat.

This is a fabulous glazed doughnut recipe that works perfectly as written. These are light and cakey and not super-sweet, even with the glaze. They’re easy to prepare and can be eaten plain after cooling or being dipped in a glaze—I dipped them in the basic glaze and let them drip for about 5 seconds before setting them on a wire rack to dry.
These aren’t Krispy Kreme doughnuts—the light, airy kind that you can eat six of and not even flinch. My doughnuts had a bit of a crust. However, they were still fluffy, and they were gobbled up as soon as they emerged from the hot oil. These doughnuts don’t keep, so eat them fresh! TIP: After mixing the dough, it may seem sticky, but if you touch it with your finger, you’ll see that it’s just moist. Also, after cutting the doughnuts out, place them on a floured cloth. I put mine on parchment and, after rising, they stuck so much that I had deflated doughnuts going into the hot oil. The doughnuts themselves aren’t sweet (as the recipe notes), so I do recommend a glaze. I also highly recommend making filled doughnuts: I had some blueberry preserves in the fridge, so I used a piping bag and the largest tip I could find to fill them. Iced with leftover cream cheese frosting, they were delicious.
This recipe is very easy to follow. The dough came together easily and I let it rest in the refrigerator overnight so we’d have fresh doughnuts for breakfast. (Chilling the dough is very important, so don’t skip that part or the dough may be too sticky to roll out.) I made the basic glaze in a shallow bowl and dunked the warm doughnuts in it. I also made cinnamon sugar to use on some of the unglazed doughnuts and those were delicious, too. A great breakfast for a Sunday morning.
I chose to make these glazed doughnuts because I had hoped to find a Krispy Kreme taste-alike recipe. While this particular one didn’t fit that bill, they were still wholly worth making. I dunked the doughnuts in the basic vanilla glaze after they’d cooled for about 2 minutes. The glaze worked well with the yeasted dough to make a filling, sweet treat.


Can the dough be made in bread machine?
Deb, we’ve never made it that way, so we don’t want to steer you wrong. Hope you understand! If you do make it in a bread machine, let us know how it turns out. And take photos!
I’m going to make it this weekend. I have a dough setting on my WP Bread machine. Thought that maybe this would work in it. I promise to let you know!!
Deb, please let us know how it goes. You might open this recipe up to a whole new flock of readers!