


TL;DR (Quick-Answer Box)
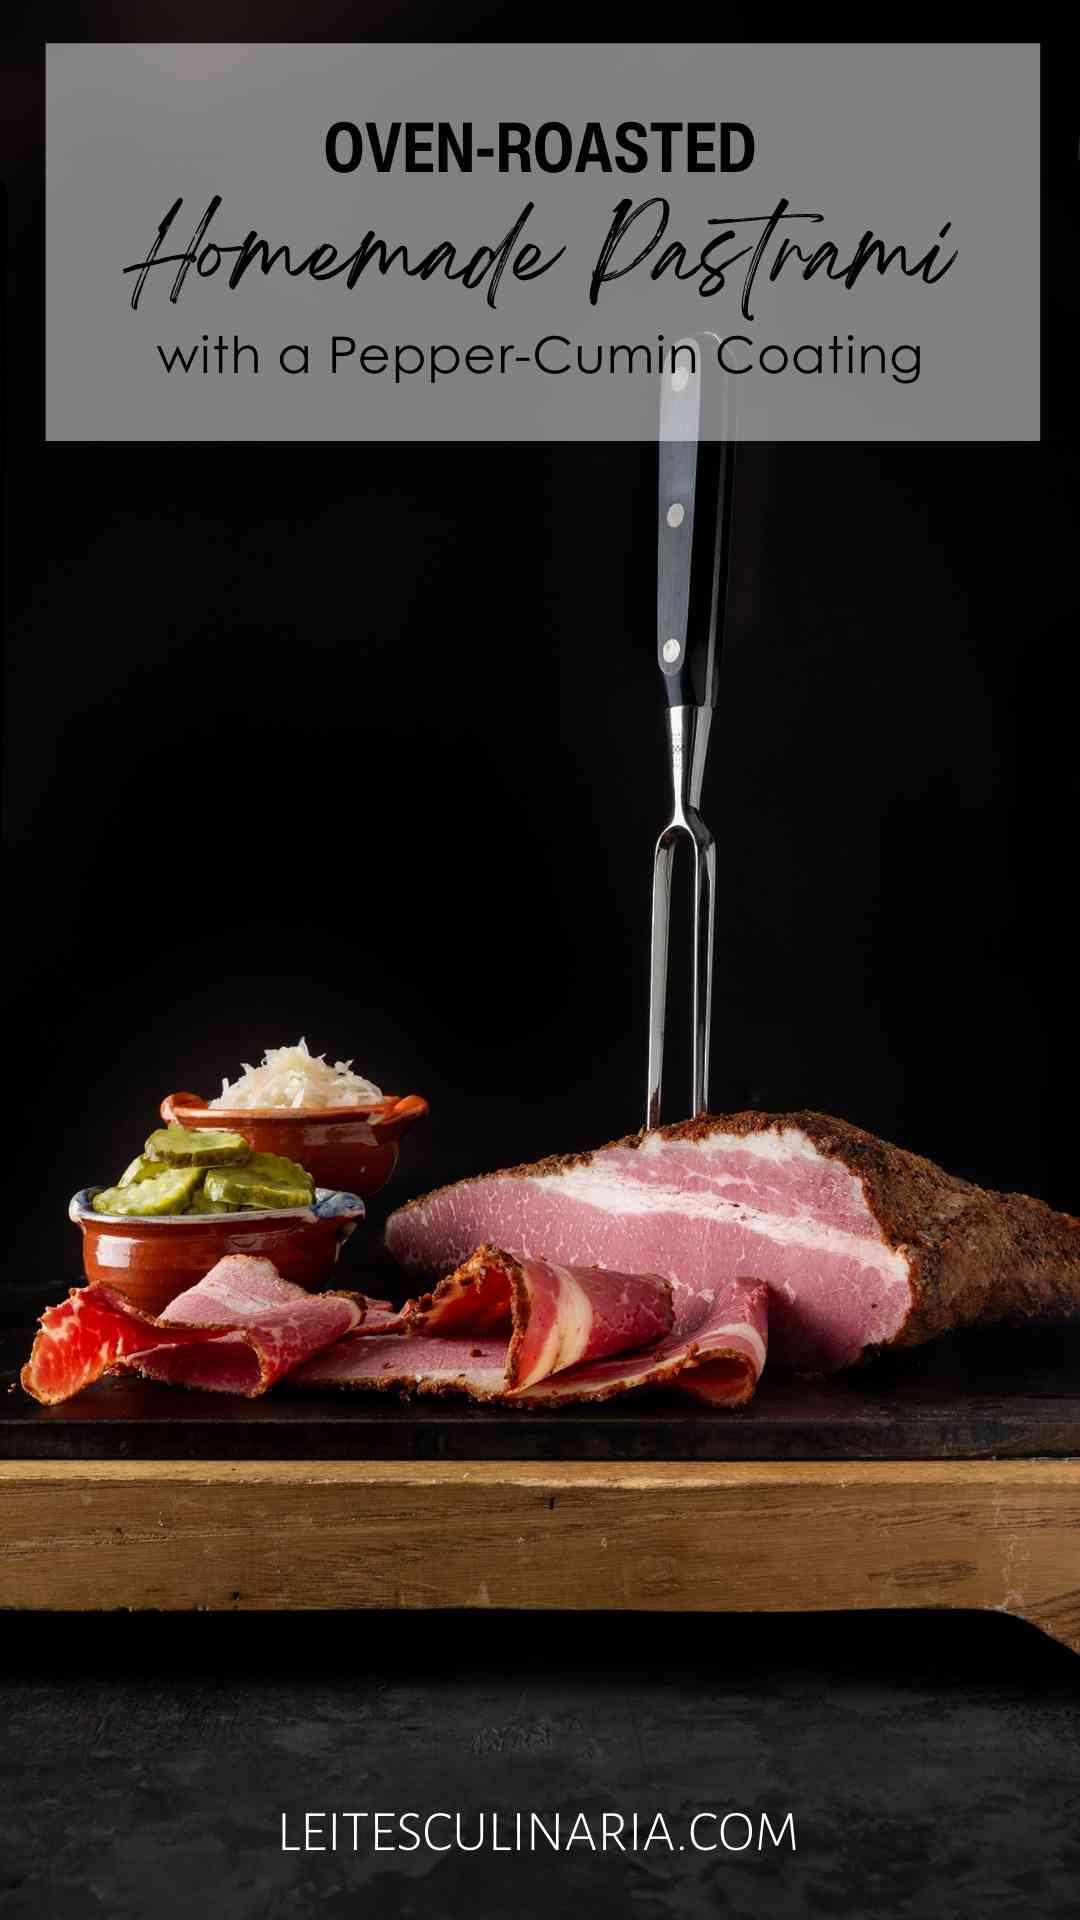
- What it is: Oven-roasted homemade pastrami recipe—a succulent, spice-rubbed beef brisket brined for five days, then baked in the oven to tender perfection without a smoker.
- Why you’ll love it: Skip the deli lines! This easy, no-fuss method delivers rich, smoky flavor and melt-in-your-mouth texture right from your own kitchen.
- How to make it: Brine the beef brisket for 5 days, rub it down with a bold mix of black pepper, coriander, and smoked paprika, then bake it in the oven until gloriously tender.

Jump To
- TL;DR (Quick-Answer Box)
- Why This Pastrami Recipe Works
- Notes on ingredients
- Visual Step-by-Step Guide: Homemade Pastrami
- Shortcuts & Variations
- Your Homemade Pastrami Questions Answered
- Pro tips & troubleshooting
- What to Serve with Homemade Pastrami
- Storage & Reheating
- More Amazing Cured Meat Recipes
- Share Your Pastrami Recipe Story
- Homemade Pastrami Recipe
- Recipe Testers’ Reviews
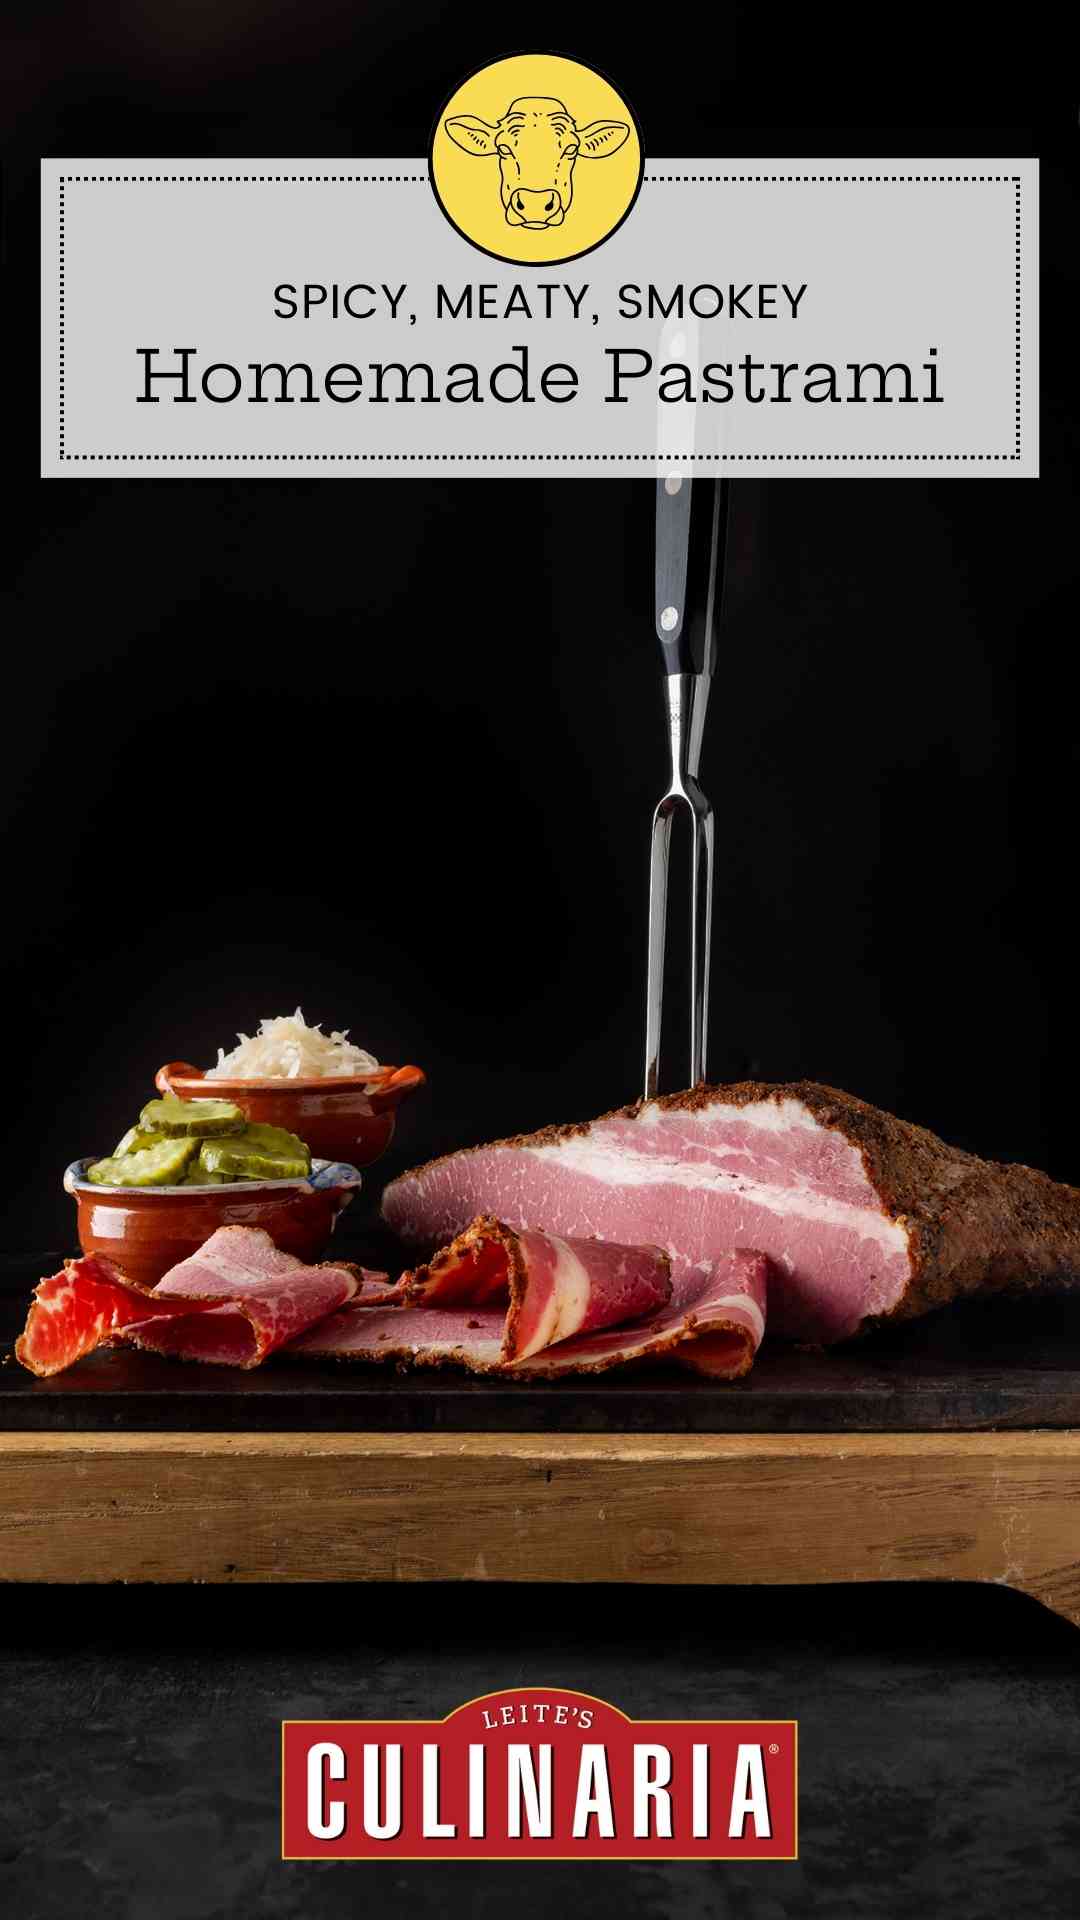
Let’s talk pastrami. I know what some of you are thinking: “David, in the oven?!” I can practically feel deli aficionados raising a collective eyebrow. In his must-read book, Save the Deli, journalist and cultural writer David Sax scandalized readers when he wrote that the smoky flavor of pastrami in many heralded delis comes from sizzling fat in the pan, not wood.
Like all great pastrami recipes, this starts with brined beef brisket. But this version calls for steam-roasting in the oven for fall-apart tender results, and a secret for cutting down that brine-cooling time. Trust me, the melt-in-your-mouth magic you’re about to create? Absolutely worth it.
Featured Review
All I can say is WOW! I live in Sarasota FL, and good pastrami is hard to find down here so I decided to make my own. I precisely followed the recipe notably doing the smoker variation and using David’s “Secret Rub” and was absolutely blown away. My neighbor joked that I need to open a deli. Highly recommend!!
Mark Hintz

Why This Pastrami Recipe Works
This pastrami may look fancy, but it’s packed with kitchen smarts that make it utterly foolproof. First, the five-day brine is non-negotiable for flavor and tenderness. And here’s a game-changer: my trick of boiling half the brine then adding ice cools it instantly—no more hours of waiting around. We then steam-roast the brisket in the oven, a method that delivers melt-in-your-mouth results and echoes how some top delis achieve their “smoke.” Plus, smoked paprika provides that classic smoky depth without a smoker. Finally, weighing your kosher salt is critical for a perfect brine; trust me, I’ve seen the salty disasters. This tested approach ensures you get incredible homemade pastrami every time.
Notes on ingredients
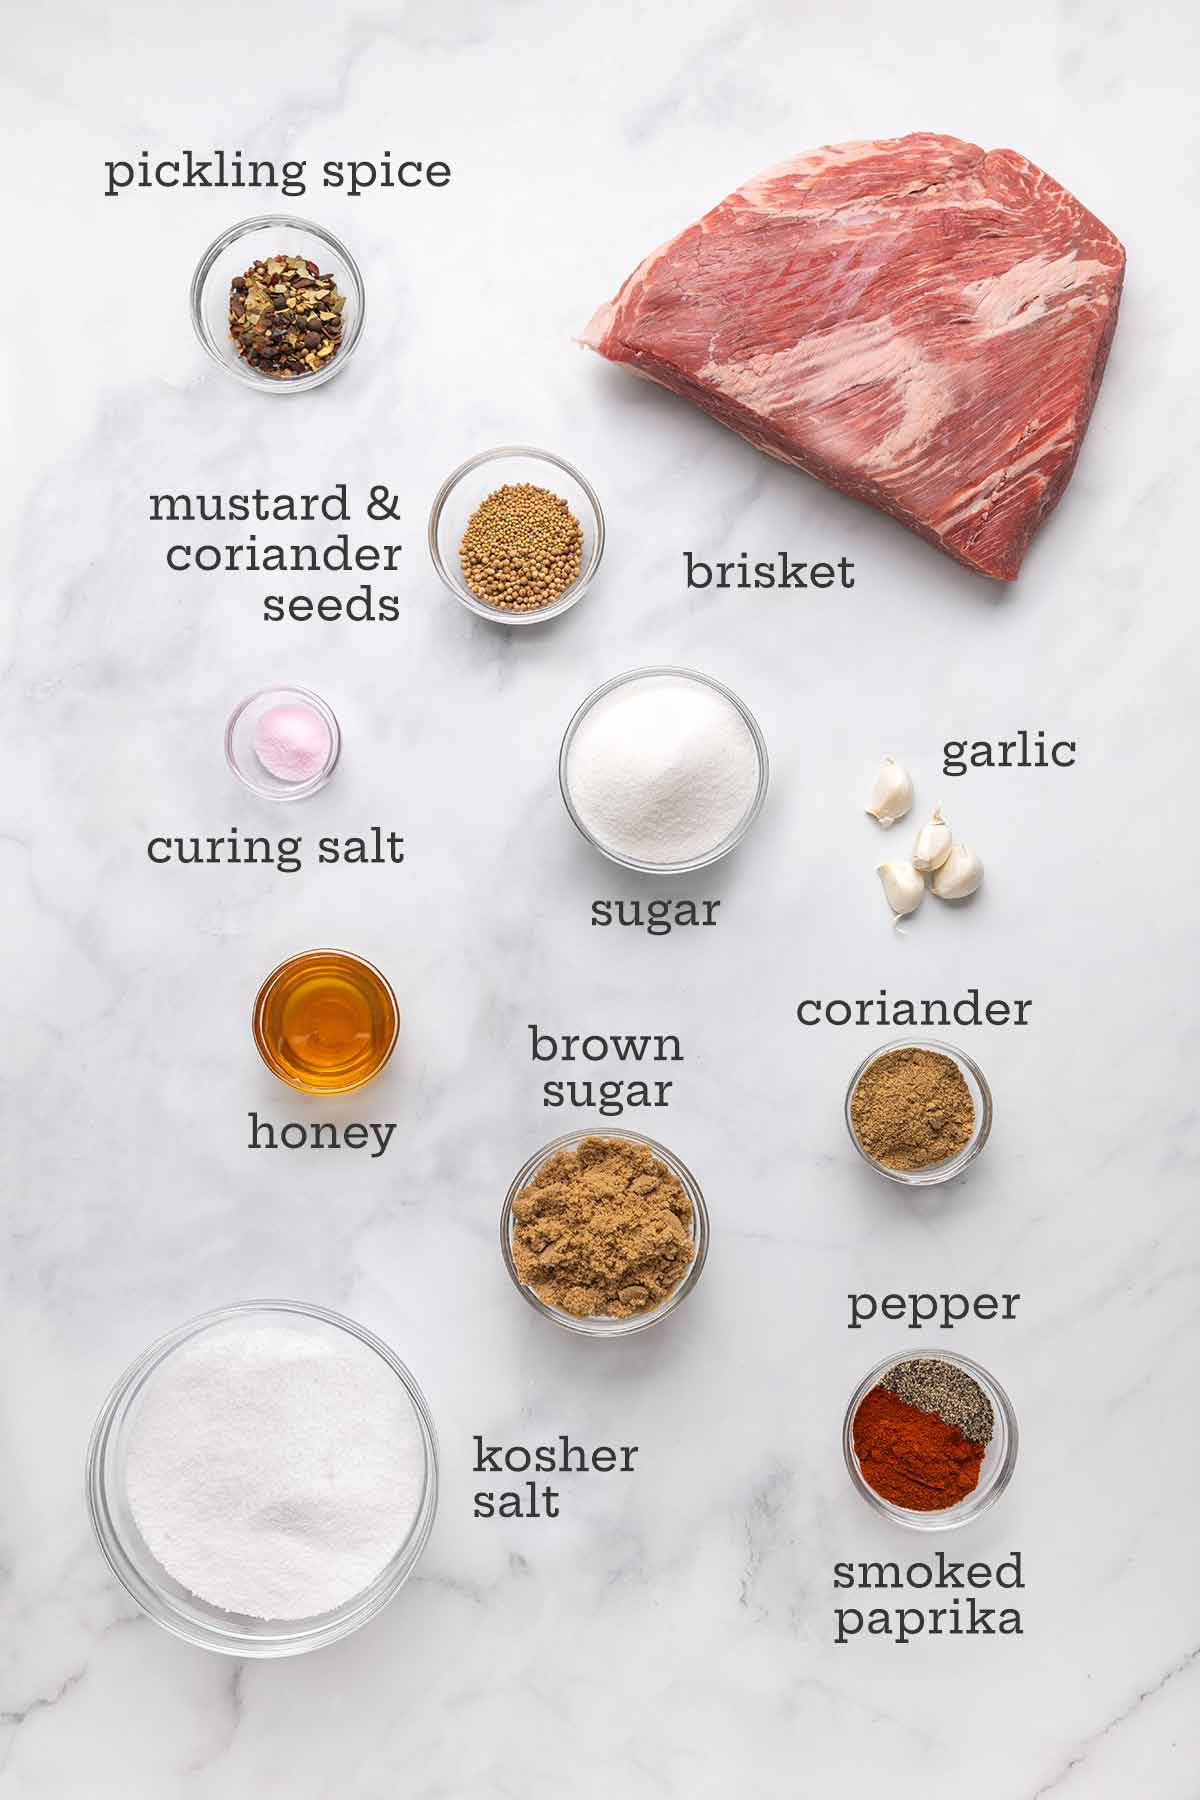
- Beef Brisket: Flat cut (first cut) or point (second cut)? Your call. The point has more marbling, more fat, more flavor. Just ensure a 1/4-inch fat cap remains for juicy perfection.
- Pink Curing Salt: Don’t even think of skipping this! It’s the magic behind that signature pink hue, but more importantly, it’s essential for food safety during curing and preserving the meat’s texture.
- Sugar and Honey: This sweet trio—granulated sugar, brown sugar, honey—in the brine isn’t just for flavor; it also helps to tenderize the meat. Just avoid any honey that’s too bossy in flavor.
- Kosher Salt: The foundation of your brine. You must weigh the salt. Seriously. Salt crystal sizes vary wildly by brand, and measuring by volume can turn your perfect pastrami into a salty disaster.
- Smoked Paprika & Coriander (for the Rub): These aren’t just spices; they’re the secret to a gentle, smoky flavor in your oven-baked pastrami. While paprika brings the “smoke,” coriander adds a warm, citrusy counterpoint that makes the rub work.
Visual Step-by-Step Guide: Homemade Pastrami
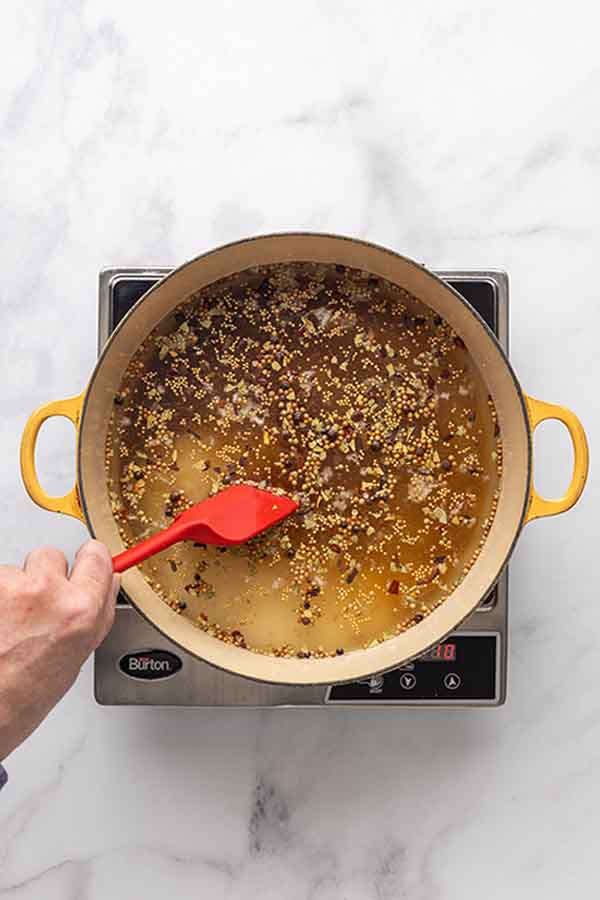
- Fill a large pot with 3 quarts of water. Add the sugars, honey, spices, and garlic.
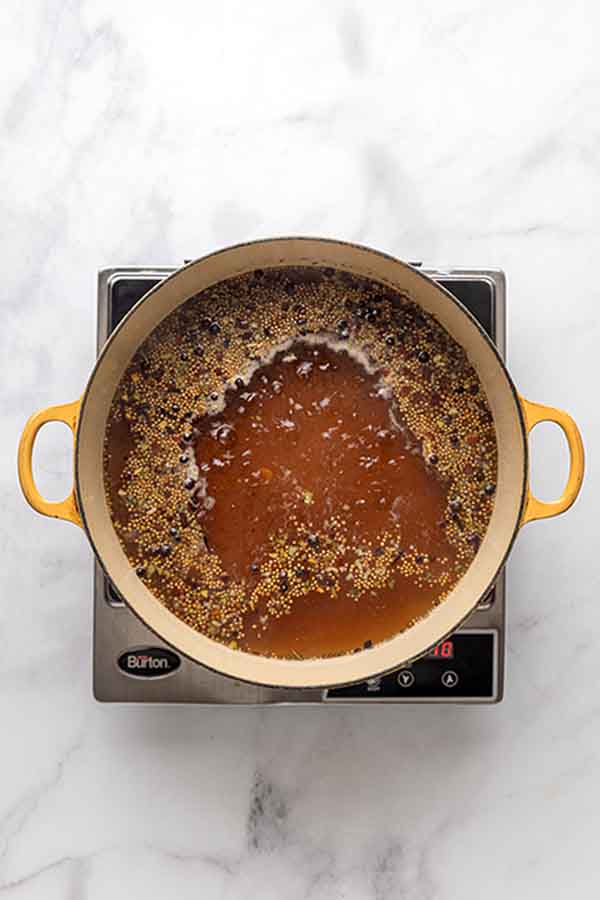
- Bring to a boil over high heat. Stir until the salt and sugar are fully dissolved.
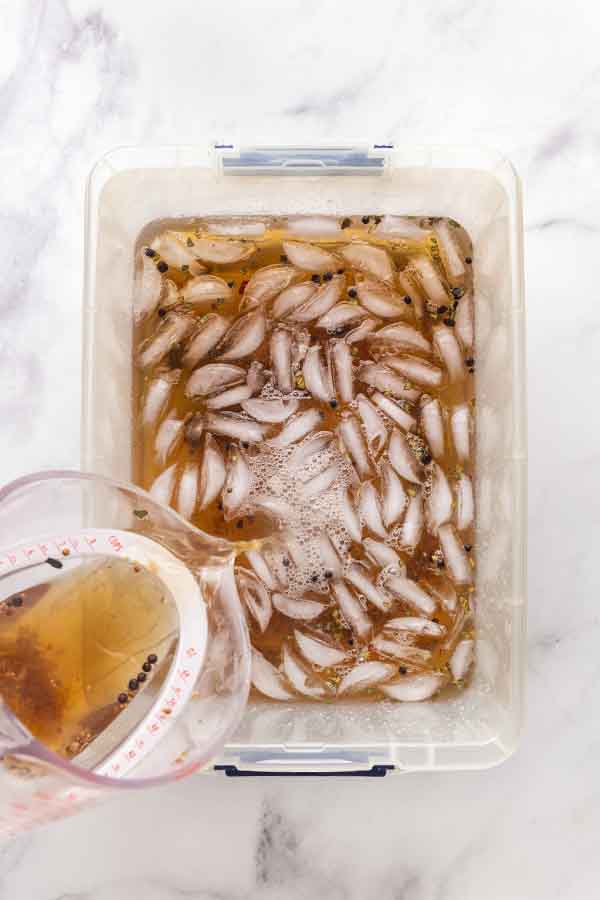
- Add 3 quarts of ice-cold water to a large container. Pour the hot brine into the container and stir until cold.
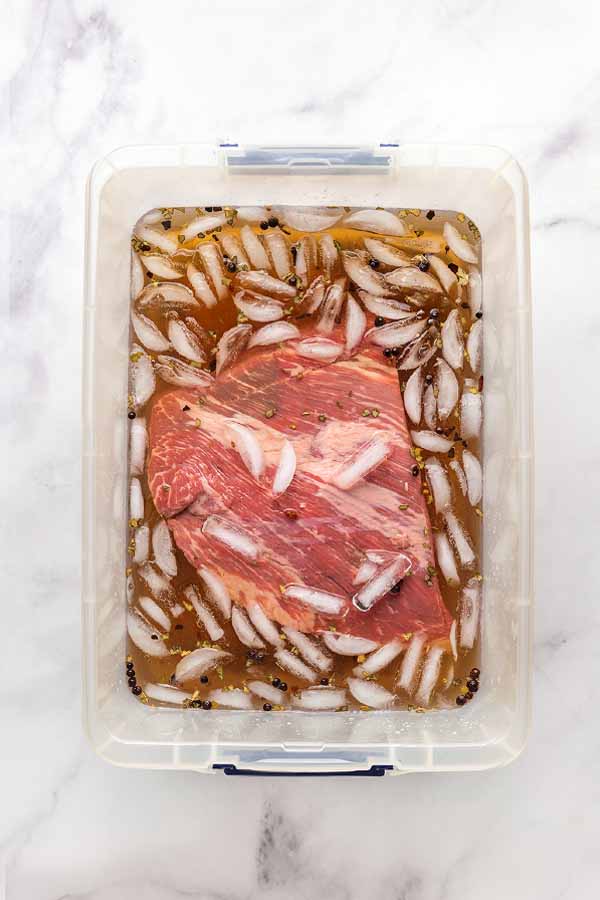
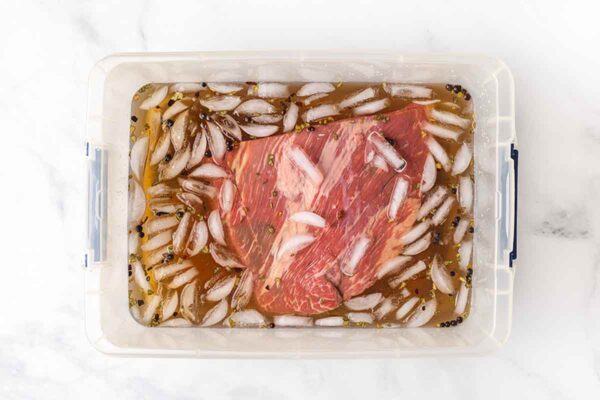
- Trim the brisket, if necessary. Place the brisket in the cold brine.

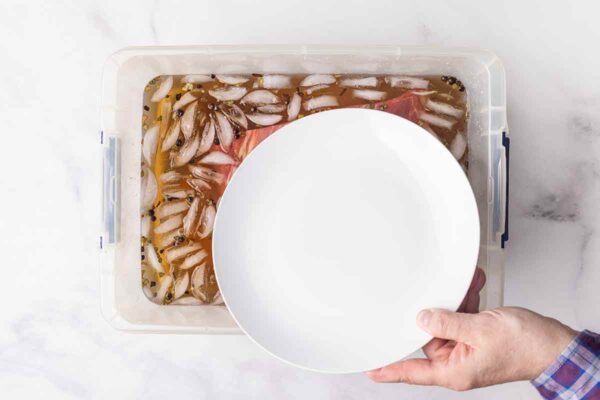
- Dunk the brisket in the brine, using a heavy object to keep it submerged.
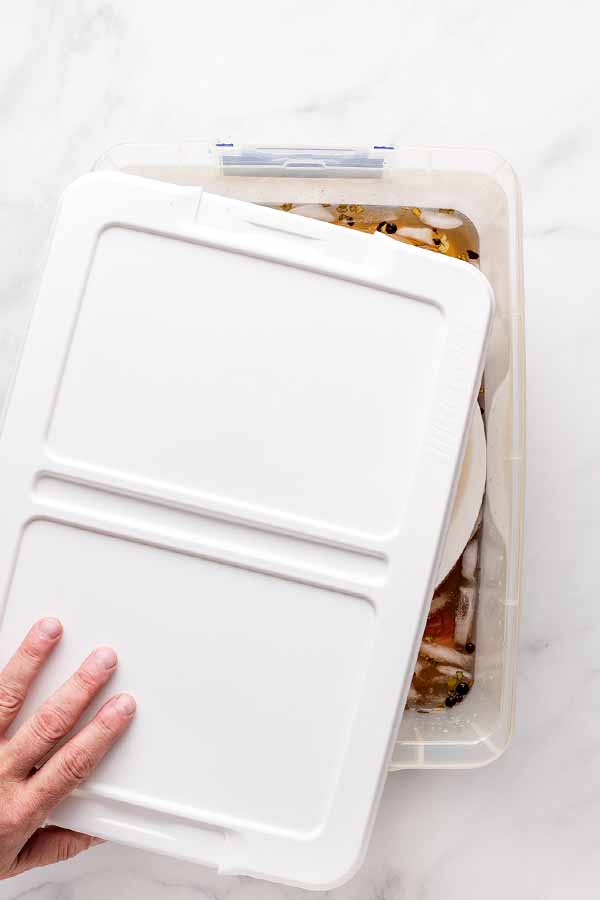
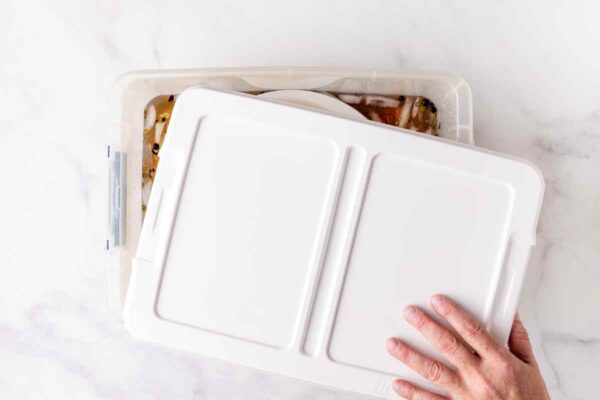
- Cover and refrigerate for 5 days, flipping the brisket once each day.

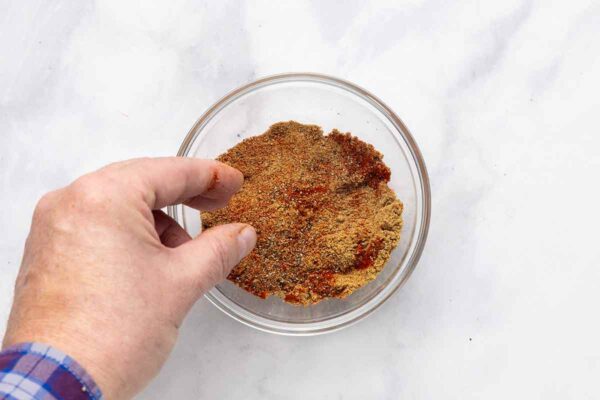
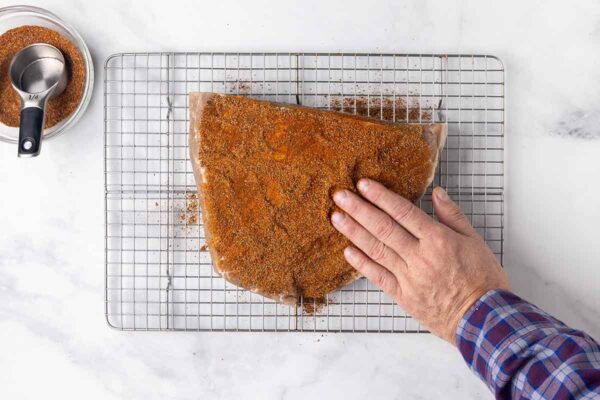
- To make the spice rub, combine the coriander, pepper, and paprika in a small bowl. Dry the brisket with paper towel. Rub 1/4 cup of spice rub on the non-fatty side of the brisket, then flip it and rub the fatty side with the remaining spice blend. Let it rest for 2 hours at room temperature.
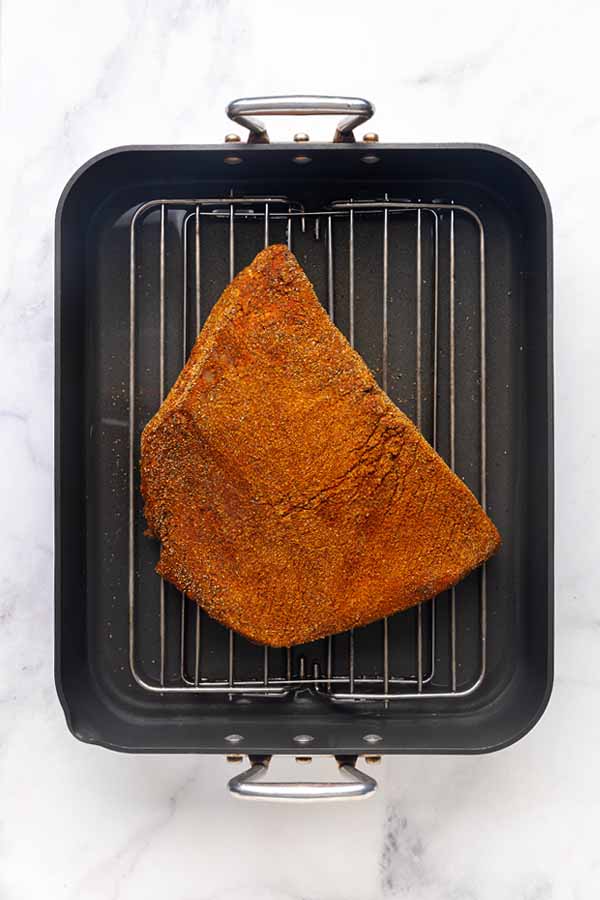
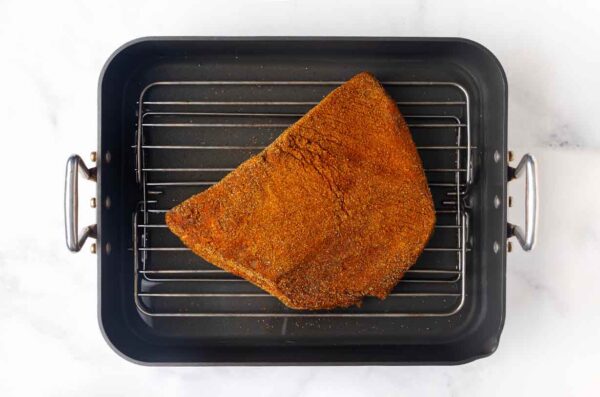
- Preheat the oven to 300°F. Set a rack inside a large roasting pan and pour 4 cups of cold water into the bottom of the pan. Set the brisket on the rack, fatty side up.
- Cover with a double layer of aluminum foil. Bake until the internal temperature reaches 200°F. Let rest for at least 30 minutes. Slice the brisket against the grain into thin slices.
Shortcuts & Variations
My Pastrami Spice Rub Variation
Sometimes, I want a bit more oomph for the coating on my pastrami, so I use my secret recipe spice blend (well, not so secret now!) Use this in step 5 below.
Ingredients
- 2 tablespoons ground coriander
- 2 tablespoons ground black pepper
- 1 tablespoon mustard powder
- 1 tablespoon garlic powder
- 1 tablespoon smoked paprika
- 2 tablespoons brown sugar
- 1 tablespoon onion powder
Instructions
- This yields about 3/4 cup of rub, more than enough to cover a 4-pound brisket generously. The quantities can be tweaked based on your preference for certain flavors. For instance, if you enjoy a more pronounced garlic or smoky taste, go for it and bump up the garlic powder or smoked paprika.
How to Smoke Pastrami (Variation)
Want that true-blue smoked pastrami experience? It takes more time than the oven method, sure, but that resulting depth of flavor is absolutely worth the effort. Since smokers and grills vary widely, these are general guidelines, but just remember the golden rule: low and slow is the way to perfection.
- Prep the Brisket: Prepare the homemade pastrami recipe below through step 5, omitting the paprika in the spice rub.
- Smoke Low & Slow: In an outdoor smoker or grill, smoke the meat, fatty side up, at 225°F (107°C) for 6 to 8 hours, or until it reaches an internal temperature of 160°F (71°C) to 175°F (79°C). Oak, maple, pecan, hickory, or fruit woods may be used, depending on availability and preference. (Avoid mesquite, as it gives a harsh flavor to long-smoked meats.)
- Finish in the Oven: Preheat the oven to 300°F (149°C). Place the brisket in a roasting pan and tightly cover the brisket and pan with a double layer of aluminum foil. Bake until the meat reaches an internal temperature of 200°F (93°C), 1 1/2 to 2 hours.
Your Homemade Pastrami Questions Answered
The most significant difference between the two types of meat lies in the cooking process. Corned beef is spice and salt-cured and then typically boiled or steamed. Pastrami is seasoned similarly, generally peppered heavily, and then smoked—but it can also be slow-baked as in this recipe.
Why, I’m glad you asked. Despite what many think, corned beef did NOT originate in Ireland. (Gasp, I know!) The first generations of Irish immigrants to the US developed the recipe out of necessity. A Saint Patrick’s Day feast in Ireland included boiled bacon, but the immigrants were too poor to afford pork and bacon products. Instead, they used a more affordable cut of meat: beef brisket.
As stated in The Little Foods of the Mediterranean by Clifford Wright, pastrima was first made in Turkey during the Ottoman Empire and made its way along the spice route to Romania. Romanian Jewish immigrants, who coined it “pastrami,” brought the recipe to the United States, and the meat became famous in New York City.
It’s traditionally made from brined and cooked beef brisket but it can be made from goose, goat, and mutton as well.
The crystal size of kosher salt can vary dramatically from brand to brand. Salts with smaller, finer crystals, such as Morton Kosher Salt, take up less space than larger crystals, such as Diamond Crystal. Measuring by weight ensures that the saltiness of the brine is consistent regardless of which brand of salt you use.
Pastrami is a good source of protein and essential nutrients, including iron and vitamin B12, so it can be included as part of a healthy diet. It is high in saturated fat and sodium, though, so it should be enjoyed in moderation.
Pro tips & troubleshooting
- Let your butcher do the work
Ask them to trim the brisket’s fat cap down to 1/4 inch (6 mm) to save time (and mess). - Keep it down
Having trouble submerging the brisket? Set a sealed bag filled with a plate or canned goods on top to weigh it down. - Brisket too big? No problem
If the whole thing won’t fit in your brining container, just cut it in half. - Slice like a pro
For neat, thin slices, chill the cooked pastrami for a couple of hours before cutting. - Allergy-friendly bonus
This recipe is naturally gluten-free and dairy-free—just double-check your spices and curing salt, since some blends can contain hidden gluten, anti-caking agents, or dairy-derived fillers.
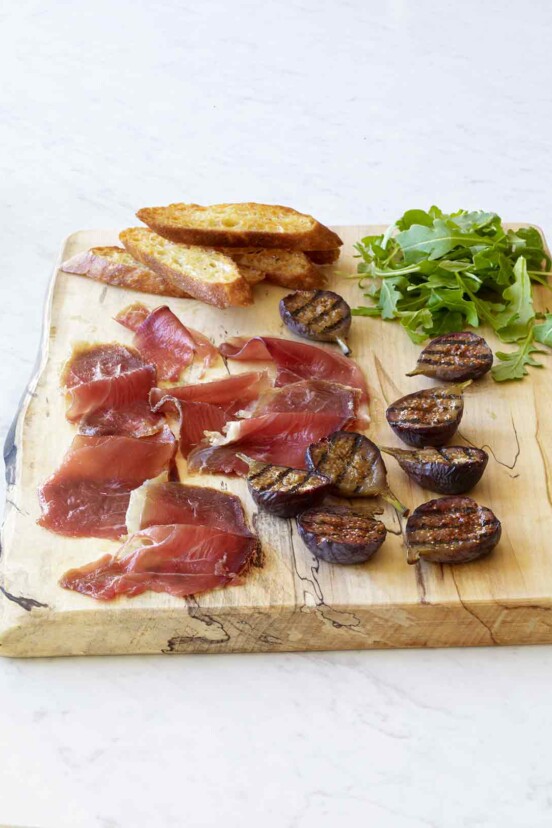
What to Serve with Homemade Pastrami
You’ve made this glorious recioe for pastrami; now let’s serve it right. It’s about an experience, not just a meal.
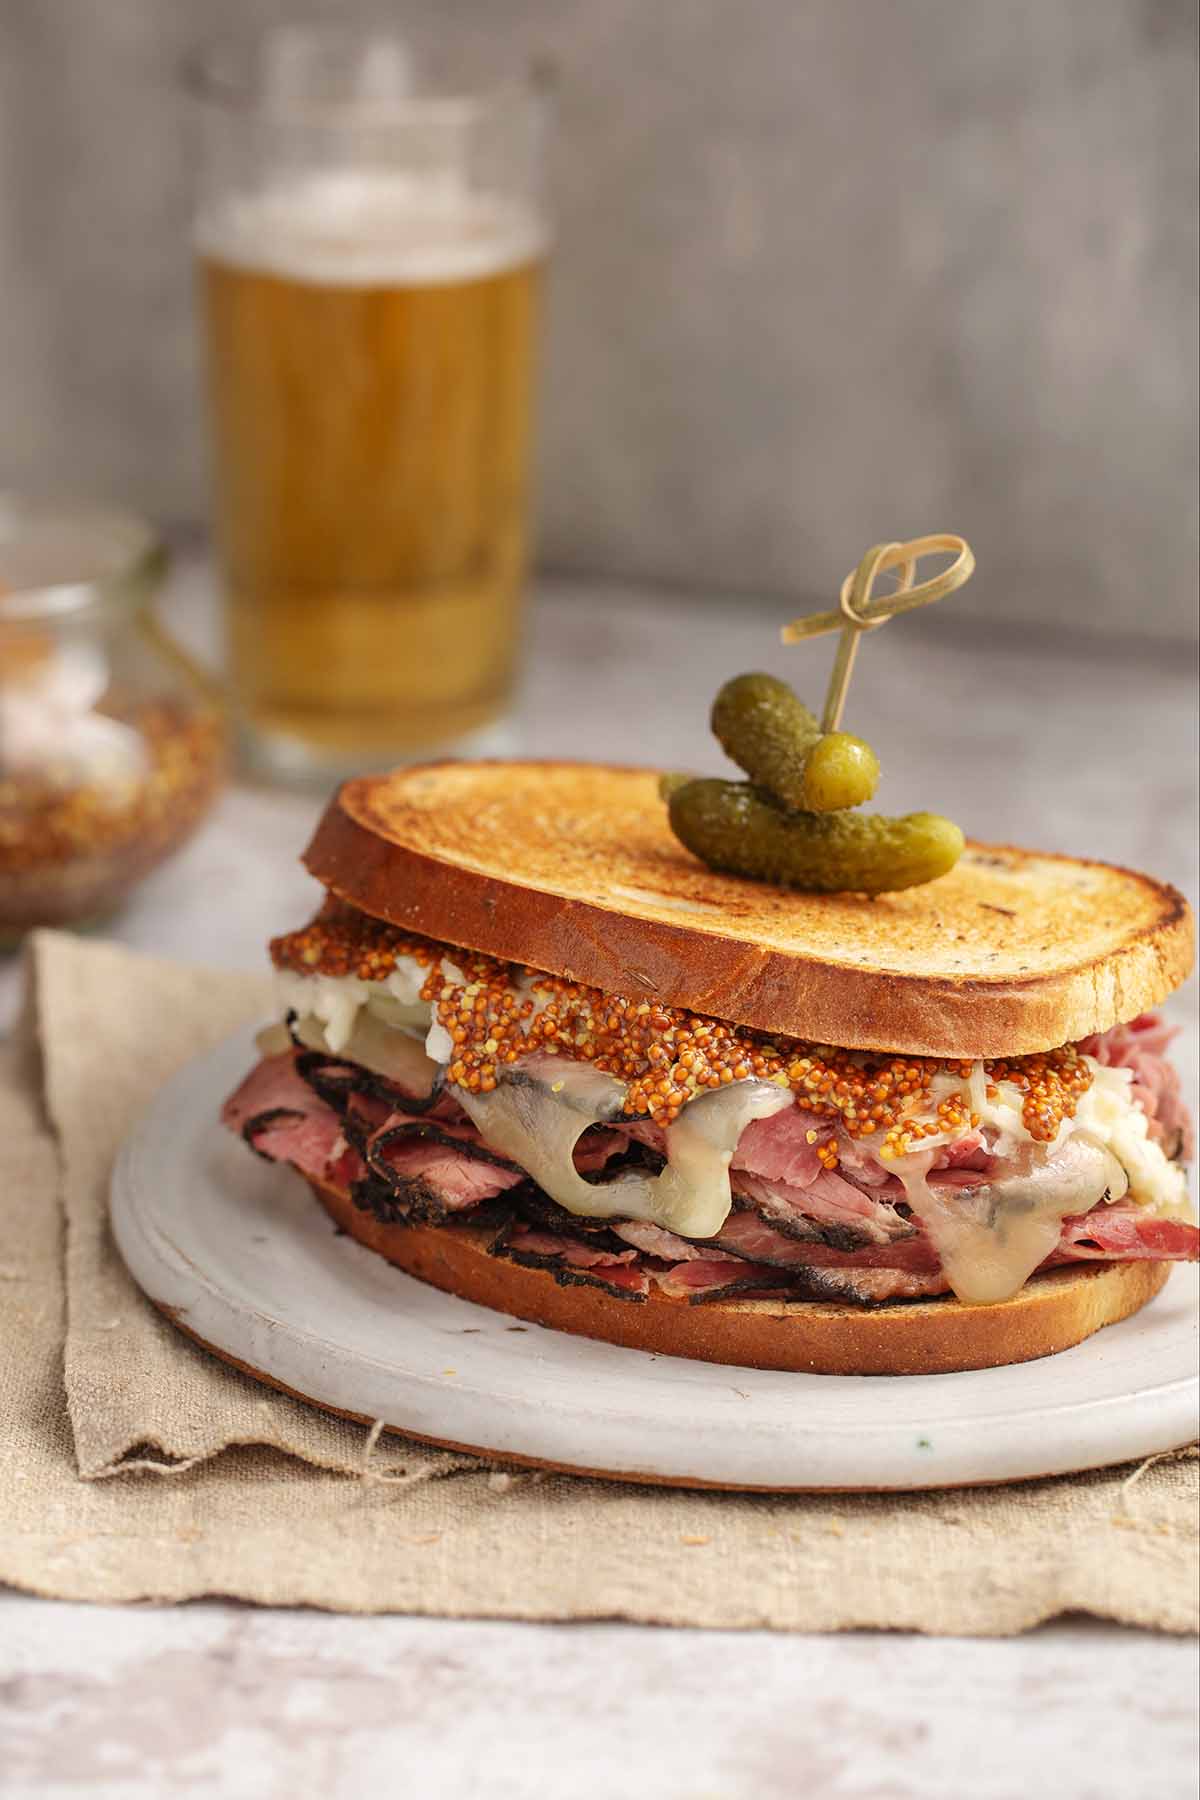
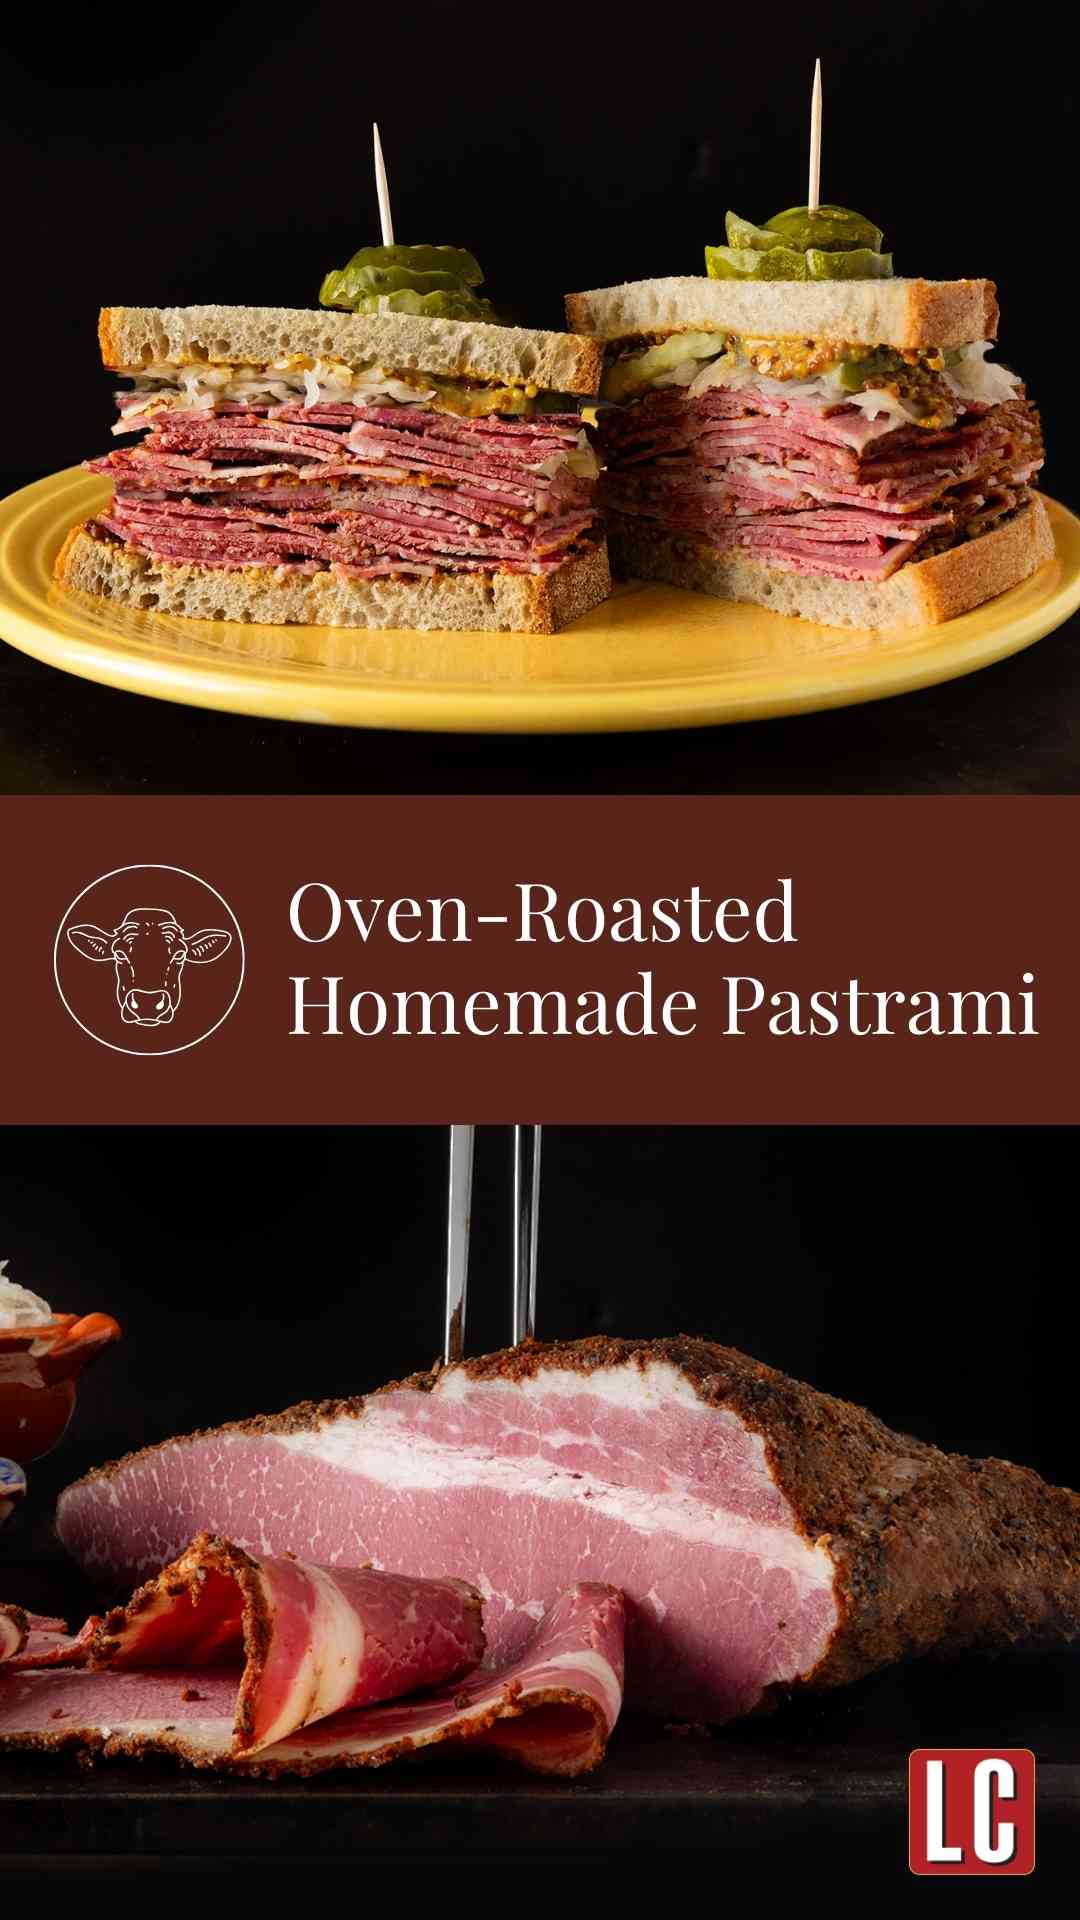
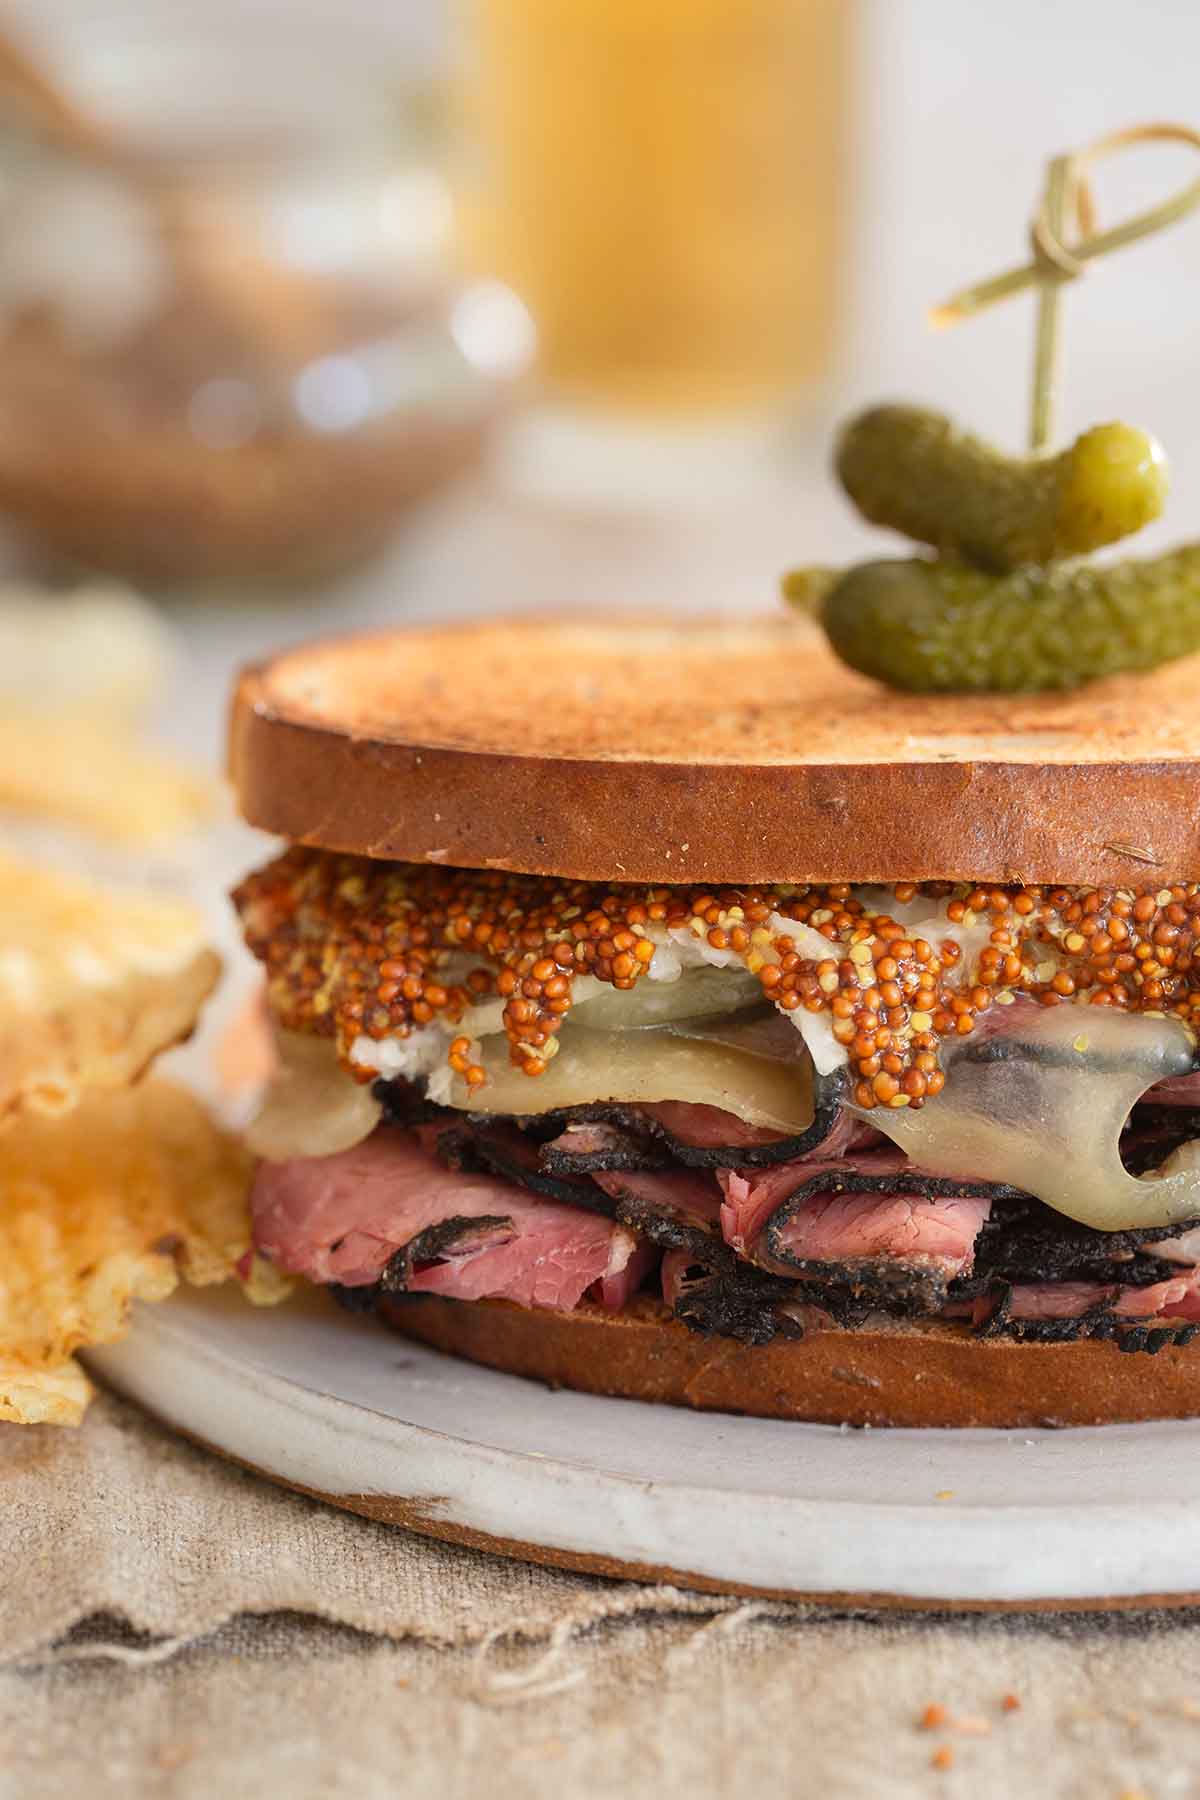
- The Classic Sandwich: A good pastrami sandwich needs freshly baked rye bread, classic yellow mustard, and melty Swiss. Add mayo, lettuce, and tomato for a cold one, or skip ’em for hot.
- Full Deli Spread: Pair your pastrami with crisp quick dill pickles, creamy coleslaw, or tangy potato salad. Steak fries are extra luxe.
- Reuben Revival: Transform it into a Reuben with sauerkraut, a great melting cheese (Comté or Swiss!), and Dijon, all grilled on rye. Pure bliss.
- Breakfast MVP: Chop leftover pastrami for a killer potato hash, topped with a fried egg. Or, for the adventurous, pastrami eggs Benedict awaits!
- Beyond the Expected: Thinly slice pastrami for a peppery arugula salad with pesto vinaigrette, or feature it on an elevated charcuterie board with artisanal cheeses and crusty olive bread.
Storage & Reheating
Fridge: Tightly wrapped in plastic or foil, your pastrami is good in the fridge for up to 1 week. Keep it sealed to fend off dryness and unwelcome fridge aromas.
Freezer: For longer love, portion and wrap individual servings, then stash them in the freezer for up to 6 months.
Reheating: Thaw frozen pastrami in the fridge overnight. To gently bring it back, steam it over simmering water for a few minutes until tender. Or, wrap it loosely in foil and warm it in a low oven (around 250°F / 120°C). Skip the microwave unless you’re a fan of rubbery meat—and, come on, who is?
More Amazing Cured Meat Recipes

Share Your Pastrami Recipe Story
If you braved the brine and came out on the other side with homemade pastrami, I want to hear about it. Leave a review, drop a star rating, and upload your proudest photo in the comments below. Whether you went oven or smoker, deli-style or Reuben remix.–David

Homemade Pastrami
Equipment
- 1 2-to-3 gallon food-safe container tight-fitting lid
Ingredients
For the brine
- 3 quarts water, for the brine
- 10 ½ ounces kosher salt
- 1 ¾ teaspoon pink curing salt, (a mixture of 6.25% sodium nitrite, salt, and a touch of red dye, also known as Prague Mix #1 or Instacure #1 or Curing Salt #1)
- 1 cup granulated sugar
- ½ cup firmly packed dark or light brown sugar
- ¼ cup honey
- 2 tablespoons pickling spice
- 1 tablespoon whole coriander seeds
- 1 tablespoon yellow mustard seeds
- 4 cloves garlic, minced
- 3 quarts total of ice and cold water, for cooling the brine
- one (3- to 4-pound) beef brisket
For the spice rub
- ¼ cup ground coriander
- 2 tablespoons freshly ground black pepper
- 2 tablespoons smoked paprika
- 4 cups cold water, for humidifying the oven
Instructions
Make the brine
- Fill a large stock pot with 3 quarts water. Add the 10 ½ ounces kosher salt and 1 ¾ teaspoon pink curing salt (it's essential to weigh the kosher salt for accuracy rather than go by a volume measure, trust me), 1 cup granulated sugar and ½ cup firmly packed dark or light brown sugar, ¼ cup honey, 2 tablespoons pickling spice, 1 tablespoon whole coriander seeds, 1 tablespoon yellow mustard seeds, and 4 cloves garlic.
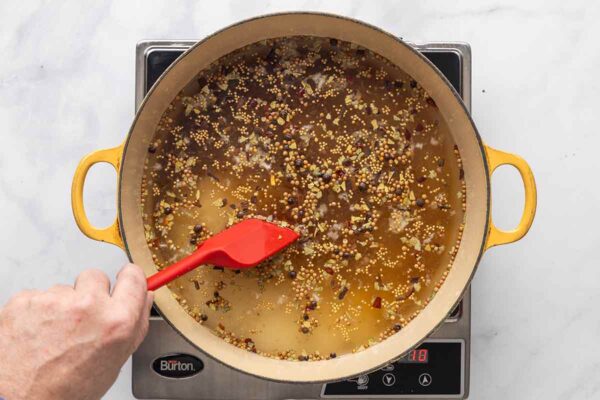
- Bring to a boil over high heat, stirring often to dissolve the salt and sugar in the fully. Immediately remove the pot from the heat once the brine boils.
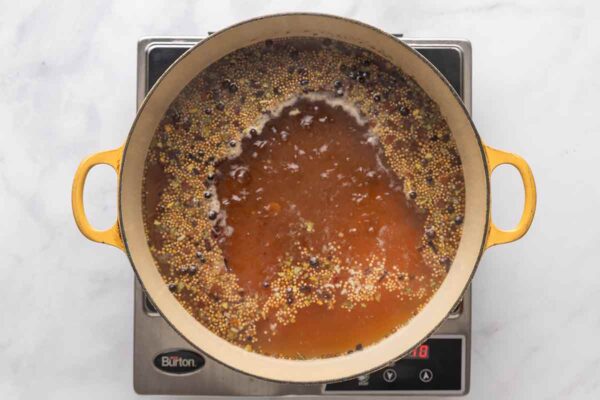
- Add the 3 quarts (12 cups) of ice and cold water to a sturdy 2-gallon (or larger) food-safe container with a tight-fitting lid that fits in your fridge. Pour in the brine. It should be instantly cool.
☞ TESTER TIP: You want a large-enough container that can fit the brisket, brine, and a plate or weight on top to keep it submerged. Don’t use disposable pans—they tend to leak and don’t keep the meat fully immersed.
- Trim excess fat from the one (3- to 4-pound) beef brisket leaving a 1/4-inch thick layer, which is important for flavor and keeping the meat juicy. Dunk the brisket in the cooled brine.
- Refrigerate the brisket for 5 days, stirring the brine and flipping the meat each morning. If any part of the brisket is touching the container (or another brisket) make sure to rotate it to expose all of the meat to the brine.
Make the spice rub
- Mix together the ¼ cup ground coriander, 2 tablespoons freshly ground black pepper, and 2 tablespoons smoked paprika in a small bowl. (Or mix together my recipe for the spice rub above.)
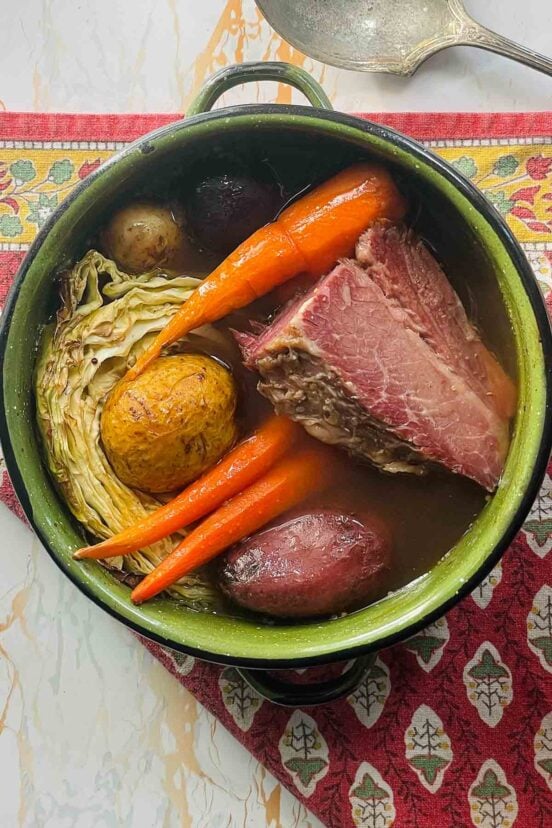
Roast the pastrami
- Remove the brisket from the brine and pat it dry. Rub 1/4 cup of the spice rub evenly on the non-fatty side, then flip the brisket and rub the remaining spice mixture onto the fatty side.
- Let the brisket come to room temperature, about 2 hours.
- Crank the oven to 300°F (149°C). Pour 4 cups cold water into the bottom of a 12-by-15-inch roasting pan. Set a wire rack inside the pan.
- Place the brisket on the rack, fatty side up. Tightly wrap the brisket and roasting pan with a double layer of aluminum foil.
- Bake until the brisket reaches an internal temperature of 200°F (93°C). This should take about 1 hour per pound, or 3 to 4 hours total. Let the meat rest for at least 30 minutes before slicing.
☞ TESTER TIP: If you want to make sandwiches, chill the pastrami in the fridge for several hours or overnight.
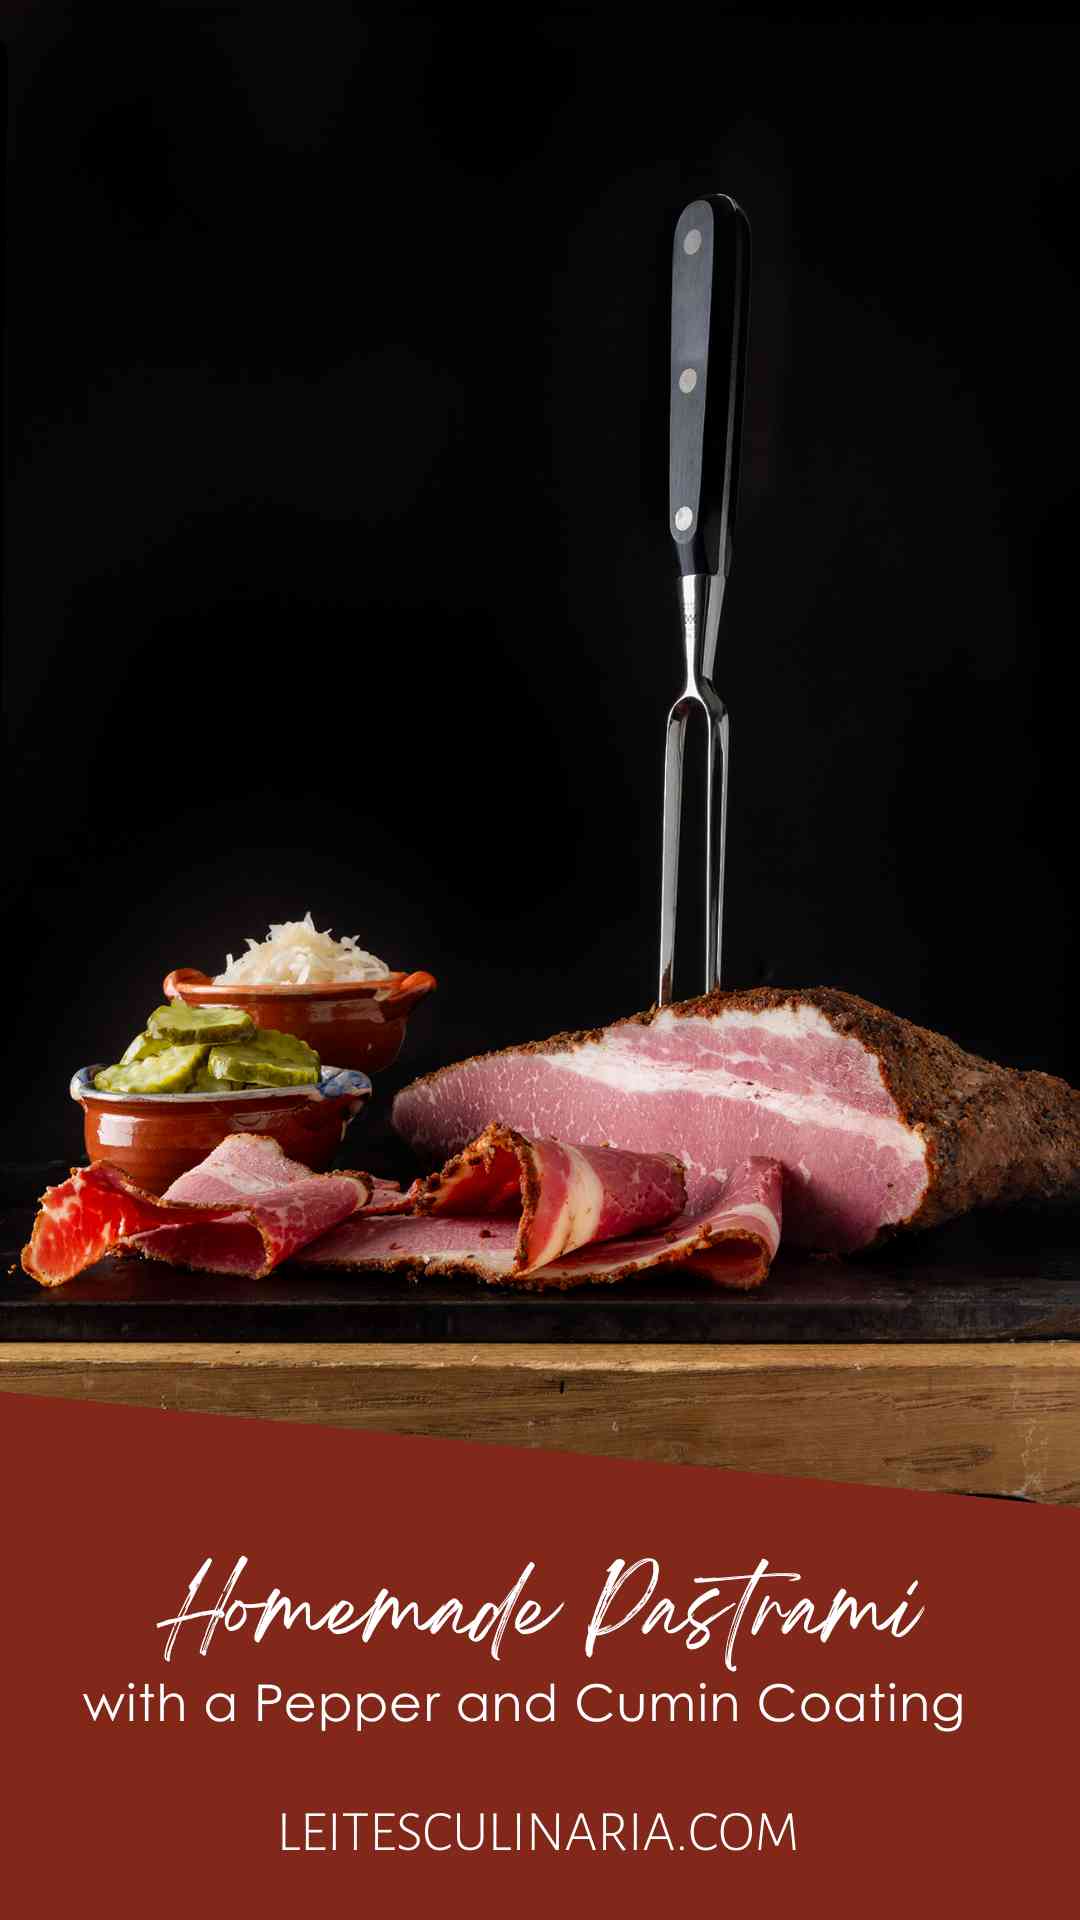
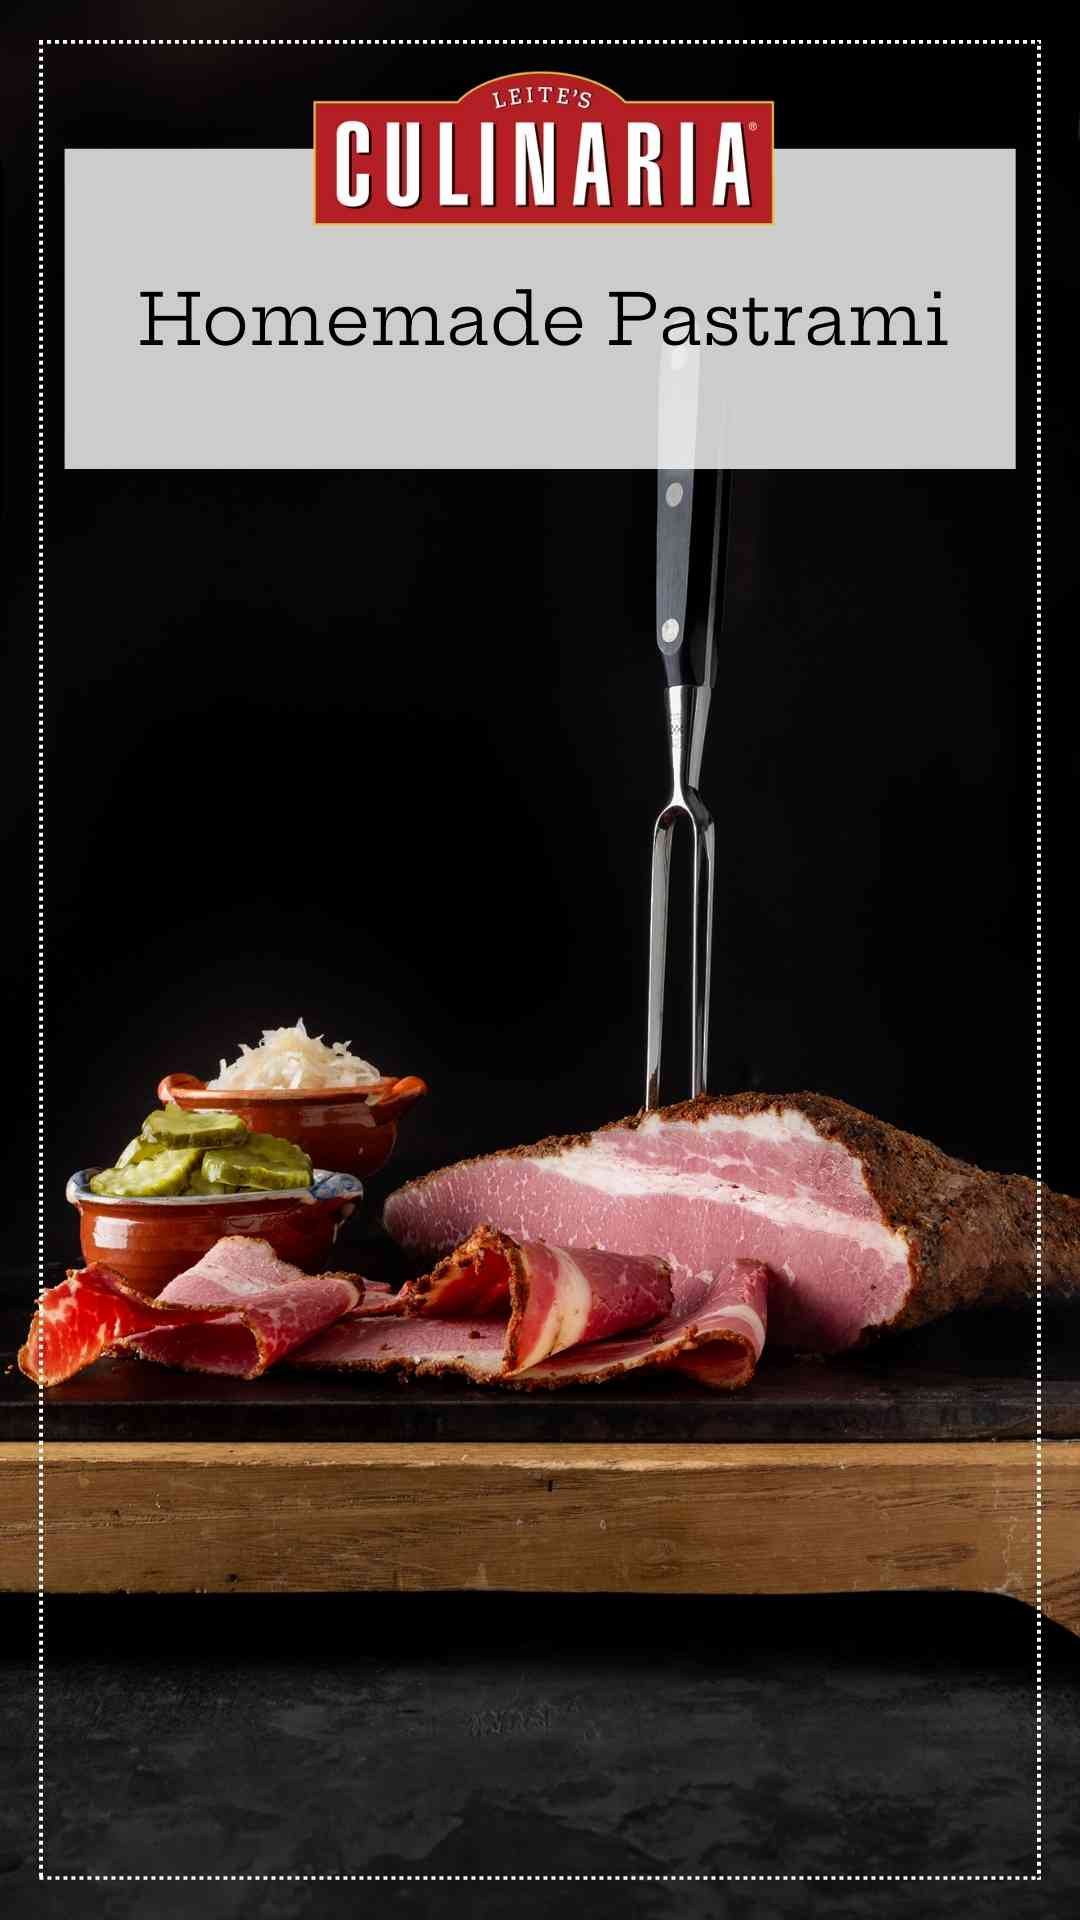
- Without trimming the fat, carve the pastrami against the grain into slices as thin as possible without the meat falling apart. Keep the meat tightly wrapped in plastic in the fridge for up to 1 week or frozen for up to 6 months.
Notes
- Time-saving tip—Save time and have your butcher trim the fat cap on the brisket to 1/4-inch (6 mm).
- Submerging the brisket—If you find it difficult to keep the brisket submerged in the brine, place something heavy (a plate of a few canned goods are great for this!) in a sealed plastic bag and set it on top of the brisket to weigh it down.
- Make it fit—If your brisket is too big to fit into the brining container in one piece, cut it in half.
- Slicing pastrami—The meat will be easiest to slice after it has cooled. If you don’t need to serve it right away, pop it in the refrigerator for a couple of hours before slicing thin.
- Storage—Pastrami can be stored, tightly wrapped in plastic or aluminum foil in the refrigerator for up to 1 week or frozen for up to 6 months.
- Dietary—This homemade pastrami recipe is suitable for gluten-free and dairy-free diets.

Explore More with AI
Nutrition
Nutrition information is automatically calculated, so should only be used as an approximation.
Recipe Testers’ Reviews
Did you know only 68% of the recipes we test make it onto the site? This recipe survived our rigorous blind testing process by multiple home cooks. It earned the Leite’s Culinaria stamp of approval—and the testers’ reviews below prove it.
Wow. Who knew making your own high-quality homemade pastrami could be so easy? This recipe made a lean, slightly spicy, smoky-tasting (from the smoked paprika) pastrami that certainly could hold its own with anything I’ve ever mail-ordered from New York. At less than $11/pound, it’s pretty economical, too (Katz’s Deli charges $12.50 a pound, unsliced, plus shipping).
Sourcing & Brining Notes
I purchased a 3 1/2-pound flat-cut brisket from Whole Foods and mixed up the brine mostly with ingredients I already had in my kitchen. The only unusual ingredient is the pink salt or Prague Powder #1, which is salt and 6% sodium nitrite. I got it online from The Spice House. I brined the meat in a large ceramic bowl (it wasn’t quite 2 gallons, but it was close enough) and weighted the meat with a plate. The brine is rather pungent, and I was glad to get it out of the fridge after the five-day brining period!
Cooking Process & Results
After removing the meat from the brine, I coated it with the spice mixture and, after 2 hours—during which time the meat came to room temperature and my daughter made three batches of cookies—I put the brisket in the oven and cooked it for 3 1/2 hours, or exactly 1 hour per pound. At this point, the thickest part of the meat was 200°F. The result was sublime: tender, spicy, and delicious.
A Note on Saltiness
My only critique is that I found it a touch too salty and wonder if you could cut back a bit on the kosher salt.

It’s pretty hard to believe that we cooked up homemade pastrami. Really. We made pastrami. Pastrami is something that you buy at a deli. But we really made pastrami.
Time & Equipment Considerations
Now, it’s not something that would be easy to make any ole time. You need time, and if you want to smoke it like we did, you need a smoker. And patience. If you have all of those things, and if you like pastrami, this is the recipe for you.
Serving & Slicing Suggestions
We liked slicing it far thinner than the recipe called for. We made an assortment of different sandwiches with the pastrami. Pastrami on rye with cole slaw and Russian dressing (where I grew grew up, this was called a “Pastrami Special”). And then there’s our version of a Reuben, with pastrami, sauerkraut, Comté cheese, and Dijon mustard on rye, grilled till golden with melty goodness.
Yield & Storage
The recipe makes quite a lot of pastrami. We’ll seal the rest in packages and freeze them so that the pastrami can be enjoyed in the future. I’m looking forward to it.

I made the oven version of this homemade pastrami recipe. I’ve had pastrami sandwiches at several of the best delis in New York City. This pastrami was very comparable in terms of flavor and smokiness.
First-Time Curing Experience
Never having cured meat before, I followed the instructions in the recipe precisely, and the pastrami turned out perfectly. Once the brine was made, it was simply a matter of turning the meat and stirring it once daily for five days.
Ingredient Sourcing Tip
I didn’t have pink curing salt in my pantry, so I ordered it online. The 4-ounce package provided enough for this recipe plus some leftovers, so unless you plan to do a lot of curing, purchase the smallest amount that is offered.
Authentic Deli Serving
To emulate the full New York experience, I served it on good rye bread with cole slaw and Russian dressing and some steak fries and pickles on the side. It was good to know that I can pretty much recreate that experience in my own kitchen!

Pastrami isn’t exactly what I’d call part of my native cuisine. In fact, I can’t say for sure whether I’d ever even eaten it before making this recipe. But I have brined a lot of meat and smoked a lot of meat, and I think I know what’s good. This was good! Just to be sure, I took it to a party with a bona fide New Yorker present to see if it met with his approval. His response was, “Apparently, I’ve been buying crappy pastrami all my life.” Everyone raved about it.
Curing Salt Clarification
I’d like to add a clarification on the ingredients. There is also a curing salt #2 out there, which contains sodium nitrate in addition to sodium nitrite, and that is not what you are looking for. You can buy curing salt #1 online from shops that cater to home sausage makers and hunters, as well as on Amazon.
Pro Tips for Smoking Pastrami
The authors don’t give much direction on how to smoke the meat, but I’ll add a few tips. When smoking brisket, whether for this recipe or anything else, you want to smoke it with the fat cap facing up the whole time. Don’t flip it. If you’re using an offset smoker with the firebox to the side, you may want to rotate the brisket 180 degrees during the cooking–but don’t flip it. The spice rub was perfect. No, it doesn’t need salt, as it’s soaked up plenty from the brine.
Creative Serving Ideas
I served this at home as a pastrami version of a Reuben sandwich. For the party, I made a sort of pumpernickel flatbread and let people top it with either Reuben toppings or just mustard and pickles, whichever they preferred. Leftovers went into a potato hash, which would make a nice breakfast with an egg on top. And I’ve seen a recipe for a pastrami eggs Benedict, which is calling my name—lots of good stuff to do with this delicious smoked meat.
Since real pastrami is unavailable where I live, I’ve been looking for an excellent homemade pastrami recipe for a long time. Needless to say, I was thrilled to try this recipe.
Dual Cooking Methods: Oven vs. Grill
I had a very large brisket (about 7 to 8 pounds), so I cut it in half and made half in the oven and the other half on my gas grill. I’ve pickled briskets many times in the past, and this recipe is pretty straightforward. I pickled the brisket for 6 days, then cut it in half and followed the instructions exactly.
Oven vs. Grill Comparison
The pastrami that I cooked on the grill was much tastier than the one baked in the oven. I thought the oven-baked one was okay but didn’t compare to the grill-cooked one. The grill-smoked pastrami smelled better, tasted better, and was more tender.
Brisket Fat Cap Reminder
I also think it’s important not to use a lean brisket. Look for—or ask your butcher for—a brisket with a 1/4-inch layer of fat on top.


I just tried this and sadly, it was a fail, for us due to excess saltiness. I’m not sure where we went off the rails, maybe in the brine. It sat for an extra day. And we don’t have kosher salt here, so I had to estimate equivalent amount of the local sea salt which is somewhat finer, closer to table salt in crystal size. The pastrami flavor was good, as much as I could taste through the wall of salt. We smoked it with cherry wood chips. Rested it over night in the ref. We heated it in the oven until it got to 199F – 202F (depending on where you took its temperature). The exterior looked good, the interior nicely cured, perhaps not quite the rich red of the photo above.
I was hoping this would be the faster pastrami approach. I have another batch of pastrami curing at the moment. It is done using the EQ curing approach. It takes a lot longer, but there is no chance of over-saltiness. I may try David’s again if I can sort out the saltiness problem. It does look like a promising approach.
I’d suggest adding the salt’s weight to the recipe. It is very easy to convert different types of salt by weight while doing it by volume is always a bit iffy.
Steve, I’m so sorry that you had a problem. I think the issue is twofold: 1.) The salt. You may have used too much. 2.) The extra day of brining.
But you raise a good point about adding weight to the salt amount, which I will do.
I agree, the salt conversion was likely it, even though I reduced the amount due to the difference in crystal size. I used 3 liters of water, which is very close to 3 quarts. We will do it again in a bit. I will adjust to your new weight figure, brine for no more than 5 days and possibly 4 if I inject the meat.
We did cook this sample to 199°F to 202°F (depending on where we took the temperature) in a covered roasting pan. It was still a bit tough in terms of pastrami. But when I put it in a steamer for an hour and a half, it really softened up. I highly recommend steaming the finished product if there is any issue with that aspect.
Thank you for your reply and we will stick with it.
Steve, do let me know how it turns out.
The majority of wet brines for pastrami call for a water soak afterwards to remove the salt (8 hours or so with water changes). Brine for 3 to 5 days, soak in water for 8 hours or so then, run, etc.
David….I am using an already brined brisket that you buy in the store with the little packet of pickeling spices…I know its pretty salty, so I soaked it in pure water for 5 days…changing the water every other day to purge some of the salt out….on the last 2 days of soaking before cooking. I made the actual brine that the recipe calls for and soaked it for another 2 days. I will be making this tomorrow…on an electric smoker…using apple, cherry, and alder wood. Do you think that it will be ok without using the pink salt?
Tim, I always use pink salt as a precaution, and the amount ingested is so infinitesimally small. If you don’t use it, the meat will be an unappetizing gray. I say use it just to be safe and for aesthetic reasons. The myth that nitrates/nitrites cause cancer has been discredited.
I used a 4lbs brisket and the flavor was great. But it seemed like the pink salt didn’t penetrate the meat entirely and I had a grey center. Do I need more of the pink salt or should I maybe add an additional day of curing?
Roman, if a piece of brisket is particularly thick, that can happen. That happened to me the first time I made it. Next time let it sit a day more. Glad you liked the recipe!
I made the home-oven pastrami for the first time and let the brisket brine 7 days, yet it still had a slight gray center. I used Prague powder/ instacure #1 instead of pink salt, which I could not locate in my area. Should I still have let it brine longer and if so, how long can I safely leave the meat in the brine? Thanks in advance!
Sandra, it’s all about the thickness when that happens. There nothing wrong about having that, but it doesn’t look “right,” I know. Seven days should be more than enough. I wouldn’t suggest going longer. Next time, make sure the meat is a more even thickness.
Thank you David. I will ask the butcher for a thinner cut next time. Regardless of the tiny bit of gray, the flavour is amazing and I’ll be making a Reuben once my pumpernickel is out of the oven 🙂
Wow, Sandra! You’re hardcore. Homemade pastrami and homemade pumpernickel. Superb.
The easiest fix is to pick up a meat injector and just inject some of the brine into the meat. You’ll probably want to inject about 10% of the weight of the piece of meat. So if you have a 4 lb slab of brisket, you’ll want to inject about a cup of the brine into the meat, focusing on the thicker parts. (The meat will puff up as you inject the brine.) Also, if you feel the not fatty side of the brisket you’ll feel denser spots, often under silver skin. In my experience, these were often the problem spots.
Also, make sure you trim the fat to 1/4 inch and that you’re rotating the slab once or twice a day and that it’s fully submerged, preferably not leaning up against the edges of the container too much.