
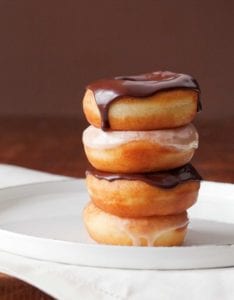
Glazed doughnuts. Everybody loves ’em. Even when seemingly everyone is paleo this and gluten-free that, you rarely see someone refuse a glazed doughnut. Especially when they’re homemade, hot from the oil, and taste just like the old-fashioned kind you remember from childhood. This particular recipe turns out doughnuts that aren’t quite as airy as Krispy Kreme doughnuts, but we don’t think that’s a bad thing. The doughnuts are less sweet than most, which means you can drown them in glaze and they still won’t seem cloying. Talk about our kinda doughnut. [Editor’s Note: Seriously. I can’t stop eating these doughnuts. This note may have been typed impatiently and one-handedly while attempting to lick drippy doughnut glaze from fingers and wrist before it plummets to certain disaster onto my laptop.]–Renee Schettler
Active dry vs. instant yeast
To make her doughnuts so wildly fluffy, author Lara Ferroni relies on a higher proportion of yeast than one would expect. A neat 3 teaspoons of active dry yeast, to be exact. You could substitute instant yeast but you’ll need to carefully reduce the amount, explains recipe tester and baking guru Cindi Kruth. Instant yeast is what’s now most readily available in larger packages, SAF and Red Star being the most common brands you’ll find at big box stores and supermarkets. At only $3 or $4 a pound, this is by far the cheapest way for home bakers to buy yeast. Kruth made these using 2 1/4 teaspoons instant yeast in place of the 3 teaspoons active dry, and she was quite, quite pleased.
Glazed Doughnuts
Ingredients
For the doughnuts
- 3 teaspoons active dry yeast or 2 1/4 teaspoons instant yeast
- 1 cup whole milk, heated to 110˚F (43°C)
- 2 to 2 1/2 cups bread flour, plus more for the work surface
- 2 tablespoons superfine sugar, (or just blitz granulated sugar in a blender until finely ground but not powdery)
- 1/2 teaspoon salt
- 1 teaspoon vanilla extract
- 3 large egg yolks
- 4 tablespoons unsalted butter, at room temperature
- Vegetable oil, for frying
For the basic glaze
- 1 1/2 cups confectioners’ sugar, sifted to remove any lumps
- 3 to 4 tablespoons milk or water
- 2 teaspoons vanilla extract, (optional)
For the chocolate glaze
- 1 1/2 cups confectioners’ sugar
- 4 tablespoons cocoa powder
- 2 tablespoons milk or water
- 2 teaspoons vanilla extract, (optional)
Instructions
Make the doughnuts
- In a medium bowl, dissolve 2 teaspoons of active dry yeast (or 1 1/2 teaspoons of instant yeast) in 3/4 cup warm milk. Stir in 3/4 cup of the flour to create a smooth paste. Cover and let rest in a warm spot for 30 minutes.
- Combine the remaining warm milk and yeast in the bowl of a stand mixer fitted with the paddle attachment. Add the flour mixture along with the sugar, salt, vanilla, and egg yolks. Mix until smooth. Turn off the mixer and add 1/2 cup of the remaining flour. Mix on low for about 30 seconds. Add the butter and mix until it becomes incorporated, about 30 seconds. Switch to a dough hook and, with the mixer turned off, add more flour, about 1/4 cup at a time. Knead the dough on medium speed between additions until the dough pulls completely away from the sides of the bowl and is smooth and not too sticky. It will be very soft and moist, but not so sticky that you can’t roll it out. (You may have flour left over.) Cover the bowl with plastic wrap and refrigerate for at least 1 hour and up to 12 hours.
- Line a baking sheet with a lightly floured dish towel. Roll out the dough on a lightly floured surface to 1/2 inch thick. With a doughnut or cookie cutter, cut out 3-inch-diameter rounds with 1-inch-diameter holes. (Note: If making filled doughnuts, clearly, don’t cut out the holes.) You can re-roll the scraps and cut out additional holes.
- Place the doughnuts at least 1 inch apart on the baking sheet and cover loosely with plastic wrap. Let rest in a warm spot to proof until they almost double in size, 5 to 20 minutes, peeking every five minutes. To test whether the dough is ready, touch it lightly with a fingertip. If it springs back immediately, it needs more time. If it springs back slowly, it is ready. If it doesn’t spring back at all, it has over-proofed, in which case you can punch it down and re-roll it once.
- While the doughnuts are proofing, heat a heavy-bottomed pot with at least 2 inches of oil until a deep-fat thermometer registers 360˚F (182°C). With a metal spatula, carefully place a couple of doughnut holes or doughnuts in the oil, being careful not to crowd the pot. Fry for 1 to 2 minutes per side, until light golden brown. Remove with a slotted spoon, drain on a wire rack over a paper towel, and let cool slightly before glazing. Repeat with the remaining doughnuts and holes, keeping the temperature consistent.
Make the glaze
- Whichever glaze you’re making, place the sugar (and cocoa powder, if relevant) in a bowl and slowly stir in the milk and vanilla, if using, a little at a time, to make a smooth, pourable glaze.
Glaze the doughnuts
- Pour the glaze into a shallow bowl. Dunk the doughnuts, let any excess glaze drip off, and then transfer them to a wire rack placed on a baking sheet or over a sheet of parchment paper to rest until glaze sets. (Who are we kidding? We know these glazed doughnuts are going straight from bowl to gaping mouth.)
Explore More with AI
Nutrition
Nutrition information is automatically calculated, so should only be used as an approximation.
Recipe Testers’ Reviews
Did you know only 68% of the recipes we test make it onto the site? This recipe survived our rigorous blind testing process by multiple home cooks. It earned the Leite’s Culinaria stamp of approval—and the testers’ reviews below prove it.

These glazed doughnuts were delicious. Not only that but the recipe was easy and quick—very quick, considering they’re yeast-raised doughnuts. With no initial rise before shaping, except for what would occur in the fridge during the one-hour rest, I expected the doughnuts to be somewhat dense. But the doughnuts rose to double their initial size in the 20 minutes that the recipe noted. I used instant yeast, so I adjusted the amount to 2 1/4 teaspoons—the standard 75 percent conversion—which was just right. Once fried, the doughnuts were delightfully light and perfectly risen. You won’t want to waste any of the dough, so fry the odd-shaped leftover pieces as well. My class devoured them in a matter of minutes. Everyone loved them. The glaze comes together in a flash, but use it right away as it dries quickly when sitting. I found that simply dipping the tops of the doughnuts into the glaze was quicker and less messy than pouring. Also, keep the frying oil between 360 to 365°F (182 to 185°C). If the oil is too hot, the doughnuts will appear done on the outside, but they won’t have fully cooked on the inside. If the oil is too cool, they can end up greasy.
It’s hard to find an argument against glazed doughnuts. It’s certainly easy enough to find store-bought ones, but you’d be missing out. Don’t be intimidated by the use of yeast in this recipe—the dough is easy to make, especially if you have a stand mixer. The dough looks flat when you cut out the shapes, but it puffs up nicely in the hot oil. I glazed mine with the chocolate glaze and next time will make a pastry cream filling to really make this an over-the-top treat.

This is a fabulous glazed doughnut recipe that works perfectly as written. These are light and cakey and not super-sweet, even with the glaze. They’re easy to prepare and can be eaten plain after cooling or being dipped in a glaze—I dipped them in the basic glaze and let them drip for about 5 seconds before setting them on a wire rack to dry.
These aren’t Krispy Kreme doughnuts—the light, airy kind that you can eat six of and not even flinch. My doughnuts had a bit of a crust. However, they were still fluffy, and they were gobbled up as soon as they emerged from the hot oil. These doughnuts don’t keep, so eat them fresh! TIP: After mixing the dough, it may seem sticky, but if you touch it with your finger, you’ll see that it’s just moist. Also, after cutting the doughnuts out, place them on a floured cloth. I put mine on parchment and, after rising, they stuck so much that I had deflated doughnuts going into the hot oil. The doughnuts themselves aren’t sweet (as the recipe notes), so I do recommend a glaze. I also highly recommend making filled doughnuts: I had some blueberry preserves in the fridge, so I used a piping bag and the largest tip I could find to fill them. Iced with leftover cream cheese frosting, they were delicious.
This recipe is very easy to follow. The dough came together easily and I let it rest in the refrigerator overnight so we’d have fresh doughnuts for breakfast. (Chilling the dough is very important, so don’t skip that part or the dough may be too sticky to roll out.) I made the basic glaze in a shallow bowl and dunked the warm doughnuts in it. I also made cinnamon sugar to use on some of the unglazed doughnuts and those were delicious, too. A great breakfast for a Sunday morning.
I chose to make these glazed doughnuts because I had hoped to find a Krispy Kreme taste-alike recipe. While this particular one didn’t fit that bill, they were still wholly worth making. I dunked the doughnuts in the basic vanilla glaze after they’d cooled for about 2 minutes. The glaze worked well with the yeasted dough to make a filling, sweet treat.


hi i’m ted. i like donuts.
Hi Ted. We like that you like donuts. We like donuts too. You definitely came to the right site….
I apologize for the length but I’ve got some questions before I attempt this recipe. I’ve tried other doughnut recipes that came out greasy or just not quite right so I’m eager to try yours.
I am confused about substituting instant yeast for active dry yeast. The Red Star Yeast website says:
“The difference between the two yeasts is the particle size. The instant yeast is sold to consumers as RED STAR Quick Rise and RED STAR Bread Machine Yeast. The instant yeast is a ‘fast rising’ yeast, and is dried to a smaller particle than the ‘regular’ Active Dry Yeast, hence they activate faster and subsequently raise the dough faster.
In traditional baking (hand kneading or stand mixer), the two can be used interchangeably, one for one. The difference will be that with the ‘fast rising’ yeast, the rising times for the dough will be shorter, up to 50%. Visit our Lessons in Yeast in Baking section for information on rising and the ‘ripe test’.”
http://www.redstaryeast.com/tips-troubleshooting/frequently-asked-questions
I’m wondering if the greater amount of yeast is needed because you’re proofing the yeast in milk and the fat from the milk inhibits yeast activation? If that’s the case, can you proof a lesser amount yeast (1 1/4 tsp of active dry yeast) in maybe 1/2 – 3/4 cup of warm water then add in enough milk to equal the amount of milk originally called for? I’m not crazy about a very yeasty dough taste.
I also wonder about the use of bread flour instead of all purpose flour. Have you found that the bread flour gave more structure to the doughnuts?
And lastly, have you found that vegetable oil is better than peanut oil for frying doughnuts? Some recipes specify peanut oil and I’ve wondered why. In addition, many recipes call for the oil to be at 375 degrees. Why have you chosen the lower temperature in your recipe?
I’m looking forward to making these with my nieces during an upcoming stay and appreciate your input before I start the recipe. I’m sure my nieces will eat them regardless but if I’m going to use up my calories I’d like them to be as good as possible. 🙂
Hi Amy, sit tight- we’re going to see if we can get some answers for you.
Hi Amy,
I have not tried the recipe with instant dry yeast, so I can’t make specific tested recommendations, but I would say follow the substitution recommendations on the package. In most cases this will be less instant yeast than called for.
The doughnuts will rise just fine with warm water instead of milk, however, I think they lose a bit of the rich dough flavor as you substitute.
The large quantity of yeast calls for makes the rising process pretty fool-proof, but if you are comfortable working with yeast doughs, you can use about 1/2 the amount of yeast and then proof a bit longer and you should still get great, fluffy results.
For the flour, I found that the bread flour makes the doughnuts lighter while they are a bit more bready with all purpose… I’m not a food scientist, but your theory that the added protein in the bread flour gives more structure, thereby allowing the dough to expand more and trap more air as it fries makes sense to me. You can use all purpose, but I do think you’ll see a difference between the two. I typically use King Arthur Bread Flour.
For the oil, peanut oil has a higher smoke point than some other oils. The key to a good oil to fry in (doughnuts or anything else) is the higher smoke point. I typically use safflower oil, as it has a nice clean taste. I don’t really like canola oil for frying doughnuts… sometimes it gives a fishy flavor, depending on the how refined it is. Peanut oil can work great, but then you have to worry about folks having peanut allergies… so I tend to avoid using it for that reason.
While it’s still fine to fry doughnuts at 375F, I find that they work great at 360 just as well and as the oil heats the temp will vary. Over 375 and the doughnuts may cook too quickly on the outside and be a bit raw on the inside. So at 360, you can deal with the oil fluctuations up and down without a problem. Below 350F and above 375 your doughnut quality may not be great.
I hope this all helps!
Lara
Lara, many, many thanks for the swell advice as well as the swell doughnut recipe!
Dear Lara and Renee,
Thank you for all of that information. I’m definitely going to give your recipe a try.
I bought some instant dry yeast just in case I would need that but think I might just stick with my active dry yeast for this recipe (it’s what I normally use). I may make a recipe of the doughnuts using the lesser amount of yeast before my nieces get here and see how it works. If I don’t get good results I’ll go to the larger amount of yeast. I’ll also use the milk as your recipe calls for.
I LOVE King Arthur flour. As a matter of fact, I don’t use anything other than King Arthur. I always get consistent results with their flour.
Thanks for the information about the oil (and temperature) too. I did some internet digging between the time I posted my questions and your reply and read that because of the way peanut oil is refined it does not cause people with peanut allergies problems. The proteins in the peanuts are removed. I can only assume that information is correct. Since no one in our family has a peanut allergy, I may try it. If it’s prohibitively expensive, I’ll decide between the vegetable oil and safflower oil.
http://www.peanut-institute.org/eating-well/allergy/peanut-oil-no-allergens.asp
Again, thank you for taking the time to address all of my questions.
I’m sure my nieces will thank you too!
Sincerely,
Amy
Yes, many thanks, Lara! And Amy, please let us know how it goes….
Can I double this recipe?
Hi Linda, I’m always reluctant to double baking recipes and would be inclined to make two batches. Let us know if you make them!
There should be absolutely no problems with scaling the recipe up or down. I regularly scale any number of bread, biscuit, cookie and cake formulas without mishap. There is a caveat; it is absolutely foolish to measure any baking (Yeah, I know this is fried, but the rule applies to donuts, fritters and fried pies, too.) recipe by volume. You must weigh your ingredients. There is no other sane way to measure. I have, after buying all too many books that used volume measures, settled on the requirement that measures be in weight, even cookbooks. There is too much variation otherwise.
The volume of flour in this recipe could range from ~220g to 325g depending on just simply how one measures; scoop and level, spoon and level or sift and level. All are accepted practices and all are wrong. Though, sift and level is the more consistent.
Determine the weight of each ingredient based on your own optimum volumes and write it down. Once the weights are establlished, scaling is child’s play.
gary, I’m with you. With weights, it’s easy to scale up or scale down a recipe. The problem is two-fold, as I’m sure you know:
1. This recipe isn’t in weights.
2. Folks in the U.S. are very, very reluctant to weigh ingredients.
Number 2, as you can imagine, is the biggest obstacle.
1. Very true, but wouldn’t it help to change issue #2 to publish recipes with weights included? Think of it as a teaching moment. 😉
2. Oddly, in the 1st half of the 20 century and before, nearly all homes had a set of kitchen scales, often two. One for most things, coffee, flour, sugar, meats, etc. and another smaller scale for seasonings. I suppose things started changing after WWII with young marrieds lacking basic kitchen tools and the advent of prepared mixes and frozen dinners.
cheers,
gary
Gary, ABSOLUTELY! When we find recipes with weights we always published them along with the volume measures. And, as a matter of fact, I’m adding weights to a pancetta recipe on the site this morning. And I had made a decision that any baking recipe of mine will include weights. I find it so much easier.
I don’t know why America turned away from the scale, but so much happened to cooking after the war, that I think you may be right.
Gary, as David mentioned, we always include the weights when a recipe includes them and when creating our own recipes. It’s a little tricky to impose weights on a recipe that only includes those silly American measures because of the variability of the measure. We test the recipes to ensure that it works to a faretheewell, but we’re hesitant to add our own weights because of small variances that can make a big difference, for example, the discrepancy in the density of flours experienced by readers in Australia versus Europe versus America. So we perpetuate the sin, I’m sad to say, just so as to not compound the problem. Does that make sense? But we are trying to seek out more and more only recipes that offer weights, because we completely agree with you. A teaching moment, indeed. Appreciate you taking the time to comment.