
Is there anything easier or better than roasted garlic? We think not. Three ingredients. Almost no effort. But wow. And we know, we know, we know what you’re thinking. This isn’t actually a recipe. And you’re right. It’s a technique. But it’s not just any technique. It’s a certifiably foolproof technique that turns out tender, creamy garlic so luscious you want to slather it over everything in sight. Just wanted to be clear about that.–Renee Schettler Rossi
Roasted Garlic
Ingredients
- 1 head garlic
- 1/8 teaspoon kosher salt
- 1/4 teaspoon extra-virgin olive oil
Instructions
- Preheat the oven to 350°F (180°C).
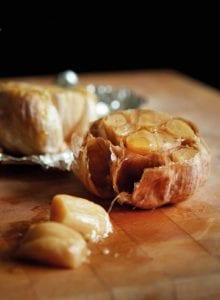
- Cut just enough of the top from the head of garlic to expose the inside of each clove. This will probably be about 1/4 inch (6 mm). Place head on a sheet of foil. Season with salt and olive oil, wrap the foil over to seal, and place it on a rimmed baking sheet. Roast until the garlic is tender, 45 to 60 minutes, depending on the size of your head of garlic. The garlic is done when you pierce the foil with the tip of a paring knife and it meets little to no resistance.
- Let the roasted garlic cool slightly prior to unwrapping the foil.
Explore More with AI
Nutrition
Nutrition information is automatically calculated, so should only be used as an approximation.
Recipe Testers’ Reviews
Did you know only 68% of the recipes we test make it onto the site? This recipe survived our rigorous blind testing process by multiple home cooks. It earned the Leite’s Culinaria stamp of approval—and the testers’ reviews below prove it.
What a magical ingredient. I urge everybody to make several bulbs each week and slather it on or mix it into everything. It couldn’t be easier to make—a quick slice, a drizzle of oil, a pinch of salt, wrap it up in tin foil, and pop it in the oven.
I used 2 small heads garlic, each roughly the size of a large plum. They took about 45 minutes to get soft and delicious. I was able to tell that they were done when they gave easily when squeezed with tongs. I let them cool for about 15 minutes before unwrapping and squeezing that amazing garlic paste from the cloves.
I find roasted garlic tends to keep pretty well in a container in the fridge, and topping it with some olive oil doesn’t hurt, either. Just 5 minutes prep and 40 to 45 minutes hands-off time in the oven makes this a project worth mixing into the routine. I’ve spread this glorious mush on toast, mixed it into pesto, stirred it into pasta sauce, and more.
This is a great guide to making roasted garlic. My garlic roasted away while I was baking potatoes and they were done at the same time. I could tell the garlic was done due to the aroma wafting through the air.
I kept the whole garlic in the refrigerator and family members grabbed whole cloves to smear on whatever they desired. This is a reliable method for roasting garlic.
Everyone should have a roasted garlic recipe in their repertoire. This recipe was so easy, although in the future I’d make a lot more garlic if I’m turning the oven on for just this.
We usually just put oil on it but the addition of the salt upped the flavor. I suppose this would keep for a few days in the fridge but it was so delicious we ate it up right away.

The smell of roasting garlic is my favorite smell to waft from the kitchen. No matter what the sweet cloves of roasted garlic are destined to be used for, they are undeniably delectable. Such a simple thing to make, but including roasted garlic in any recipe really steps up the recipe to a whole other level.
Some of my favorite ways to use it include simply spread on toasted bread, added to sauteed spinach with a touch of lemon juice, spread on the bottom of a savory tart, even added into a compound butter to be used under the skin of a roasted chicken. This recipe was simple and to the point. My head of garlic (which was medium-size) cooked in 45 minutes. I recommend that once you begin to smell the garlic from the oven, it needs to be checked. And yes, once I smell the garlic, I pierced a clove with a sharp knife and if it is very soft, you know it is perfectly roasted and sweet. I kept the head wrapped in the foil in a small ramekin for a couple of days. This stuff doesn’t last long in my house, though! It is irresistibly tasty.
At 45 minutes, I pulled the garlic out to check for doneness. I unwrapped the garlic. It was gooey and browned in some areas, but the middle cloves were not tender to the point of the knife. I continued checking every 7ish minutes, and the garlic was roasted fully at around 1 hour. I finished the roasted garlic within 4 days, and it tasted as great on day 4 as it did fresh from the oven. I will say, the Tupperware I stored it in will never not smell like garlic again, though!

This is about as simple as it gets. Cut the top off a head of garlic, place it on a piece of foil, sprinkle with salt, drizzle with olive oil, wrap and bake. Mine was done in 40 minutes. I did not need to stick a knife through the foil. I could tell that my head of garlic was done by the softness I felt when I took my foil packet out of the oven. Can’t get much easier than that.
I used some of the roasted garlic to make a big batch of hummus and the rest to make mashed potatoes. I tend to make this when I need it since it is so easy to make, rather than make it and let it sit in the refrigerator, where I tend to forget about it, and then find it days/weeks/months later.

This may not be a recipe per se, but it’s a great reminder about the wonders of simple roasted garlic and how easy it is to make.
I roasted a head of green garlic (aka spring garlic) which is the young or immature version of the cured or dry garlic normally found in grocery stores. It’s early summer and green garlic is plentifully available in every farmers market I’ve recently visited, both in Chicago and in Washington, DC. I used heavy-duty foil to wrap my garlic and roasted for 50 minutes to start. To check on it, I unwrapped it just a bit, took a look, and saw no reason not to go for another 10 minutes. It was soft and lovely after 50 minutes and just a bit more so after the full hour. I cooled for 15 minutes, and then unwrapped fully.Hands-on time is less than five minutes, and then cooking and cooling about an hour and a quarter, plus about 15 minutes for pre-heating the oven, so it’s best to plan a little bit ahead for your roasted garlic needs.
While it roasted, the aroma was fragrant and gentle, and I had time to think of what I might do with this. My first nibble was off the tines of a fork. Delicious, tender, yes, creamy, yes, and ready to slather, yes. If I had a cracker handy, that would have been the next taste. After that, well, there are 1,001 possibilities! Use it as you would use regular garlic and this will add an extra-special roasted and simultaneously more gentle garlic flavor. Therefore, marinara sauce, pizza sauce, atop pizza, in salad dressing, in soup, atop soup, in potato salad, in pasta salad, in compound butter, atop garlic bread, in onion dip, in spaghetti aglio e olio, in stir fries, in rice dishes of all sorts, atop sautéed or roasted vegetables, in quiche or tarts, as a condiment or with a selection of olives and pickles to accompany hors d’oeuvres or a cheese tray, in sandwiches, traditional or to garnish a Scandinavian open-faced sandwich, as a garnish atop mashed potatoes, or in a potato gratin, in macaroni and cheese, speared on a toothpick as a Bloody Mary garnish, in mayo, in cream cheese, in pasta primavera…
I made one head, and I love the idea of making multiple at a time, which brings to light the question of how long it keeps? I actually have no idea, as the one head is long gone at the first serving. Additionally, however, one of the wonderful features of having used green garlic is that the green stalks are also useable, and so I had the added benefit here of not only the gentle – and even gentler roasted garlic – plus the tender and delicious stalks to enjoy! My green garlic roasted to a less browned finish, and there was virtually no paper to remove, since it was younger.
Simple and soooooo good, but our garlic only took 25 minutes to roast in our toaster oven at 350°F. My garlic weighed 1.25 ounces and instead of wrapping the bulb in foil, I placed the bulb in a ramekin and covered the ramekin with foil. That way it was easy to see and test when the cloves were done. We squeezed out the delicious garlic goo and smeared it on buttered toast to make a garlic lover’s garlic toast. Served with spaghetti and giant meatballs and a Virginia cabernet franc.

I’m not sure I’ve ever used a recipe to make roasted garlic and I’m really glad to have one! Roasted garlic takes about 30 seconds to prep—even less time if you skip the salting, which I will do from now on—and just about 50 minutes for a head that’s smaller than a baseball but larger than a golf ball and weighing about an ounce and a half. I didn’t wrap the foil tightly around the garlic, rather I just pulled up all 4 corners and scrunched them together leaving room to steam a bit.
When the time was up, I stuck a thin knife through the foil to see if the cloves were tender. Usually I end up sticking the knife the whole way through the foil!
The next time your oven is set to 350°F for any reason, throw in a head or 2 of garlic. Your tuna salad on toast and mashed potatoes will thank you.

This recipe works very well. It takes about 1 minute to prepare and 50 minutes to roast. I had a relatively small bulb, which weighed 2 ounces. To test for doneness, I always open up the foil pouch and look for a nice, caramelized color. I also poke one of the cloves with a knife and check for a soft texture. Once the bulb is done and cooled slightly, you can squeeze out the pulp and use it for a variety of purposes. I like to add it to mashed potatoes or spread it on a piece of crusty bread or a sandwich.
I always thought that roasted garlic was an amazing addition to just fall soups and stews. Was I wrong and was I happy to be wrong! I tried it with the steak, and with a toast with sardines and tomato-onion salad. To both dishes, this roasted garlic was a perfect compliment. It was done at 40 minutes when the aroma was filling my kitchen.
This is a great basic recipe that everyone should have in their back pocket. It takes about 10 seconds of effort, tastes amazing, and can be used a million different ways. I roasted just one bulb, which was 95g and 2 1/2 inches across where I cut the top off. I left it in for the full 60 minutes, but this is a forgiving process so if I’d pulled it out a bit earlier it would have been fine.
The first thing I did was to stir a couple of cloves into some plain Greek yogurt with lemon zest and juice, parsley, salt and pepper. Served with grilled meat, amazing. I also smooshed some into sauteed spinach, and just smeared it on bread for a snack. But these were all a departure from what we usually do with roasted garlic—mix the entire bulb with soft goat cheese, parsley, and toasted pine nuts, and serve it with crackers.
This kept in the fridge for about four days—might have gone longer but we finished it!
If you can call garlic seductive, roasted garlic is just that. The scent as it’s caramelizing is irresistable. Sweet and pungent, permeating every room, it invites you to dinner. The spicy raw fragrance from the cut garlic bulb transforms into a mellow, creamy, and sweet bitter richness when taken out of the oven. This recipe is simple yet makes you seem like a chef with secret knowledge when you add this to your sauce, butter, or as a spread for toasted bread drizzled with olive oil. It also makes a luxurious substitute for butter on your pasta.

This is a product you must always have in your fridge. You can use it to spread on toasted bread, to stir in the juices of roast pork butt or lamb, on mash potatoes, as a condiment to dressings, even in soups. The roasted cloves slip out very easily with one little squeeze and you get a soft and spreadable paste, that can be stored in the fridge, in an airtight jar, with its surface covered by a thin layer of olive oil, for 1 or 2 weeks.
You can add thyme or bay leaf to increase flavor. After opening the foil to expose the garlic, it took 7 minutes to roast until golden brown. The exact time depends on the oven. I used it in mashed potatoes and in a tomato soup.


While I haven’t made this exact recipe, I wanted to share something similar that I make that is much easier and less messy. I just bake loose garlic cloves (I can buy these quite easily at any Asian produce market and if I don’t find them, I peel the cloves myself) in oil for about 45 minutes to an hour at 300-350 deg – put enough oil to cover the garlic. I then mash them and optionally add lime juice (or not). Sometimes I add lime juice to all of it or only half of it. I also add enough kosher salt to ‘preserve’. The end result is just delicious. The garlic need not be mashed either. Once cooked, it is soft like toothpaste and sweet and nutty and can be used with anything . I wanted to share this as an option. I do not like cooking in foil and I find that using the whole garlic means there is often wastage as the entire clove does not pop out seamlessly. I hope you will try this alternative method. Equally delicious and fantastic.
Sagar! Thanks for this. I certainly will try it.